

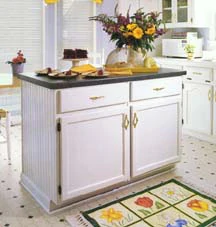
While pewter bowls, flatware, chaffing dishes, and hand painted trays may make up an entertainer’s dreams, those visions can seem more like a nightmare when it comes time to store the pieces. A kitchen island might be the answer. Using premade products, you can create an island in just a weekend—we’ll show you how. Finishing details such as beaded-board paneling give the island a polished look. Lowe’s is happy to provide this information as a service to you.
Tools & Materials
Tools Materials
Drill/driver 2 (24-inch) unfinished oak cabinets
Circular saw Sandpaper
Goggles 4 tubes heavy-duty construction adhesive
Finishing nails 1-inch wood screws
Hammer 3 pieces 5/16-inch pine beaded-board paneling
Miter saw 16 feet base moulding
Casters 16 feet shoe moulding
Clamps Drawer and cabinet hardware
Caulking Towel bar
Wood putty Countertop
8 feet corner moulding
Steps: How To
Step 1: Remove Doors
Remove the doors and drawers from the premade cabinets. To allow both doors to open from the center, reverse the swing of one door by measuring and marking the hinge hole locations on the opposite side of the opening. Remove screws and hinges. Drill pilot holes. Fill the original hinge holes with wood putty, and sand smooth.
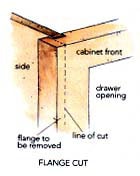
Step 2: Cut Flange
Use a circular saw to carefully cut the inside flange off both cabinets, so they will be flush when placed side by side. Be careful not to cut into the side panels. Reserve one flange strip to cover the cabinet’s seam.
Step 3: Use Adhesive
Apply an ample amount of construction adhesive to the sides of the cabinets that will be joined; push them together. After the adhesive dries, attach nine (1-inch) wood screws into the inside panel of one cabinet. Repeat for the opposite cabinet.
Step 4: Attach Beaded-board
Cut two pieces of beaded-board paneling equal in length to the distance from the top of the cabinets to the top of the toe space. Cut the remaining piece of beaded board equal in length to the distance from the top of the cabinets to the floor. Beginning on one side of the joined cabinets, butt the grooveedge of one shorter piece of beaded board up against the flange of the cabinet, and glue in place. Repeat with the opposite side. Using a circular saw, trim the excess beaded board so it is flush. Apply beaded board to the back of the joined cabinets by aligning the center of a piece of beaded board with the seam of the cabinets, and glue in place. Continue adhering beaded board to the back of the cabinets, working outward. Use a level to ensure squareness. Set the circular saw blade to the depth of the beaded board; trim the excess. Be careful not to mar the beaded board.
Step 5: Attach Base Moulding
Measure and cut the base moulding for the sides and front. Miter the corners for a tight fit. Attach the base moulding with construction adhesive and finishing nails. (Note: Drill small pilot holes in the base moulding before nailing to prevent the wood from splitting.) Measure and cut the shoe moulding, miter the corners. Attach the shoe moulding with construction adhesive and finishing nails.
Step 6: Glue Flange Strip
Glue the flange strip (cut in Step 2) to the front of the cabinets along the seam. Hold the strip in place with clamps until it dries.
Step 7: Prime and Paint
If painting the island, fill any seams with caulk. Let the caulk dry. Prime and paint or stain the entire piece. (Tip: The inside of the cabinets should be the same as the exterior.) Paint the corner moulding for later use.
Step 8: Install Hardware
Put the drawer back in the cabinets, and reinstall the doors. Install the drawers, door hardware, and the towel bar.
Step 9: Attach Countertop
Before installing the countertop, place it on the cabinets to check the fit. Depending on the edging style, you may need to trim the inside lip of the countertop so it will sit flush. Adjust the depth on your circular saw to prevent cutting onto the top of the countertop. Turn the countertop upside down to cut. Use a chisel to remove the ends of the lip. Use construction adhesive to mount the countertop. After it dries, attach 1-inch screws through the corner braces of the cabinets in to the underside of the countertop.
Step 10: Add Corner Moulding
Measure the two back corners of the island, and cut the prepainted corner moulding to fit. Drill pilot holes in the moulding to prevent it from splitting. Apply the corner moulding using construction adhesive and small brads. For mobility, attach four casters to the bottom of the island.
Originally published in Lowe’s Creative Ideas for Home and Garden February/March 2000. ©SPC Custom Publishing
