

Hanging window treatments is one of the simplest décorating projects you can undertake. But the payoff from dressing up an ordinary window with a little color and texture can be startling.
Perhaps the most challenging part of the job is choosing hardware of the appropriate size and style. That’s why it is crucial to measure the window before buying materials. Curtains typically look best when they span just beyond the window casing. As for length, they can hang to the window sill or almost to the floor-or a point somewhere in between. Take your measurements to Lowe’s and they’ll help you select from among a range of ready-made window treatments. Make sure you go home with the suitable hardware.
Tools & Materials
Tools
Tape measure
Stud finder
Screwdriver
Electric drill
Carpenter’s level
Materials
2-1/2” Wide Pocket Rod & Curtain Rod Combination
Swag set and valance
Steps to install Rods
Whichever type or style of curtains and hardware you choose, installation generally follows the steps shown here. Brackets are mounted to the wall on each side of the window casing. The brackets (along with a center support) hold up a curtain rod, which in turn supports the curtains. For curtains that come with a valance, a valance rod completes the installation. Be sure to follow all the manufacturer’s instructions.
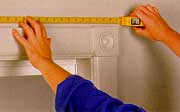
Measure the window width.
1. Measure the Window Width
Although you can mount hardware right onto window casing, it’s best to attach the brackets to the wall slightly outside and above the head casing. Measure the length of the head casing, including any rosettes, and add 2 to 5” to the measurement. This extra width will ensure that the edges of the curtains won’t be visible from outside. When shopping for window-treatment hardware, make sure the type you buy is adjustable to your final measurement.
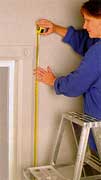
Measure the height of the window.
2. Measure the Window Height
To determine the length of curtains required, measure from the point where you want them to fall to the point where you plan to fasten the wall brackets-in this case, a few” above the head casing.
3. Installing the Wall Brackets
Hold one wall bracket in position-in this example, 2” outside and 4” above the head casing-and mark its screw holes. If there is a wall stud in line with the marks—use a stud finder to check—drill a hole for the screws supplied and attach the bracket. If there is no stud, drill a hole for the toggle bolts supplied, and use them to fasten the bracket to the wall. With a carpenter’s level, mark a level line across the wall from the top edge of the bracket to the other bracket location. Align the second bracket with the line and fasten it to the wall.
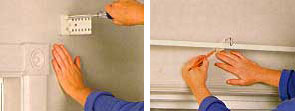
Left: Install the wall brackets.
Right: Install the center support.
4. Install the Center Support
Hook the curtain rod onto the center support and snap the rod into place on the wall brackets. These wall brackets feature three fittings that enable you to hang the curtain rod at three different heights. Choose the height that best suits your décor. Use the tape measure to position the center support midway between the wall brackets. Then, mark the center support’s fastener holes. Remove the curtain rod and secure the center support with the fasteners supplied.
5. Hanging the Curtains
Feed the curtains onto the curtain rod. Snap the rod into place on the wall brackets and center support.
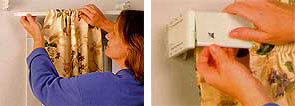
Left: Hanging the curtains.
Right: Installing the valance rod.
6. Installing the Valance Rod
With the curtains in place, snap the end brackets supplied into the wall brackets so that they project the same distance from the wall as the center support. Feed the fabric onto the valance rod following the manufacturer’s instructions, then hook the valance rod on the center support and snap the rod into place on the end brackets.
