

Part One of this two-part series focused on fast and reliable framing techniques for building a sundeck. As with all framing, that process sets the stage for the finish work, which for a deck includes the decking, handrail posts and handrails. But, this is no light-duty trim-out. Rather, this is structural detailing whose primary role is to provide safety. Secondarily, it’s job is to look good.
It’s important to point out that the handrail system illustrated in this article is required by my decking supplier, Lowe’s ChoiceDek. But, what I like about this system is that you can integrate it into other systems for a similar effect and performance. Of course, what you must do before any structural work to a deck is to check with your local code officials to see if it passes muster with them. As far as my local code goes, I’ve used handrail systems that have a lot less “umph” than this one and don’t provide as clean a look.
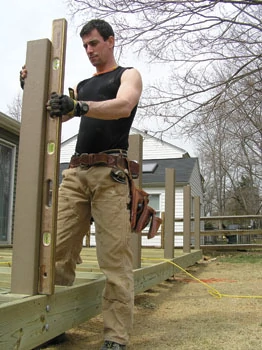
The key to the Lowe’s system is—and unlike other systems I’ve used—to integrate the posts with the deck framing and then deck around them. This provides belt-and-suspenders connections that aren’t going anywhere, while enabling you to get the posts nice and plumb. Plumb posts means you can key in the handrails later without having to get a degree in brain surgery or theoretical geometry to make it all look like it grew there—and making it look like it grew there is the goal.
Post-Up
The first step is to lay out the post locations. The synthetic ChoiceDek posts must be no more than 72 inches on center. I use the outside corners of the deck frame as control points for measuring and spacing posts as evenly as possible around the deck perimeter. The deck posts shown here, for example, laid out to be 66 inches on center. Be sure to include gate posts, stair egress, or benches in your layout scheme, too. This takes a little head scratching sometimes, but the key is to get them as evenly spaced as you can.

Sometimes, layout will drop the post right on a joist. Don’t alter the post or the joist, just move the post to whichever side of the joist is closest to the proper layout. Spans are large enough that your eye won’t be able to pick it up. Well, maybe your eye will, but everybody else won’t be able to see it.
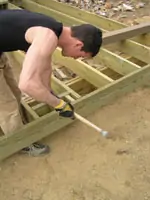
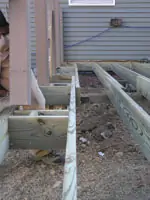
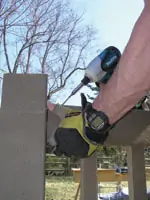
Cut blocking—Here’s the “belt” part of this belt-and-suspenders approach: You frame post housings into the deck joists using blocks cut from joist stock (2-by-8 in this case). When cutting the blocks that fit between the joists, it’s smart to cut them a hair short. Joists, no matter how careful you install them, are never perfect. It’s just a fact of life. If you have to pound a block into place, you’ll end up deforming the band joist—and that’s bad. It’s much easier to just cut the board 1/8 to 1/4 inch short. And, since ChoiceDek posts are 4-3/16 inches square, cut the block that bridges the back of the post a little big (say 4-5/16 inches). This enables you to slide the post into the housing and shim as necessary, which you take care of a little later.


For fastening the blocking, whether I use screws, hand nails or gun nails, I like to drive a fastener into the top, middle and bottom of the blocking in each nailing location. This prevents drilling obstructions that might occur when you through-drill the posts for carriage bolts (more on that later).
When installing the blocking, it’s easiest and most accurate to build the post housings piece-by-piece. I tried making them on my bench then installing them in one piece, and it took more time.
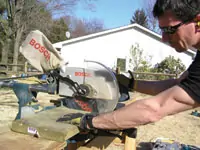
Tool Tip: Whenever I have to cut lots of small parts like the blocks, I use a slide compound miter saw to make the cuts. It’s safer than a circular saw, way more accurate, and a lot faster. That’s a nice combo if you ask me.
Determine post height—Post heights can vary depending on a number of factors. The key is to layout the post properly to get the height you want—that also meets code. Code usually requires a 36-inch minimum handrail height with a minimum 2-inch toe gap. For my project, it boiled down to form meeting function. My client determined that he liked the posts 40 inches above the decking, which did look nice. To lay that out I had to account for: 1-1/8-inch deck board thickness; 3-1/2-inch toe space; 36-inch rail assembly; 1-1/8-inch decorative rail cap; and post protrusion above the rail cap.
Long story short, measuring 43-1/2 inches from the top of the post provides a post 40 inches tall off the top of the decking and looks nicely proportioned with the handrail.
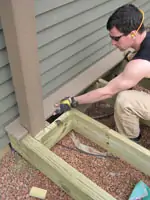
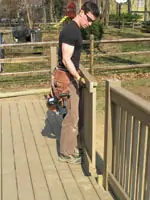
Install the posts—Prepare the posts for installation in the post bracket. First, measure down from the top of the post 43-1/2 inches and square a line across the post. This line will sit flush with the deck framing. Before dropping the post into the post bracket, set two nails right on the line as cleats. They keep the post from sliding through the post bracket while you drill and plumb it.
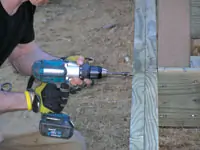
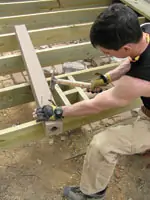
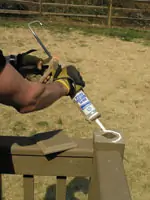
Drill for post the bolts—With posts installed in their housings, drill through all framing using a 3/4-inch diameter auger bit. Install the carriage bolts and lightly tighten them snug. Before you drill, however, take a close look to be sure your bit won’t hit any nails in the blocking.
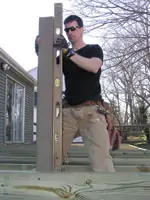

Next, plumb each post in all directions (front/back, left/right). Shim as necessary to hold them plumb; tighten all carriage bolts. The bolts are the suspenders in this belt-and-suspenders approach. As you tighten, check that the posts remain plumb, and make sure to tighten the bolts so the bolt heads crunch into the joist stock.
Tool Tip: A ratchet works to tighten the bolts, but a cordless impact driver works great. Keep the ratchet handy, though. You’re bound to get boxed in between joists, blocks and everything else where only a ratchet can get in there.
When shimming the posts, use wide cedar shingles as shims or cut your own from a scrap of 6-by. The reason is that a nice, flat, wide shim provides the best bearing surface for the post. Thin shims (like the 1-1/2-inch types you buy in a pack) have less bearing surface and give the post an opportunity to roll or shift. I didn’t have any cedar on site, so I took my 8-1/4-inch Skil wormdrive and sliver cut the end of a 6-by scrap to make shims on site. They worked great.
Decking
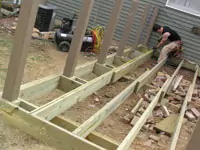
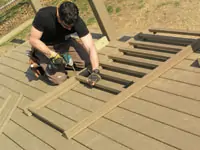
With the ChoiceDek posts installed and secure, you’re now ready to start applying the decking stock. This is where you’ll be happy if you’ve framed carefully.
Lay out the decking—Pull a measurement from the front band joist back to the house on each corner of the deck to check for square. If the measurements are the same, then rough-set a deck board. Measure to the front edge of the deck board to double check. If everything is still copasetic, fasten the deck board in place.
If the measurements are more than 1/2 inch off, you’ve got some adjustments to make (see the “Decking Tricks” Side Note below).
Next, determine the decking overhang on the left and right band joists. Decking that cantilevers the left and right band about 1 inch gives a nice look. For installing a decorative wrap, I like to increase the overhang to 1-1/2 inches. To get the deck board measurement right, measure your deck frame, then cut a deck board 2 inches longer (or 3 if you’re wrapping.). The deck board should span the deck framing with an inch of overhang on each side.
If one deck board doesn’t span the entire deck width, then cut your first deck board so it has the correct overhang on one side and lands halfway on a joist on the other. Continue the rest of the span with another board. Install the second and third courses the same way—but be sure to stagger the splices.
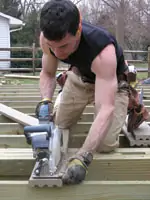
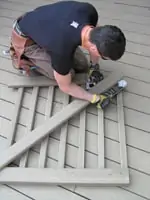
Install the decking—Using spacers, install the remaining deck boards. ChoiceDek requires that you maintain a 1/8-inch space between all deck boards and at all butt joints. Using store-bought spacers as a gauge works best, but you can also cook up a jig on site. The key is to make sure that anybody installing decking is using identical spacers. Fasten securely using stainless steel trim drive screws. Once you’ve installed the first three deck boards, run the rest of them 1 to 3 feet wild.
The decking needs to be notched around the posts. I use scraps to practice the layout before cutting new deck boards—it takes a little more time on the front end, but it’s worth it. Lowe’s recommends a 1/8-inch gap between the notched deck board and the post.
The last board—Notch the last board around the posts and install. If the last board will overhang the deck framing more than 2 inches, then rip it to width and use a router to bullnose it so it matches the other deck boards. Another method is to make the thin board the first-to-last board installed, so the last board on the deck is a full board. This provides a nice finished look, too.
Snap the cutoff line—At each front corner of the deck, measure and mark 1-inch out from the band joist (or 1-1/2 inch if using a decorative wrap). Pull a chalkline tight to the edge of the first courses of deck boards already cut to length. Snap the line.


Trim the wild decking—I love this part of deck building. Take your circular saw and cut all the wild deck boards all at once. This is the fastest, most accurate way to get a nice even cut. Make sure you have a clear path to walk along the edge of the deck for low decks, or that the surface is clear of obstructions for a taller deck. And, unless you’re using a cordless circular saw to make the cut, make sure you have enough slack in the cord to reach the entire cut.
Handrails
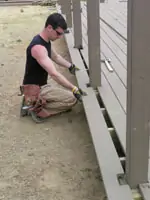
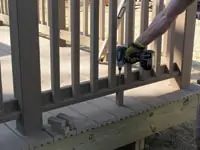
To lay out the handrails, measure between the posts at the base. This determines the length of the top and bottom rail and the rail cap. Unlike the blocking, take on-the-money measurements and cut all pieces to match. I use the miter saw to get fast, exact cuts here.
To fabricate the panels, spread rails and balusters on the deck and install the balusters. Use a spacer block to maintain 4-inch on-center baluster installation. Use one screw in the top and bottom of each baluster to secure them.
Safety Note: While you may be daunted at the number of balusters required and want to spread out the spacing—don’t. You’ll fail inspection and, more important, create a space determined to be unsafe for curious kids and pets whose heads and bodies can fit through larger gaps.
Next, set the rail panel on blocks (2-by-4 scraps work great). Toe-screw each rail panel securely to each post top and bottom. Remove the blocks and repeat for each panel.
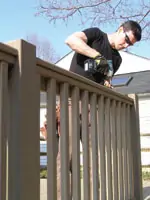
Then install the rail cap. The rail cap fits between the posts and covers the top rail with an extra element of decoration. Shoot screws straight down into the top rail.
Fabricating and installing a gate—For decks with a gate, assemble the gate as you would a rail panel. Then, so the gate won’t sag, install a diagonal brace. I lay out all my diagonal bracing for gates using a Starrett ProSite Protractor. It’s ideal for dialing-in funky angles like these. Install the gate using the proper gate hardware.
Post caps—You can screw down the post caps, but using adhesive is easier and faster. I use a bead of Phenoseal on the top of each post and then set the cap into the bead. Before I let the adhesive set, I eyeball it to make sure it is square to the rail.
Railing support blocks—Two-by-two Railing support blocks are required for the Lowe’s ChoiceDek system. Cut them from baluster material and fasten with one screw in the bottom/center of each rail to prevent sagging.
Install Grill, Cooler, Self—This is my favorite step: Invite friends over, light the barbeque, have a cold one—and a great time on your new deck.
Editor’s Note: Mark Clement is author of The Carpenter’s Notebook and Kid’s Carpenter’s Workbook, Fun Family Projects! Find out more at www.TheCarpentersNotebook.com.
Side Note #1
Decking Tricks
If you find yourself with a deck frame out of square by 1/2 inch or more, you’ll need to reach into your bag of deckbuilders’ tricks. The trick you need to pull off is to get a course of deck boards running parallel to the front band. Here are three ways to get it straight.
Trick 1—For deck frames that are only a little more than 1/2 inch out, fan out the deck boards—slightly—on one side of the deck as you install them to make up the gap. Only open them a little more than 1/8-inch. While some deck boards will be spaced further apart than others, the gap will be invisible to the naked eye and over the course of several boards, you can create a course of deck boards parallel to the front band and the decking will finish off nicely.
Trick 2—Cantilever the last deck board 1-1/2 to 2 inches over the front band to hide the problem. This works best on low decks where you can’t see the discrepancy when you’re below the deck. Do not cantilever a deck board more than 2 inches.
Trick 3—Pad out the front band parallel to your deck boards with a decorative wrap, and then run the decking over it.
Side Note #2
Random Decking Pattern
For decking surfaces wider than deck boards are long, you need to stagger the butt joints between courses of deck boards. Never line up joints from one course to the next. In fact, a good rule of thumb is to go at least 4 courses before using the same joist for a joint.
The key to doing this is to run the deck boards wild over the ends of the left and right band joist. For example, say you have a 20-foot-wide deck and 16-foot-long deck boards. Working from left to right, install a long deck board. Let it hang off the left side 2 feet or so. Set the right side so it sits halfway on a joist. Cut another board to cover the rest of the span (about 4 feet) plus about 4 inches for overhang.
For the next course, use the cut-off from the previous course as your starter board. Land it half way on a joist, at least two joists away from the first splice. Let the left side run wild, and fill in the right side. Do this all the way to the end of the deck, making sure butt joints between boards don’t repeat.
And, when using a cut-off to start a course, make sure the end that’ll butt with the next board is cut square. You can cut these in place using a circular saw and a speed square as a guide. This is a quick and accurate way to work. Once all the deck boards are in, snap a line and cut all the ends at once.
Side Note #3
Hide the Fasteners
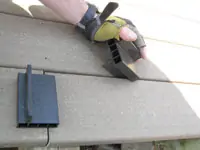
Lowe’s recommends Swan No. 7, 2-1/4-inch stainless steel trim drive screws for use with the composite ChoiceDek material. They provide a secure mechanical connection, but the other cool thing is that after you drive the screws you can hide the hole instantly.
Driving the screw creates a small mound of material. Rub the loose material into the hole with your fingers, then pound down with a hammer—the hole and fastener head disappear. It’s a neat and fast way to build a “fastener-free” deck.
