

By Larry Walton
Not everything should be set in stone. Laminate counters still have their place in many home improvement applications.
Realtors often caution against over-building in some neighborhoods where values are established by comparable houses in the community. In these cases, it’s wise to select materials that keep costs down. This doesn’t mean you have to go with fake wood grain or avocado green. Large varieties in color and textures are available with today’s laminates.
One of the big advantages to flat lay laminate countertops is the ability to fit them precisely to irregular wall shapes and a variety of countertop sizes. To do this, you should plan to fit and fasten the sub-decks to the cabinets or strong backs first, and then fit and install the laminate.

Design Options
Because flat-lay laminate can be fit very closely to the wall, it works well for desktop surfaces where no backsplash will be used.

When you want to use a backsplash for kitchens, baths and utility rooms, you have a number of options including tile, stone or matching laminate. One of my favorites is a 3/4-inch thick backsplash with a laminate face and wood accent cap to match the counter edges.

I prefer to use a hardwood self-edge, which can be stained or painted to match the cabinets. For this application we cut the countertops for a 1/4-inch overhang past the face frame of the base cabinets. We then install a 3/4-by-1-1/2-inch counter edge, which extends the overhang to the desired one inch.

Countertop-grade particleboard is my favorite material for laminate applications. The material is strong, consistent, smooth, flat and bonds well to contact cement. Plywood underlayment is not countertop-grade.

Once the countertops are fastened to the cabinets, apply the self-edge with carpenter’s glue and nails, either flush to the counter or slightly higher. When the glue is set, sand the self-edge flush with the counter top. Make sure the countertops are well fastened, flat, smooth and clean.

Tight Fit
Now you can determine the best size and shape of the laminate pieces to fit your application. Knowing what is available is important. I will sometimes order 5-by-8-foot pieces so I can cover areas without seams or put a seam at the sink opening where only a couple of inches will show. I can usually make good use of the material cut from the inside of these pieces.

We also order 30-inch wide pieces to use 25 inches on the deck and 5 inches for the backsplash. So, knowing what sizes are available or what sizes the wholesaler is willing to cut is important.

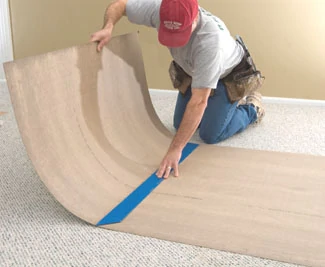
Once you have the materials, block out the pieces and cut them to approximate size. Allow one inch or so of overhang to leave room for scribing along out-of-square or less-than-straight walls. We use a straight edge and laminate cutting tool for most of the initial cuts.

Put the roughed-out pieces in place and begin scribing them in to fit the walls. If a piece is blocked in by two perpendicular walls, fit one wall first then scribe it to the other wall. At this point you are dry-fitting the material so you can take your time and get everything right before opening a glue can.

Hopefully you’ve been able to eliminate all the seams in your layout. If you have one, try to plan it for the sink opening. During the fitting process, you can overlap the pieces that will be seamed together. If the seam is at a sink opening, cut out some of the extra material from the sink cut-out area so the seam-matching portion will be smaller.

Slightly back-bevel one of the seam edges with a flat file. Overlap this edge over the other piece and trace along the newly back-beveled edge so you know where to cut the bottom piece. Cut the bottom piece very slightly larger than the pencil mark and file to the mark while applying a slight back bevel. Fit the seam together and make adjustments as needed.

With all of the pieces blocked in, scribed to the walls and the seams fitting properly, trace along the self-edge near the walls so you can cut by hand, the first 8 inches or so close to the self-edge. Your router design will determine how close you can get to the wall. What cannot be reached with the router will be filed by hand, so it’s best not to leave extra material next to the walls.

Make two or three matching marks on the laminate and the walls so the material can be returned to the exact position after gluing. Remove the pieces and place them upside down on a clean, smooth surface.

Glue in Place
Apply contact cement to the laminate and to the countertops. Be particularly careful to get good coverage right out to the edges.

Allow the contact cement to dry to the point where you can touch it without removing glue. The glue may be very slightly tacky, but the idea is that it is dry and not wet.

Place separator strips on the countertop to keep the two glued surfaces from touching each other prematurely. Warning: Contact cement bonds to contact cement instantly. You must take care that these two surfaces do not touch because you will not be able to move them without causing damage.

Carefully position one of the laminate pieces using the wall marks as a guide for precise alignment. Pull one or two of the separator strips from one end and touch the laminate to the counter. I usually work from closed area to open area. Pull the separators out one at a time working the laminate down as you go.

If you have a seam, place the second laminate in position after the first piece is firmly in place. Carefully touch the second piece down along the seam line first, working away from the seam.

Use a roller to make sure the laminate is touching the countertop everywhere.
Use a router with a laminate bit or a flush cut bit to trim the laminate to the self-edge.
You can add a bevel to the countertop edge by cutting both the laminate and the self-edge with a bevel-cutting router bit. Where the router cannot reach to the walls, match the router cut with a file to create a crisp consistent look to the new laminate countertop.
Tools & Materials
• Plastic laminate
• Tin snips
• Laminate cutter
• Contact cement
• Paintbrush and/or roller
• Power sander
• Router with flush-cut bit
• Dowel rods or other strips
• Straightedge
• Flat file
You can pick up plastic laminate at the local home-improvement center, but the selection will probably be limited. For more choices, track down a store that either specializes in countertops (large markets) or a flooring company. In our area, the flooring company can show you samples and sell you the product. You can pick up the material at the store, or the retailer will write up a slip so you can pick it up at the wholesaler.
Editor’s Note: Photos by Mark and Tim Walton
SIDE NOTE 1
Backsplash Build
One of my favorite backsplashes is made with 3/4-inch countertop material with the face laminated in place and the top capped in wood trim. Here’s how it’s done:


SIDE NOTE 2
Installation Options
Post-form (a strange name for pre-made) counters are available with the laminate already on them, but that’s not always the best way to go. Aside from all of the limitations in size and transitions, post-forms can present some real problems when it comes to fitting, anchoring, supporting and making splices. For example, the post-form solution for a counter with 90-degree turns (L, U or even G shaped kitchens) is to put a long 45-degree splice in the deck. The seam is not pretty and sometimes difficult to pull off, especially if the walls have some curves or are out of square. However, flat-laying laminate in place can usually handle these kitchen shapes with a tiny seam at the sink, or with no seam at all, while allowing a ton of flexibility to scribe in irregularities.
