

By Larry Walton
Removing the old mirror was an easy decision. However, that left us with the task of covering the same area or repairing the wall surface where a new mirror might not cover it.
I wasn’t really up for ordering a custom mirror to get the exact size we needed. So, I had pretty much decided on the wall repair when we happened upon a tile backsplash with a matching tile mirror frame in a commercial building. We knew immediately this application would work well in our bathroom to complement the floor tile and provide continuity in color and texture throughout the room.
The previous homeowners had left behind some 6-in. tile and grout that matched the floor tile. We bought an off-the-shelf 36-in. high mirror, which was tall enough when placed on top of the 6-in. tile backsplash to fill the void left by the old mirror.
The length of the vanity and the wall area we wanted to cover would be concealed by the 60-in. stock mirror plus a nice 2-in. tile frame around it. These were very similar proportions to what we had seen at the commercial site.
Step by Step Application
![[01] LDW_126_0002](https://extremehowto.com/wp-content/uploads/2015/03/01-LDW_126_0002.webp)
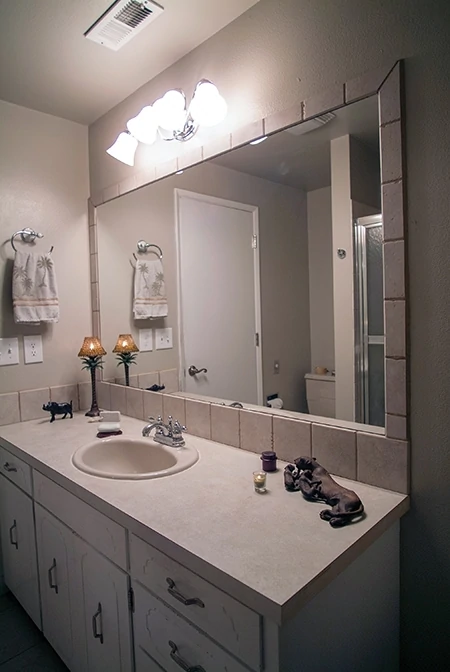
Removal of the old mirror revealed some rugged wall surface including wallpaper and missing texture. Installing a large enough mirror and frame combination eliminates the need to match the texture and paint to the rest of the bathroom.
![[02] LDW_126_0007](https://extremehowto.com/wp-content/uploads/2015/03/02-LDW_126_0007.jpg)
Beginning with the backsplash end tiles, we put teaspoon-size globs of tile adhesive on the back four corners of the tiles. Keep adhesive away from the edges so it doesn’t fill the grout joints when the tile is pressed on the wall.
![[03] LDW_126_0014](https://extremehowto.com/wp-content/uploads/2015/03/03-LDW_126_0014-.webp)
Put the bottom edge of each tile on the countertop and tip into place. Slide tiles side to side to adjust the grout joint width. Remove any excess tile adhesive from the tile surface and the joints so the grout can penetrate the joint by at least half of its depth.
![[04] LDW_126_0018](https://extremehowto.com/wp-content/uploads/2015/03/04-LDW_126_0018.webp)
Measure the last tile for the wall, allowing space for grout by subtracting the grout joint width.
![[05] LDW_126_0080](https://extremehowto.com/wp-content/uploads/2015/03/05-LDW_126_0080.webp)
We marked the cut line on our tile pieces because we used a wet saw without a cutting guide like you would find on a stationary saw.
![[06] LDW_126_0092](https://extremehowto.com/wp-content/uploads/2015/03/06-LDW_126_0092.webp)
Cutting the tile was easy when using a small circular wet saw. This saw also works well for cutting hard surface materials in place for remodel projects where you want to leave some existing tile work.
![[07] LDW_126_0098](https://extremehowto.com/wp-content/uploads/2015/03/07-LDW_126_0098.webp)
Complete one wall first then measure to cut the last tile of the remaining wall, subtracting double the grout joint width. On our project we wanted 3/16-in. grout lines so we cut the last tile for each wall 3/8 in. under the measurement.
![[08] LDW_126_0023](https://extremehowto.com/wp-content/uploads/2015/03/08-LDW_126_0023.webp)
Prepare the wall surface for the mirror according to the instructions on the mirror adhesive’s container. This wasn’t necessarily toxic dust, but if I’m going to put on a dust mask, I use one that really works.
![[09] LDW_126_0021](https://extremehowto.com/wp-content/uploads/2015/03/09-LDW_126_0021.webp)
Determine the center of the mirror and mark both edges on the wall. Apply mirror adhesive according to the manufacturer’s instructions.
![[10] LDW_126_0103](https://extremehowto.com/wp-content/uploads/2015/03/10-LDW_126_0103.webp)
With the adhesive on the back of the mirror, position it starting with the bottom edge of the mirror on top of the backsplash tiles. Tip it into place. The tile supports the mirror while the adhesive sets.
![[11] LDW_126_0100](https://extremehowto.com/wp-content/uploads/2015/03/11-LDW_126_0100.webp)
Determine the width of the mirror frame tiles by measuring from the mirror to the corner wall or to the end of the vanity. Cut all of the frame tiles to the same width. Cut the four upper corner tiles at 45 degrees. Set the upper corners of the mirror frame first. Grout-joint spacing can be adjusted by moving the short point of the tile cuts closer or farther away from the corner of the mirror, while keeping the inside edge touching the mirror.
![[12] LDW_126_0027](https://extremehowto.com/wp-content/uploads/2015/03/12-LDW_126_0027.webp)
Set the tiles along the top of the mirror, working from the corners back toward the center. The center tile or the two center tiles can be cut, depending on whether the number of tiles between corners is even or odd.
![[13] LDW_126_0113](https://extremehowto.com/wp-content/uploads/2015/03/13-LDW_126_0113.webp)
After the tile adhesive has set overnight, mask off the countertop, mirror and wall areas next to the tile. Scrape any excess tile adhesive out of the joints.
![[14] LDW_126_0067](https://extremehowto.com/wp-content/uploads/2015/03/14-LDW_126_0067.webp)
Apply the grout using a grout float, a squeegee or plastic putty knife, making sure to completely fill the joints. Since we kept the factory tile edges next to the mirror, we used grout to make a 45-deg. bevel along the outside cut edges of the mirror frame.
![[15] LDW_126_0078](https://extremehowto.com/wp-content/uploads/2015/03/15-LDW_126_0078.webp)
Sponge off the surface of the tile. Be careful to keep sponge pressure light to avoid digging grout out of the joint. Cheese cloth or towels can be used to remove minor grout haze after the grout has dried. You may wish to use a colored caulk that matches the grout to seal the joint between the tile and countertop to prevent cracking.
Side Note
No Saw, No Problem
Some tile stores offer a free cutting service for a certain number of cuts on tile purchased at their store. They usually have a per-cut price for additional cuts.
As alternatives to saws, manual tile cutters work much like glass cutters by scoring a line across the tile along which the tile should break. For big jobs with lots of cuts they can be very fast, but be prepared to lose a few tiles in the process.
