INSTALLING A COMPOSITE SHOWER PAN IS FAST AND EASY. Before discussing the simple steps to install a composite shower pan, I felt that some clarification and definitions are necessary because not all shower pans are alike.
What’s in a name? A roof is a roof, although there are many different roofing systems and roofing materials. Not true with “shower pans.” They are often interchangeably called a shower pan, shower pan liner, shower pan membrane liner, waterproof barrier, shower base, shower tray, or shower receptor. Yet, each has a different meaning depending on context and each are available in a variety of materials.
For the sake of clarity, I offer the following definitions.
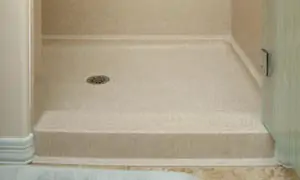
SHOWER PAN & SHOWER BASE – A finished area that is capable of retaining and directing water to the drain, plus it doesn’t require tiling once installed. The shower pan or base has a drain hole, sloped floor to properly direct water to the drain hole, sidewalls, and a threshold (entrance to the shower that forms a curb to keep water from running out onto the bathroom floor). A shower pan is synonymous with a shower base.
SHOWER PAN LINER, MEMBRANE LINER, & WATERPROOF BARRIER – A barrier, usually a plastic sheet or membrane, that is intended to trap water that penetrates the shower floor tile, grout, and mortar under the tile and force the water to flow to the drain. As long as it doesn’t leak, it prevents water from reaching the sub-floor and surrounding wall enclosure. The liner is a component within a constructed shower pan. A shower pan liner is synonymous with a shower membrane liner and a waterproof barrier.
SHOWER TRAY & SHOWER RECEPTOR – A shower tray is synonymous with a shower receptor. Both are used in place of a liner. They serve the same function as the liner, but are pre-formed to eliminate some of the installation steps necessary when using a liner.
Shower pan liners, shower trays, and shower receptors are all used in conjunction with the construction of a shower that has a tiled floor as well as a tiled wall enclosure.
However, as an alternative to tile, shower pans are available as complete, ready-to-install units. They eliminate the need to create a mud-sloped floor and a shower tray, and there’s no need to tile the shower floor. All are generically classed as composite materials.
COMPOSITE SHOWER PANS. As composite shower pans are made from a number of different materials and constructed differently. I wanted to touch on each of the most common types. Composite shower pans fall into several material groups; cultured marble, fiberglass, acrylic, and solid surface. Generally all are made by fabrication of flat sheets, thermal-formed from a single piece of material, or molded or cast to form a one-piece unit. The one-piece construction eliminates seams, which in turn eliminates potential leaks. Each has their pluses and minuses. Because beauty is in the eye of the beholder, I will not comment on appearance. All composite shower pans install on a flat, level floor and do not require the creation of a sloped mud base. Also, the cast or molded pans generally do not require the use of a plastic membrane.
Cultured marble and dressier versions, like cultured onyx and granite, tend to be the least costly. Cultured marble is made by spraying a ‘gel-coat’ onto a mold. This coating is about 1/64” or less in thickness. The gel-coat is covered with pigmentation and then backed with calcium carbonate. The calcium carbonate gives the finished part its strength. Also, in the casting process it is infused with air pockets to lower its density and weight.
The cultured marble floor is cast separately from the sidewalls. Thus, the incorporation of a shower pan liner is essential to ensure a watertight, leak-free installation. Although widely used, the down side of cultured marble is that other than the gel-coat layer, the calcium carbonate is highly porous. Any crack or scratch through the gel-coat will allow water penetration. Other gel-coat characteristics include; yellowing, even without UV exposure; clouding from hot tap water; staining; crazing (fine hairline cracks); and it is not reparable when cracked or chipped.
Fiberglass is widely used as well. Fiberglass is strong, lightweight and inexpensive. Many fiberglass manufacturers make one-piece shower pans and enclosures and one-piece combination tubs and showers with the wall enclosures. Similar to cultured marble, fiberglass is made with a gel-coat, then backed with pigment and chopped strands of fiberglass in a resin mixture. Generally the finished product is about 1/8” to 1/4” in thickness. The underside of the shower pan floor has webbing added to provide support to the floor. As the floor is not solid, the unsupported space between the webbing can flex. This flexing is especially noticeable with heavy loading or where one is standing between to the webbing. Over time, the flexing can cause material fatigue and cracking. Once a crack develops, the pan has failed.
Acrylic Sheet
Acrylic sheets are used to vacuum form shower pans, bathtubs, spas and many other items. The vacuum forming process begins with a 1/4” sheet of pigmented acrylic that is heated to a temperature that makes the acrylic ductile. The sheet is placed on a mold and stretched over the form to create the finished shape. The heating and stretching of the sheet causes a reduction in wall thickness. The reduction is directly proportional to the amount of stretching that occurs. With shower pans there is far less material reduction than with creating a tub or spa. The heating, stretching, and cooling of the material could also introduce stresses to the finished pan.
Like fiberglass pans, acrylic pans need support elements under the pan floor. A commonly used support element is polyurethane foam. The foam fills the void and eliminated the flexing of the pan floor. Acrylic sheet material is susceptible to crazing, minute surface cracking, and cracking when cleaned with many common cleaning chemicals. Should crazing occur, over time these cracks can lead to a pan failure.
Solid Surface
Acrylic solid surface materials very different physical and chemical properties than acrylic sheets have. In addition to the acrylic resin used in solid surface, the solid surface material receives additional physical and chemical characteristics from the addition of alumina-tri-hydrate, or ATH. The ATH causes cleaners that adversely affect acrylic to have no affect on solid surface.
Solid surface shower pans are the top-of-the-line in physical and chemical characteristics as well as performance, repairability and a myriad of other features and benefits. Solid surface pans are non-porous, will not support the growth of mold, mildew, or bacteria, are available in a large variety of looks (some like natural granite) and colors, and are 100% repairable should chipping, scratching or even cracking occur. Health departments throughout the country have approved solid surface materials for use in hospitals and food preparation areas for its resistance to bacterial growth, ease of cleaning and maintenance, and resistance to staining and contamination.
Some solid surface shower pan manufacturers fabricate their pans from sheet goods in a similar fashion as the acrylic shower pans. That is, they “thermal form” the pan floors by heating and stretching the material, and then bond sidewalls and a threshold to the floor.
The Royal Stone brand of solid surface shower pans are the pans that I manufacture and will use to illustrate the simplicity and ease of installation that can be had when installing a composite shower pan. Unlike fabricated solid surface shower pans, the Royal Stone shower pans are a cast one-piece solid surface product. By casting the pan as a one-piece unit, there are no stresses introduced in the pan, and there are many other features engineered and designed into this pan.
The most obvious features are the large radius transition between the pan floor and its sidewalls. Secondly, the flange (also called a weep edge) is 1-1/2” tall. I have seen pans that do not incorporate an integral flange or have flanges 1/2” to 1” tall. The added height is designed to minimize, if not eliminate, any water being drawn up behind the wall surround panels that could cause water damage to the shower sub-structure.
Royal Stone’s pans have a minimum wall thickness of 1/2”, and the webbing elements have a wide foot with large radius stress-relieving corners between the pan floor and the webbing. All shower pans are engineered to support the weight of 3/4” thick (2 cm) granite slabs as well as all other commonly used wall materials like tile, fiberglass, acrylic, and solid surface panels. Finally, regardless of floor loading, the Royal Stone pan floor is so solid that it feels like one is standing on a rigid concrete floor. There is no perceptible flexing or oil-canning of the pan floor. Thus, there is no possibility of floor fatigue and cracking over time, and the potential for pan failure is eliminated.
Installation is fast and easy. As I have already stated, composite pans install on a flat sub-floor. The following installation information may not apply to all types of composite shower pans. Specifically, I have direct knowledge of installing the cast one-piece solid surface shower pans that Royal Stone manufactures. Thus, the following directly applies to Royal Stone’s standard and custom shower pans. The same steps should also apply to other types of composite pans and other materials, however, follow the manufacturer’s recommended installation instructions.
Step #1 – SUB-FLOOR PREPARATION: Using the template provided with the shower pan, place the template on the floor and verify that the drain is in the correct location. If the drain is NOT properly located, relocate the drain. NOTE: Relocating the drain is usually far less expensive than having a custom pan cast to accommodate your existing drain location.
The hole in the sub-floor needs to be larger than the drain pipe. About a 6” diameter hole or the size of a coffee can is recommended. This larger opening allows room for the drain assembly that extends below the bottom of the pan. Most drain pipes are 2” PVC. The PVC pipe allows for some flexing within the 6” opening in the sub-floor. This flexing is desired and makes the pan installation easier. The PVC pipe should extend above the finished sub-floor by a minimum of 1/2”.
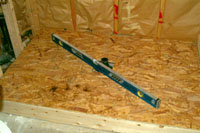
Fig.1 Fig. 2
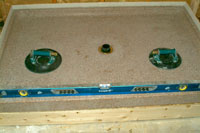
The sub-floor can be wood, plywood or concrete. The sub-floor must be level and free from debris. To ensure a level floor, check the floor with a long level as shown in Fig. 1. The longer the level, the more likely that the sub-floor will be level at its greatest dimensions. Check front to back at the left and right sides and at the center. Do the same from side to side. Finally, check the diagonals. At a minimum, 8 readings should be taken.
Depending on the results of the level measurements, some additional prep may be necessary. If the sub-floor is relatively flat, shims may be used to make the shower pan level. If the floor is uneven and out of level, pouring self leveling thin-set material may be necessary.
Once the sub-floor is level and the opening for the drain is correct, the setting of the shower pan is next.
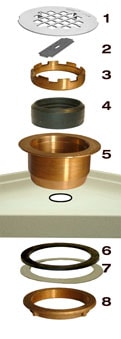
Fig. 3 Fig. 4
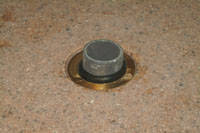
Step #2 – ATTACH DRAIN ASSEMBLY TO PAN: A standard two-part Brass Drain Assembly is recommended, as shown in Fig. 2. This assembly should be readily available at any plumbing supply store or home-improvement store. Royal Stone also sells this drain assembly. Disassemble the drain assembly. Keeping the components in order makes reassembly faster and easier.
Place the pan on saw horses or any raised platform that allows access to the top and bottom of the pan. Spray the drain opening with rubbing alcohol, Fig. 3. With a clean rag, wipe the surface and interior edge of the pre-cut drain opening, to remove any dust or other contaminants from the pan’s drain area. Around the drain opening apply a generous bead of 100% silicone, (Fig. 5).
Insert Brass Drain Body, Part #5 of the Brass Drain Assembly, into the drain hole and press firmly into place.
Fig. 5 Fig. 6
Step #3 – REMOVE EXCESS SILICONE: Remove the excess silicone from the Drain Body, Part #5. Spray an alcohol mist over the drain area and the silicone. With a Dap-Cap, scoop away the excess silicone. This step may have to be repeated several times to completely remove the silicone. Last, spray a mist of alcohol and wipe remaining film away from the Drain Body, Part #5, with a soft cloth.
Fig. 7 Fig. 8
Step #4 – MOUNT DRAIN LOCKING RING: Attach the Drain Strainer, Part #1, to ensure that the Drain Body, Part #5, is centered within the drain hole. From the bottom side of the shower pan, attach Parts #6, 7, & 8 to Part #5. Tighten the Locking Ring, Part #8 until snug. DO NOT OVER TIGHTEN. Over tightening may crack the shower pan. Remove the Drain Strainer, Part #1, and set aside.
Fig. 9
Step #5 – DRY FIT THE SHOWER PAN: Lower the shower pan into place. Make sure that about 1/8” space exists between the shower pan flange and the studs. With the level, confirm that the pan is sitting flat on the floor as shown. If additional shimming is required, lift pan and place shimming material where required. Lower the pan into place and check for level. A LEVEL PAN IS ESSENTIAL FOR PROPER DRAINAGE.
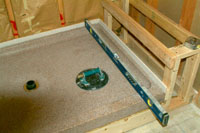
Fig. 10 Fig. 11
Once the pan is leveled and properly positioned, draw a pencil line onto the sub-floor at the front of the threshold, Fig. 6.
Step #6 – TRIMMING THE PVC: The top of the PVC drain pipe MUST NOT extend above the Brass Drain Body, Part #5. If it is at the top of the Brass Drain Body, Part #5, or extends above the top, trim the PVC so that it is about 1/4” lower than the top of the Brass Drain Body, Part #5.
Lift the shower pan onto its back edge and lean against wall. CAUTION: Handle carefully to prevent damage to the shower pan’s flange. Trim the PVC as required.
Step #7 – SILICONE THE BOTTOM OF THE PAN: Apply 100% silicone caulking to the underside of the shower pan webbing, (Fig. 12). Also, apply a thick silicone ring around the drain opening in the sub-floor and along the line where the threshold is marked. Then, silicone all shims into position as required.
Fig. 12 Fig. 13
Step #8 – SET SHOWER PAN: Lower shower pan into place. Check the pan for level. Press down as necessary to re-level the shower pan. At the threshold, remove any excess silicone that has oozed out from under the threshold.
Step #9 – CONNECT DRAIN PIPE TO DRAIN ASSEMBLY: Place the Rubber Gasket, Part #4 of the Drain Assembly, over the PVC pipe and slide down until the top of the Rubber Gasket, Part #4, is below the top of the PVC pipe. Apply a spray silicone lubricant to the inside and outside of the Rubber Gasket, Part #4, to lubricate the part and allow it to slide into place more easily. Screw the Locking Ring, Part #3 of the Drain Assembly, onto the Drain Body, Part #5. Tighten the Locking Ring, Part #3, with the Tightening Tool, Part #2, until the Rubber Gasket, Part #4, is seated and tightly in place.
Fig. 14 Fig. 15
Remove the Tightening Tool, Part #2, and press the Drain Strainer, Part #1, into place. The installation is complete. Excluding any sub-floor preparation, the installation should take about one hour or less.
Step #10 – CURING: Let the shower pan set for 24 to 48 hours to allow the silicone to properly cure. Once cured, the wallboard and wall panels can be installed.
CAUTION: When attaching solid surface shower pans and wall panels, ONLY use 100% SILICONE. Other adhesives or caulks may harden. The loss of the elastic bond between the solid surface and other materials can cause stresses in the solid surface. In turn, these stresses may cause fractures of the part and void the manufacturer’s warranty.
Editor’s Note: Milton Lemberg is President and Marketing & Sales Manager of Royal Stone Industries. He holds a degree in mechanical engineering and is the engineer and designer of the shower pans Royal Stone offers.


