

Inspiration has struck. Whether you’ve been watching too much HGTV (like me) or have just noticed your friend’s dark and richly stained new piece of furniture, you just know you need to tackle that DIY project that’s sitting there, waiting. You’ve heard that staining pine dark brown is difficult, which is why you’ve been putting it off. But what if we told you it’s easier than you think?
This is a step by step guide to staining pine dark brown and achieving that rich, deep brown color you’ve always wanted. We’ve also included some helpful hints and tips to help you avoid the most often made mistakes!
How to Stain Pine Dark Brown Using Tea and Wood Stain
Before you get started, gather your supplies:
- Tea bags
- White vinegar
- Sandpaper
- Paintbrushes
- Steel wool
- Glass jar or container
- Wood stain
Let’s get to work!
1. Sand the Wood
Lightly sand the wood with the sandpaper.
2. Stain With Tea
Stain with tea. Yes, tea! Black tea brings out the tannins in the wood, which is what gives it that beautiful dark color. Boil a cup of water and add 4-5 tea bags. Leave it to steep for half an hour, then remove the tea bags. After letting it sit for 12-24 hours, dip in your paintbrush and start painting the wood with the tea. You may not notice a difference yet but this is completely normal! While the tea itself doesn’t stain the wood very much, it prepares it nicely for the next steps.
3. Apply Vinegar and Steel Wool, Then Sit
Pour some white vinegar into the jar, add some steel wool, and allow it to sit for a couple of days. This combination creates a chemical reaction. Apply it to the wood and you’ll start to see the color deepening. This is because the mixture is oxidizing the tannins in the wood.
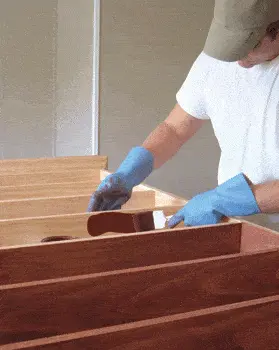
4. Stain With Wood Stain
Apply the wood stain, following the instructions on the container.
5. Top Coat and Relax
Apply a top coat, and wait for the wood to dry.
Hints and Tips
If your wood doesn’t come out as dark as you’d like, don’t go straight to applying more coats. This will take a long time as each coat will need to dry before you apply the next one, meaning this project will take a lot longer than expected. Also, each new coat will dissolve the previous one, leaving you with a big mess!
Lastly, multiple coats will obscure the natural grain. To get the grain to show up better, use a less concentrated sealer. The final product may be slightly blotchier than what you envisioned, but it won’t be very noticeable and you’ll be rewarded with a beautiful, natural grain everybody will admire.
Check Out Our Other How-To Guides
We hope this article has helped all of you DIY enthusiasts out there! We at Extreme How To wish you luck with your project and hope it comes out beautifully. Now that you’ve got your DIY boots on, feel free to check out some of our other how-to guides to turn your home into your own personalized palace.
