Back when our house was built there was little cause for giving much thought to securing a garage. In fact, so slight was the concern that the door to the backyard had a single pane of glass and a basic handle set, which is a sweet set-up for today’s thieves. First, they can window shop to see if there is anything they’d like to have or sell. If access cannot be quickly gained using a credit card on the standard lockset, breaking out the window on the door would be no problem.
Don’t try to tell the guys at Oregon Carpenters, Inc. that eliminating the window and adding a deadbolt would fix things either. It’s a good start, but they’ve replaced plenty of kicked-in door jambs on windowless doors with a deadbolt.
Properly installing a deadbolt with the security plate thoroughly anchored into the framing eliminates intrusion by small or lazy crooks, but the experienced break-in artist knows that some well placed blows will cause the door edge to spread open and the deadbolt to hinge out of and past the jamb.
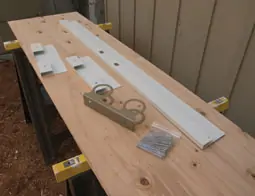
It is often said that necessity is the mother of invention. That is certainly the case with a product called Door Jamb Armor, from Armor Concepts, LLC, which was born of a landlord’s quest to secure his properties and to prevent costly repairs from break-ins. The system provides the structural characteristics of a steel-framed door and is designed to both reinforce a jamb against break-in or to repair a jamb that has been kicked in.
The product he developed was just what we needed to complete the security measures we planned to apply to our vulnerable door.
In the end our door got a triple beef-up by replacing the glass with wood, installing a deadbolt, and installing a Door Repair and Security Kit by Door Jamb Armor. While we were at it, we did some door and trim repairs, so the entire job was not only practical but pretty as well.

Lights Out
A window in a door is called a light, but this light wasn’t very bright. Not only did it allow trespassers the opportunity to survey the contents of the garage, it was installed in the days prior to tempered glass, which made it dangerous in the event of accidental breakage.

We took the door off the hinges, put it on saw horses and used a putty knife to determine which side of the door had removable stops to hold in the glass. Next, we used a utility knife to cut the paint and caulking between the window stop molding and the door frame. We then used the putty knife to loosen and remove the stops by bowing them in the center to relieve pressure on the inside miters. We then numbered each stop and its location on the door jamb.

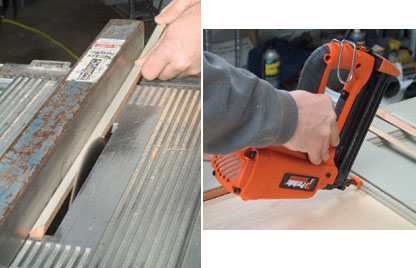
After removing the glass and measuring it, we cut a piece of plywood the same size as the glass panel and installed it in the door frame. We found that we needed to rip down the stops because the plywood was thicker than the glass. Then we used a finish nailer to re-install the stops that hold the plywood panel in place.
Harder Hardware
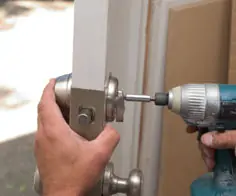
With the window out of the picture, it was time to address the single door latch, which was vulnerable to being “carded” (opened using a credit card to push back the locking mechanism).
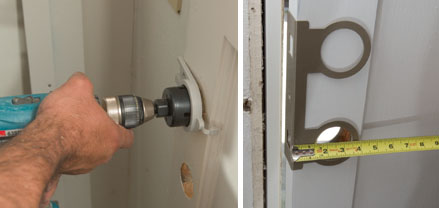
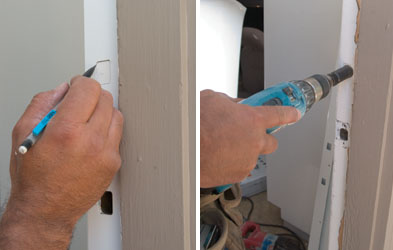
We used the door armor from the Door Jamb Armor kit as a template to layout the location of the new deadbolt. We also used a GuideRight door installation kit to center the deadbolt holes in the right locations.
When we were drilling the 2-1/8-inch hole through the face of the door, we drilled until we could see the pilot bit of the hole-saw coming through the door and completed the hole from the opposite side of the door.
The GuideRight kit had an opening for the edge bore as well. Caution: Even with the guide you need to make sure you are keeping the drill square to the door in both directions.
Applying the Armor
With the glass gone and the deadbolt drilled, it was time to tackle the wood jamb that offered little resistance to a kick-in.
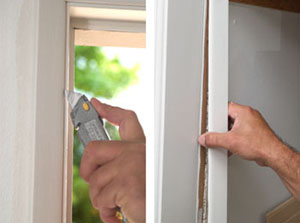
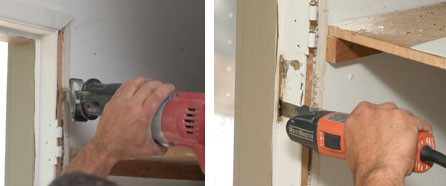
We started the Door Jamb Armor installation by removing the interior door casing. You can avoid damage to the casing, the jamb and the walls by first cutting the caulking between the casing and jamb and between the casing and interior wall. Pull the casing from the center, then the bottom and finally the miter ends.
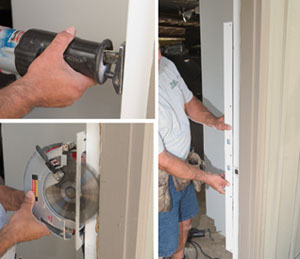
Since our door jamb was originally installed with nails, we used a reciprocating saw to cut out the nails and shims between the door jamb and framing. If the door was installed with screws, try to get access to the screw heads, which are often hidden behind the weather strip. Case-hardened screws are difficult to cut.
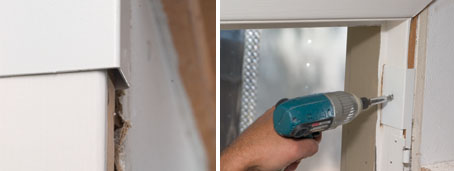
When we slipped the door jamb armor into place we found that our older door jamb did not have enough distance between the jamb edge and the door stop to accommodate the exposed portion of the Door Jamb Armor. This is probably because the jamb was designed without weather stripping; this is not usually the case. We used a circular saw to cut a slot into the door stop to receive the extra 1/4-inch of the Door Jamb Armor. We didn’t have to worry about scratching the jamb because the Door Jamb Armor would cover that part of the jamb.
With the Door Jamb Armor in position, we marked the location of the hole for the deadbolt latch. We then removed the Door Jamb Armor and drilled a 1-inch hole through the jamb to receive the deadbolt.

We used the countersunk hole in the face of the Door Jamb Armor as a guide to pre-drill through the jamb and second layer of the Door Jamb Armor. We fastened the armor to the framing with the supplied screw.

After installing the bolt latches for the handle set and the deadbolt, we installed the door armor. With the door armor piece in place, the door hardware installation proceeded as normal. A single screw through the edge of the door helps secure the door armor.
Switching to the hinge side of the door, we used a Sawzall to make room for the Door Jamb Armor hinge reinforcements.
Like the strike side, the hinge-side pieces needed a little more room at the stop to fit against the side of the jamb. Because of a shelf near the door, we couldn’t use a circular saw to make this room, so we used our Fein SuperCut saw to make a slot for the hinge reinforcements.
A screw through the Door Jamb Armor and into the framing completes the hinge side of the door.
The garage-to-backyard door is no longer the chink in our home’s defensive armor. With a new panel and the deadbolt mechanisms securely anchored in Door Jamb Armor, we can move on to our next home security challenge of making our house our castle.
Sources:
Armor Concepts, LLC
Body Work
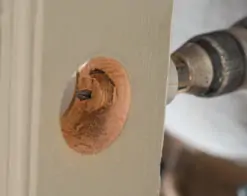
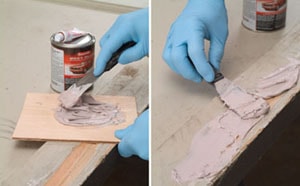
Extensive door damage can be repaired with an auto body-type filler like Bondo. This two-part product adheres well, sets fast and can be sanded very smooth. Make sure you have everything ready before mixing the product because it sets up very quickly. Follow the directions for mixing like you were doing a car repair, over-fill the damaged are a little. After it sets, sand it to the profile of the surrounding surface.
Materials
Door Repair and Security Kit by Door Jamb Armor
Drill
Reciprocating saw
Hammer
Chisel
Tape
Utility knife
Putty knife
Finish nailer
Measuring tape
Additional Security:
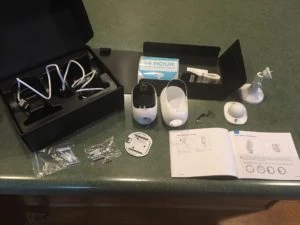
If you are looking for some additional security for your front door, we recommend installing a security camera with a motion sensor. We recently installed this Reolink Argus 2 wireless camera. We have been impressed and very satisfied with the results.

This unit provides clear real time images and will send an alert to your phone (via the Reolink app) when the motion sensor is activated.

The camera is easy to install and comes with everything you need to get started in minutes. Download the app, install the unit, and you are good to go. We recommend using the available cloud storage for recording.
The camera is wireless and has an optional solar panel available for charging.
For more info, go to: https://reolink.com/product/argus-2/