


Is it about time you did something about that old kitchen faucet—the one that goes drip, drip, drip and leaks a constant stream of water? Does your faucet look like a holdover from a short-lived style popular a couple of decades ago? If so, you can update it yourself with a basin wrench and a few other common tools. Replacing a faucet is not difficult and should usually take no more than about an hour. Replacing a kitchen faucet is very similar to replacing a lavatory faucet, so this article serves for both types.
Tools & Materials
Basin Wrench
Slip-Joint Pliers
Adjustable Wrench
Faucet
Supply Lines
Plumbers Putty or Silicon Caulk
Teflon Tape
Flashlight
Faucet Selection
Faucets are available in a wide range of prices and styles. They range from very inexpensive, mostly plastic models to high quality brass units. You’re better off buying a better quality, brand-name faucet. You’ll get better service, and when the time comes (if it comes) for you to need parts, they will be much easier to find. Some of the better brand washerless faucets have lifetime warranties.
What’s That Doodad Called?
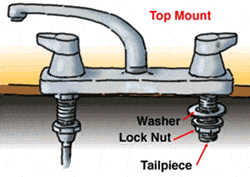
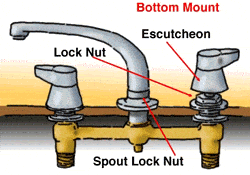
Faucets come in one of two basic types—top mount and bottom mount (widespread faucet). The parts relevant to installation for both types are shown in the illustrations at right. Most faucets which are installed by homeowners fall into the top mount category.
Removing an Old Faucet
The most difficult part of replacing a faucet is removing the old one. Once the old stuff is out of the way, your nice new faucet should go in easily.
Step 1: Shut off the water. If you miss this step, you’re going to get wet, and you’ll end up doing cleanup as the second step instead of the last. You can turn off the main water valve, or turn off the two valves immediately under the faucet you are replacing. Then, open the faucet and allow it to drain and release any pressure.
Step 2: Disconnect the water supply lines. If you choose not to replace the lines, disconnect them from the faucet only. If you choose to replace them, disconnect the lines from the shutoff valve. Actually, you might as well change them now since you are going to the trouble of replacing the faucet. It could save you an extra trip under the sink later.
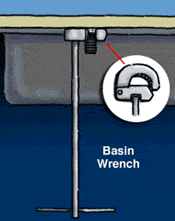
Step 3: Remove the faucet from the sink. Basically, faucets are mounted in one of two ways—Bottom mount faucets are removed from above. For these, the handles and escutcheons must be removed to get to the nuts which secure the faucet in place. Top mount faucets are held in place by nuts located underneath the sink, and must be removed from below. The nuts may be loosened using waterpump pliers or a special basin wrench. The basin wrench is necessary when the area in which the nut is located is too tight to allow the use of pliers.
If it is an old sink and the nuts are rusted or corroded in place, apply penetrating oil and allow it to work into the threads before trying to remove the nuts.
Once the faucet has been removed, a buildup may be present on the sink in the area where the faucet plate or escutcheons were attached. Clean it off to make ready for the new faucet. A 50-50 solution of vinegar and water will help dissolve the buildup Scrape it away with a razor blade and/or scouring pad.
Installing a New Faucet
Now that the dirty part of the job is out of the way, putting the new faucet in place should actually be a pleasure.
Top-Mounted Faucet
Step 1: Apply a bead of plumber’s putty or silicon caulk around the faucet base. Some faucets have rubber or plastic gaskets for the base and do not require this step.
Step 2: Ease the faucet into place, pressing against the putty to assure a good seal.
Step 3: Under the sink, install the washers and mounting nuts on the tailpieces. Tighten the nuts by hand.
Step 4: Align the faucet with the back of the sink and tighten the mounting nuts with waterpump pliers, adjustable wrench or a basin wrench. Wipe away excess putty or caulk from around the base.
Bottom-Mounted Faucet
Step 1: From under the sink, hold the faucet in place.
Step 2: Install the washers and mounting nuts, tightening the nuts by hand. Align the faucet with the back of the sink and tighten the mounting nuts with waterpump pliers or a wrench.
Step 3: Run a bead of plumber’s putty along the base of the escutcheons and screw them in place.
Step 4: Install the faucet handles. The one marked hot should go on the left. Wipe away excess putty from around the base of the escutcheons.
Hooking up Supply Lines
If you have chosen not to replace your supply lines, you can simply hook them back up and turn on the water. If you have chosen to use new lines, your job is not much more difficult.
Different types of supply lines are available. Chromed copper lines are the most difficult to replace—you must buy the right length and then bend them as necessary to make them work. They are the most attractive, however, and are often used with wall-mounted sinks or in any installation in which the supply lines are exposed. Flexible lines are allowed in many locations. They are inexpensive, can be cut to size with a knife and are very easy to use. Flexible plastic and braided metal supply lines are also available.
Copper supply tubes have a rounded end that fits into the seat of the faucet’s water inlets. When the coupling nut is tightened, the end seals itself against the seat. The supply tubes are connected with the included compression fittings to the shutoff valve.
Attaching a Sink Sprayer
If you are installing a kitchen sink, you may also need to attach a kitchen sprayer.
Step 1: Apply a bead of plumber’s putty to the base of the sprayer holder. Insert the holder into the hole and tighten it in place with the mounting nut. Wipe away any excess plumber’s putty from around the base of the holder.
Step 2: Insert the supply tube of the sprayer through the holder from the top. The sprayer will sit in place in the holder.
Step 3: Under the sink, screw the sprayer supply hose to the hose nipple on the bottom of the faucet. Tighten the nut with a wrench or waterpump pliers.
Installing a Pop-up Drain
You may be installing a lavatory faucet with a pop-up drain assembly. This is a simple procedure, but since this drain can be either plastic or metal, and because the individual components of these assemblies may vary by model, follow the step-by-step illustrated instructions included with your faucet.
