


By Brian Zuccaro, Product Manager, QuickDrain & Oatey Co.
The demand for freestanding tubs has increased in recent years, with this version of the bathtub becoming one of the most desired fixtures for all types of bath décors.
In fact, according to 360 Market Updates, the Global Freestanding Bathtubs Market Size was estimated at USD 3.1 billion in 2021 and is projected to reach USD 4.5 billion by 2028, exhibiting a compound annual growth rate (CAGR) of 5.50% during the forecast period. According to the report, the United States is the leading region.
Contractor dilemma
While designers, homeowners and building owners can’t get enough of freestanding tubs, most contractors will express how difficult it can be to install one, likely sharing multiple job-site frustrations that have occurred while installing the drain.
Feedback from contractors usually sounds something like this:
- “Keeping the ceiling open is a pain.”
- “Every tub is kind of different.”
- “My biggest fear is making a solid connection. You’re blind when dropping the tub.”
- “I have to triple- and sometimes quadruple-check with my super and other trades.”
If you’re a bathroom designer, you’ve likely heard these and other, similar comments many times before.
So, let’s break down where these pain points come from.
Old ways to install a freestanding tub
1. The stub-out method
Traditionally, when a plumber installs a freestanding tub drain using the stub-out method, they install it blind. After making a P-Trap connection, the contractor must leave the PVC/ABS pipe “stubbed out” a few inches above the floor. Once the tile is set, they have to saw off any extra pipe, based on measurements, to figure out where the tub is going to land — often guesswork. Then, the contractor or plumber will need to solvent-cement the P-Trap to the tub.
In this scenario, the contractor is positioned underneath the tub solvent-cementing. He will then have to roll out from underneath the tub as it is lowered.
But let’s say the contractor made measurements and thought they’d done a good job, only to learn later those measurements were off by a couple of inches. In that case, a miscalculation could push the P-Trap out of the line when they drop the tub.
Another example: If the pipe was too high, that could cause the tub to sit too high. On the other hand, if the pipe was cut too low, you’re left with a bad connection that isn’t watertight. Of course, no one usually realizes there is a leak until the installer gets a call 30 days later, sounding something like: “Hey, I’ve got this dark spot in my ceiling…”
At that instance, they quickly realize the installation wasn’t done properly.
The above stub-out method causes a lot of on-site frustrations, such as confined space for the contractor to solvent-cement, tight measurements, and guesswork that could result in the tub knocking the P-Trap out of place.
2. Access from the ceiling below
Clearly, the stub-out method is a tricky and risky operation. That’s why many installers opt to cut a hole in the ceiling to make the solvent connection from below. In other words, they leave an opening in the ceiling, and once the tile is set, they cut a hole from below in the subfloor to install the P-Trap and tub.
However, access from below is terribly disruptive for both residential and commercial spaces. It has many downsides, such as project delays and additional costs to bring a drywaller and painter back to repair the ceiling. Matching drywall can also be tricky depending on if there’s a pattern in the ceiling.
In short, the old ways of installing a freestanding tub are neither installer- or plumber-friendly. But there are also big downsides for a designer and property owner. Because with the old way of installing a freestanding tub, the designer or owner is faced with unexpected labor costs and may need to sacrifice other design elements to make the freestanding tub happen.
A more convenient way to install freestanding tubs does exist: A universal drain like the 1916 Collection Freestanding Tub Drain removes guesswork and complexity, while making this growing trend more accessible to home and building owners.
New way to install a freestanding tub
Let’s take a closer look at the plumber-friendly features of the 1916 Collection Freestanding Tub Drain and why it offers a better way to install a freestanding tub drain, even when compared with other drains in the marketplace.
1. Fast and easy installation
The 1916 Freestanding Tub Drain allows the contractor to freely drop the tub into the drain, eliminating both the stub-out method and the need to access the drain from below the floor to solvent-cement the connection.
That’s because this new drain has a slip joint for it to pass through (no need to stub-out/cut the pipe). As a result, you don’t need ultra-precise measurements.
The drain also shortens the time and manpower required to drop the tub — no more spotters needed or crawling under the tub when making your connection (even with slab-on-grade.)
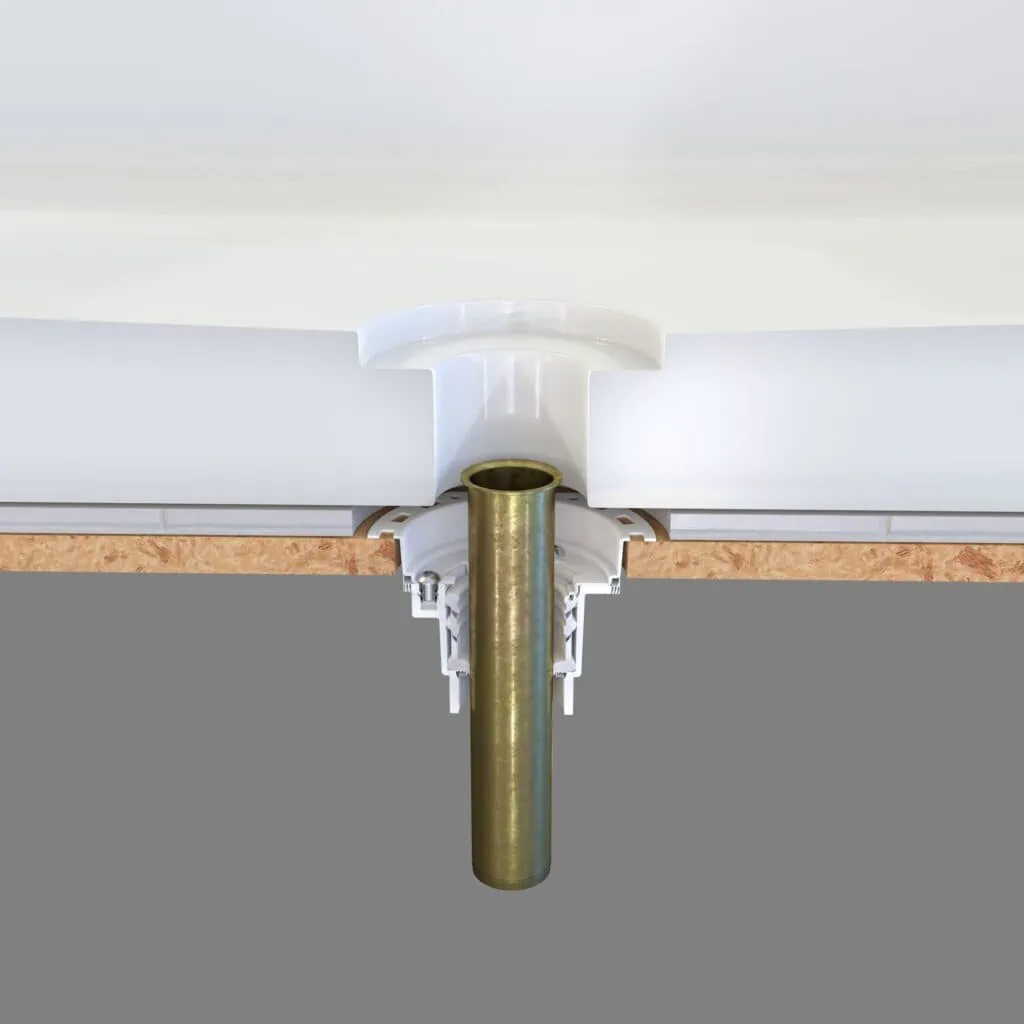
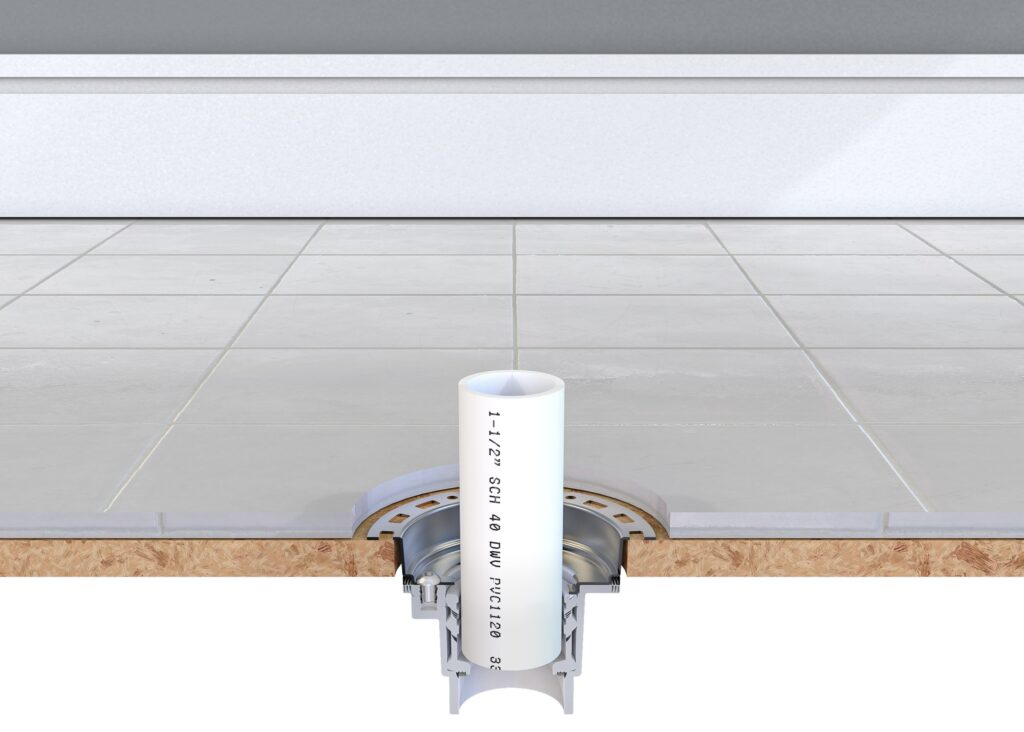
Compatible with brass and Schedule 40 tailpieces, the Rubber Gasket inside the drain body removes the need to solvent-cement the connection, and it provides a watertight seal. The brass or PVC tailpiece penetrates through the drain into the PVC pipe. The brass tailpiece will penetrate through the drain into the PVC pipe. The Schedule 40 tailpiece will enter the drain and hit the ‘stop’ at the bottom of the gasket, which is itself the smaller opening for the brass tailpiece.
Below are graphics illustrating how the connection is made, whether using a PVC or brass tailpiece:
2. Universal Compatibility
As mentioned above, an added benefit of the 1916 Freestanding Tub Drain is that it allows you to use a brass tailpiece that is included in the drain kit. If you prefer to stay with Schedule 40 PVC, or ABS pipe, no problem: You can use that same material.
Some contractors have more confidence knowing that they’re not transitioning from plastic to brass, So, the 1916 Collection Freestanding Tub Drain allows the contractor to use one material all the way through, without making a transition.
In short, the drain’s universal compatibility allows it to work in virtually any situation. So a plumber need not know exactly what tub is going in, and what drain is compatible with that tub. The 1916 Freestanding Tub Drain is compatible with any setup.
A plumber can carry one product on their truck and walk into a job with confidence they can install a freestanding tub without having to go back and find different materials.
3. Compact Size
The Freestanding Tub Drain’s compact size allows it to fit between floor joists easily. The drain can fit inside 8-, 10-. and 12-inch joists and inside a 4-inch hole saw opening, making it a great choice for remodels.
Moreover, the drain’s compact size allows contractors to use it in older homes with shorter floor joists. A floor joist is usually anywhere from eight to twelve inches. Having a compact design allows you to get into tighter spaces and still be able to make your connection freely.
Other drains on the market are five to six inches tall, meaning you need at least a ten-inch joist for proper clearance. And you might not always have that luxury.
It’s also common that when you’re inside a joist, other obstructions may be present; i.e., ductwork, electrical, and hot and cold supply lines. But within a shorter joist, having a smaller diameter drain allows you to drop it in and not worry about hitting any of those obstructions.
Another consideration is the flange design. Many freestanding tub drain flanges are much larger or are complete circles that cannot bump up against. The 1916 Collection Freestanding Tub Drain has straight edges, allowing you to put it up against a wall or partition or even underneath a window. This drain, therefore, allows more freedom for the designer to place the tub wherever the customer wants it.
And customers can be very demanding if the tub is off a couple of inches.
4. Jobsite ready
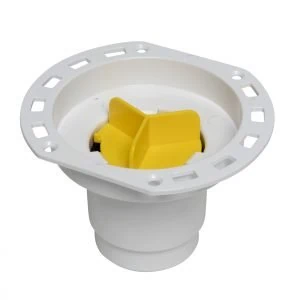
The 1916 Freestanding Tub Drain comes job-site ready with a tool-free, quarter-turn test plug, pre-installed, a 1-½” drain hub with 1-½” x 2″ adapter, and a cap that protects the drain while tile is being set. The pre-installed tool-free test plug allows for water, smoke, and air testing up to 40 feet of the head.
The reusable test plug reduces risk and liability. The high-visibility protective cap allows the contractor to walk away at rough-in, knowing the drain is watertight and free of dust and debris.
In short, the 1916 Collection Freestanding to drain is an all-in-one solution. It’s the industry’s most compact freestanding tub drain, providing the greatest design freedom for tub location. The drain eliminates the extra time, money, and inconvenience of cutting through the ceiling below to access the drain and, finally, increases project flexibility versus the old stub-out method.
About the author: Brian Zuccaro is Product Manager, QuickDrain and Oatey Co. Brian has over 20 years of experience holding leadership roles across new product development, channel, and product marketing for several nationally recognized building product brands as well as one of the nation’s ten largest homebuilders.
