A Step-by-Step Photo Illustrated DIY Kitchen Upgrade
By Clint Thomas
Americans have a lot of stuff. From just household clutter to full blown junk rooms, those of us who live in the Land of the Free have not adopted a minimalist lifestyle and this is never more evident than in the kitchen. The typical household kitchen is the nerve center of any home. It is where meals are prepared and cooked, children’s homework is often done, science projects carried out, all while serving as the place that we eat our meals and store our food.
The average kitchen contains both base cabinets and wall cabinets. However, there never seems to be enough storage room in the typical kitchen. Let’s face it, once all of the pots and pans, dishes and other cookware are inside those cabinets there never seems to be enough room for the food, not to mention all of the other stuff that eventually winds up in the kitchen. My wife recently complained about this problem and commented that she wished that she had a large kitchen pantry like her grandmother used to have in her kitchen.
If you’ve priced custom cabinets lately then you know that you’ll probably need a either a second job or a second mortgage to have a large pantry built if you use a cabinet shop or order one through a box store. The alternative to this fiscal nightmare is to build one yourself.
I recently built two, eight foot tall pantries in my kitchen for less than a $1,000 in material and about $300 dollars in tools and tool related accessories. Admittedly, I already owned a miter saw, a bench saw and router table. Even if you don’t own these tools and have to purchase them, you’ll still spend a fraction of what it would cost to have these same cabinets custom built.
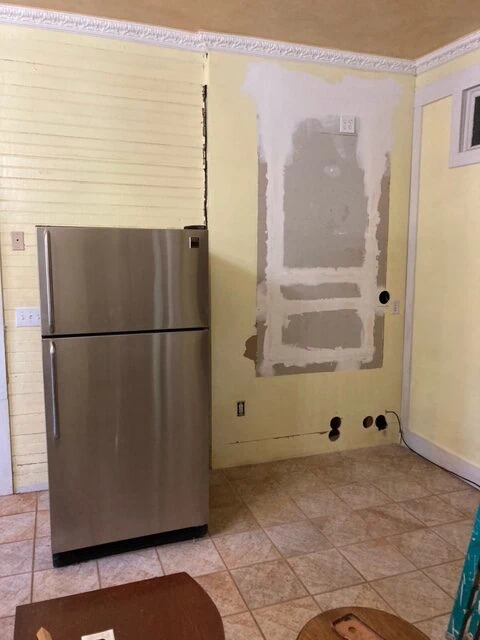
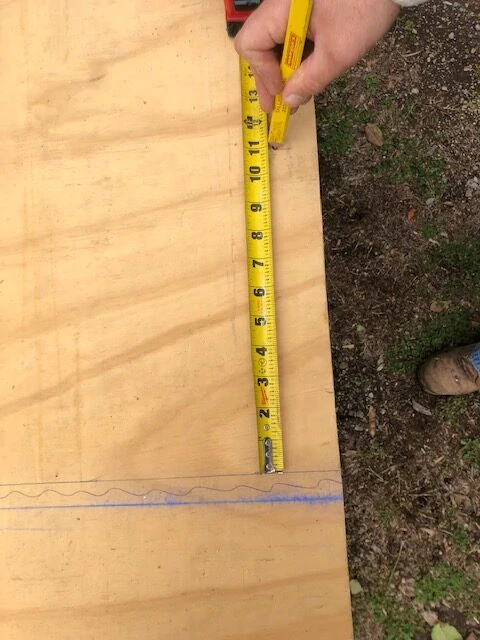
The first step in this process is to take a measurement of the area where the pantry will be built. Make sure to measure both the width and the height but also pay attention to the depth of the pantry to make sure that it is not going to interfere with any other aspect of your kitchen. Once I had my overall measurements, I sketched out a rough drawing of the cabinet design. I’ve often said that I’m not much of an inventor but I can copy just about anything. While working on the sketch for my design, I examined my existing kitchen cabinets and their dimensions and incorporated some of the overall design into the plan for my new pantry. There’s no reason to re-invent the wheel when you have one that you can simply copy. For example, how far apart are the shelves, what is the width of the stiles and how many hinges were used on the doors.
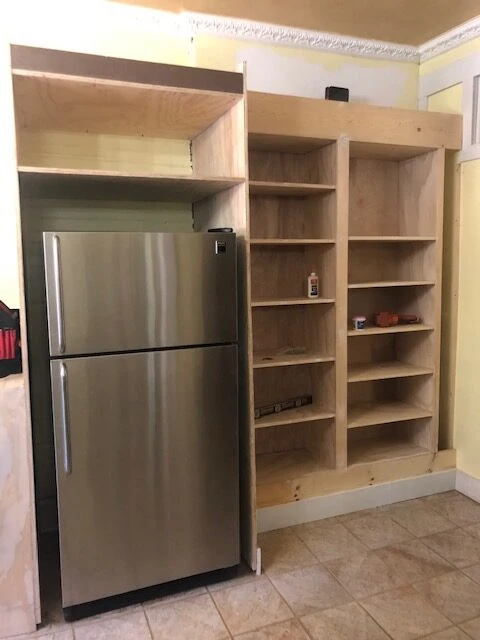
My wall space measured 115 inches wide. I then subtracted 11 inches for the bookcase that my wife wanted for her cookbooks, 39 inches for the width of the refrigerator opening and also subtracted out 3/4 of an inch for each side panel of my pantry. I left a 7 inch wide section on the right hand side in the corner officially to be used as a broom closet but in reality it served as a built in fudge factor in case I mis-measured somewhere. I then divided the remaining measurement in two to arrive at the width of the pantry shelves.
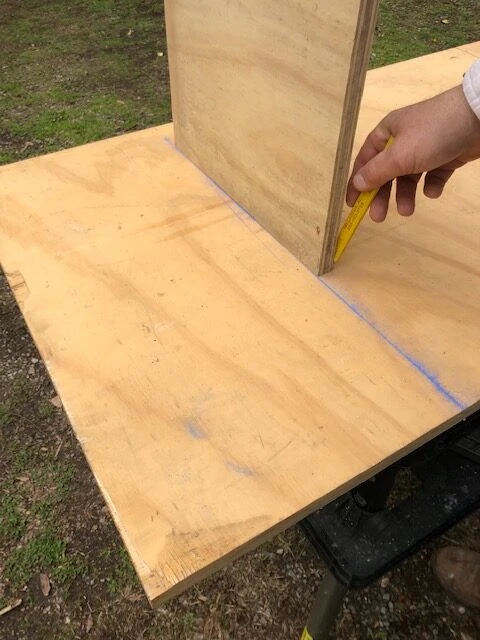
Knowing that I would build the pantry out of cabinet grade 3/4″ plywood which comes in sheets 4′ x 8′ in size coupled with the fact that my kitchen has a ten foot ceiling, I chose to make the overall height of the cabinet carcass eight feet tall not counting the decorate trim that I would add at the top of it. I decided that the shelves would be sixteen inches deep which allowed me to cut three side panels out of each piece of plywood by ripping the 4′ x 8′ sheet into three sixteen inch wide lengths. The shelves themselves I made thirty inches wide. Each of the two sides of the pantry would be sixteen inches from front to back and have shelves that were thirty inches wide and an overall height of eight feet tall.
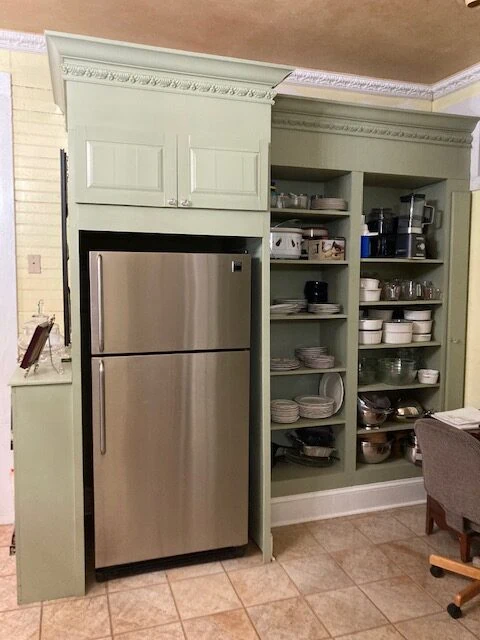
The refrigerator cabinet would require a greater depth of thirty-six inches due to the size of the refrigerator. This caused the two sixteen inch pantry cabinets to be recessed back from the front edge of the refrigerator unit since I saw no reason to have thirty-six inch deep shelves in the pantries. Therefore, what began as three separate units, i.e., the refrigerator unit, pantry one and pantry two, were all subsequently secured together and trimmed out to become one single giant panty but were built as three separate pieces.
With the basic design in mind, the next step was to purchase the necessary lumber. As previously mentioned, the cabinet carcass and the shelves were constructed out of 3/4″ cabinet grade plywood. By cabinet grade plywood, I am referring to plywood that has a very smooth finish that is free from knots or other imperfections. I chose a hardwood plywood from my local box store that is designed for interior applications. For the trim work and cabinet facing I selected a premium grade one-by lumber that is completely free of holes, knots or other blemishes. I purchased several pieces of 1″ x 6″ x 8″ lumber that I then cut down to the necessary size on my bench saw using a 60 tooth saw blade.
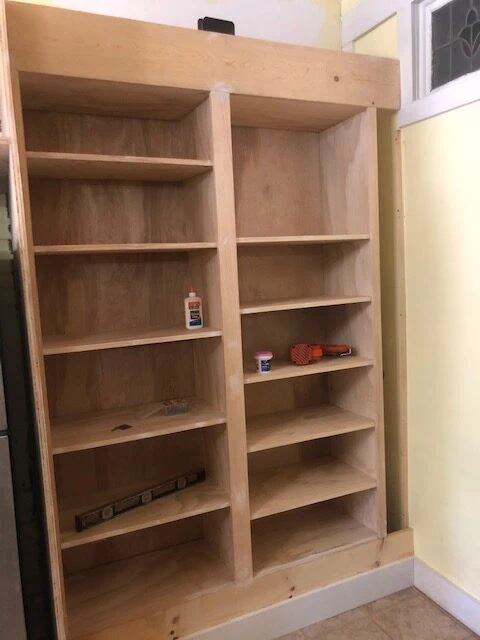
Shelf layout
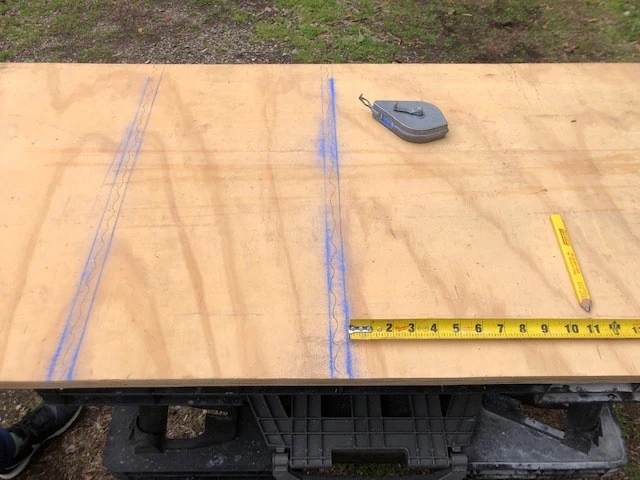
After cutting the required number of sixteen inch wide by eight foot long side panels out of the sheets of plywood, I then marked the layout of where the shelves would be located along with the top of and bottom of the pantry. I used the measurements of my existing kitchen cabinets as a basic guide and after a little bit of experimentation I finally settled on a bottom shelve that would be seven inches off of the floor with the cabinet top four inches below the upper most point of the side panels. With these two pieces as reference points, I then determined that my shelves in one cabinet could be evenly spaced at eleven inches part except for the upper most shelf that would be slightly smaller. I constructed the remaining pantry with taller shelves to accommodate large items like the blender, food processor and stacks of cookware.To keep all of the shelves at the exact same height, I used the first panel as a template to mark the position of the shelves on each subsequent panel. Once the side panels had been cut and marked I then cut the shelves out of the remaining pieces of plywood.
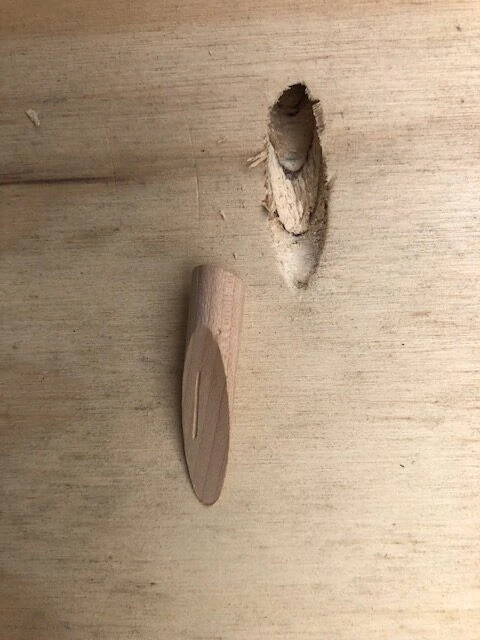
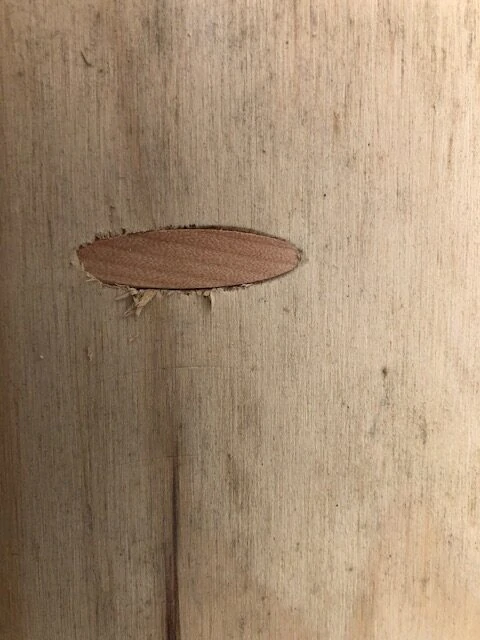
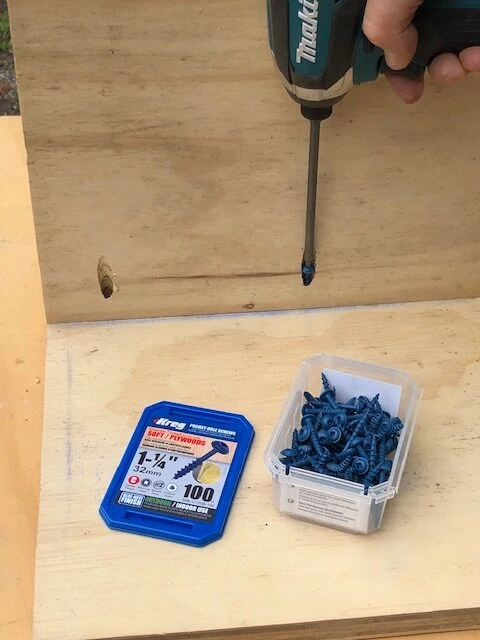
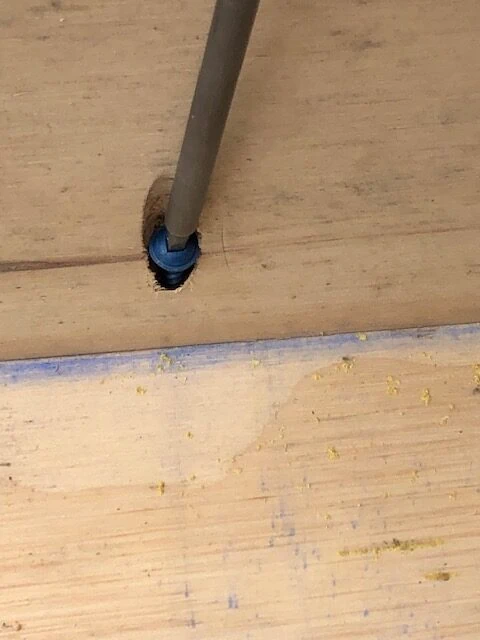
Multiple ways exist to attach the various pieces of a cabinet together. I chose to use a pocket-hole joiner that is sold by Kreg. A pocket-hole joint does not require any special measuring and also conceals the screw holes by allowing them to be placed on the underside of the shelves. The holes can be filled with maple plugs, also available from Kreg, when they are visible. The only down side to a pocket-hole joint is that they are permanent. Shelves that are attached using pocket-hole joints cannot later be moved because they are literally screwed in place. Therefore, be sure to layout the location of the shelves precisely where you want them to be. Pocket-hole joints are made by drilling holes in the two side edges of each shelf with the use of the Kreg pocket-hole jig and accompanying drill bit about every six inches apart.
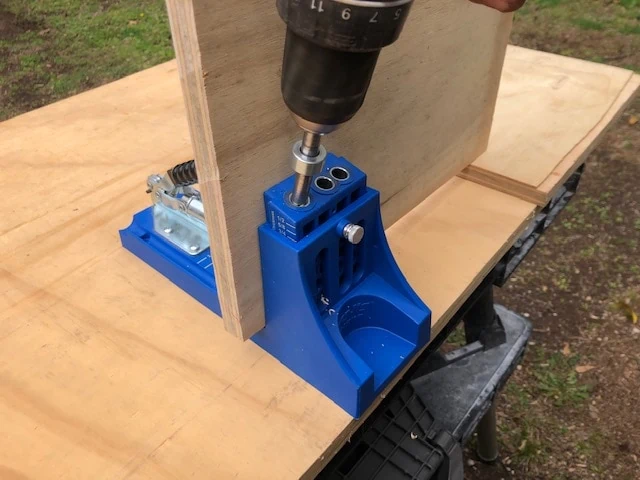
Once the holes are drilled, lay one side panel down with the layout marks facing up and position the shelfs on the layout lines and attach them to the side panel with 1 1/4″ Kreg self tapping screws. Repeat this for each shelf in the pantry. After all of the shelves are attached on one side, have someone help you flip the entire unit over and lay it on top of another side panel so the side panel that was on the bottom is now on the top. Line up the loose ends of the shelves with the layout marks on the side panel that is now on the bottom and screw it in place.

After the shelves have been securely fastened to the side panels, the next step is to attach a 1″ x 4″ panel across the front and rear of the unit at the top to give it added support and to have something to screw into to fasten the pantry to the wall. The upper most panels should rest against the upper side of the top piece and fit in between the side panels. One should be at the very front and one at the very rear. Screw the 1″ x 4″boards to each side panel and the top panel with pocket-hole screws. A piece of plywood or any scrap 1″ x 4″ lumber can be used for these two panels since they will not be visible in the finished product. It’s also a good idea to fasten a similar board along the bottom of the pantry just under the bottom shelf. This provides extra strength to the overall cabinet and provides a surface that the base trim can be easily nailed to.
After assembling the basic carcass of each pantry, I then cut and attached a piece of 1/4″ luan to the back side of each pantry to give it a finished appearance and to provide additional stability. Attach the luan with traditional ring shanked paneling nails making sure that none of the nails miss the side or the shelves and poke through to be visible from the front side of the pantry.
After cutting the required number of sixteen inch wide by eight foot long side panels out of the sheets of plywood, I then marked the layout of where the shelves would be located along with the top of and bottom of the pantry. I used the measurements of my existing kitchen cabinets as a basic guide and after a little bit of experimentation I finally settled on a bottom shelve that would be seven inches off of the floor with the cabinet top four inches below the upper most point of the side panels. With these two pieces as reference points, I then determined that my shelves in one cabinet could be evenly spaced at eleven inches part except for the upper most shelf that would be slightly smaller. I constructed the remaining pantry with taller shelves to accommodate large items like the blender, food processor and stacks of cookware.
With each carcass fully assembled the next step is to stand them up in place for a dry fit and fasten them together and to fasten them to the wall checking for level and plum as you go. Wood shims can be added to the underside of the units if the kitchen floor is out of level. I recommend attaching the units to the wall with three inch screws and large washers that are fastened directly into the studs at the top and at the bottom of the unit. This is a safety precaution to keep the pantry from turning over on someone. I screwed each pantry unit to its neighbor with drywall screws for additional support and stability after I had gotten them level and plumb and secured each one to the wall.
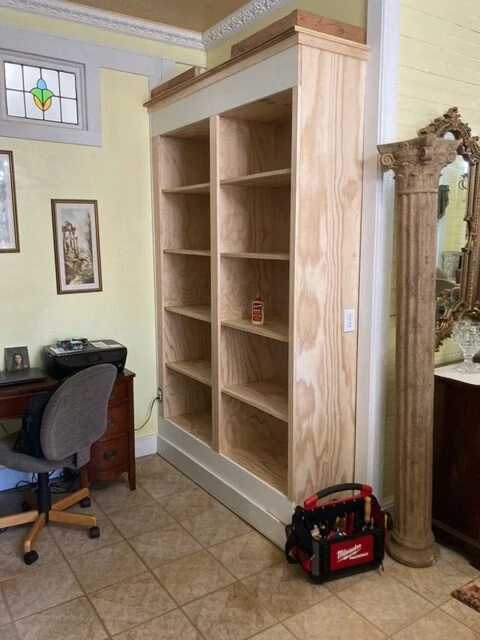
With the three basic cabinet carcasses built and attached to the wall, the next step in the process is to install the trim work on the facing of each pantry. Since the basic carcasses were built out of plywood it is necessary to cut thin strips of premium quality dimensional lumber and nail them to the front edge of each shelf as a band. Follow this up by installing pieces of dimensional lumber as the rails and stiles. I used full 1″ x 8″ pieces of lumber for the top plate and the bottom plate and made the stiles on the outer edge 1 ” wide and the center stile three inches wide. A one and half inch stile is the minimum width that can be used if the cabinet is going to have doors installed on it. Anything smaller, and the doors may not open properly and there also won=t be enough wood for the door hinges to screw into. All of the trim lumber can be easily attached with either paneling nails or a nail gun using 16 gauge finish nails. I prefer using a nail gun with two inch long 16 gauge finish nails.
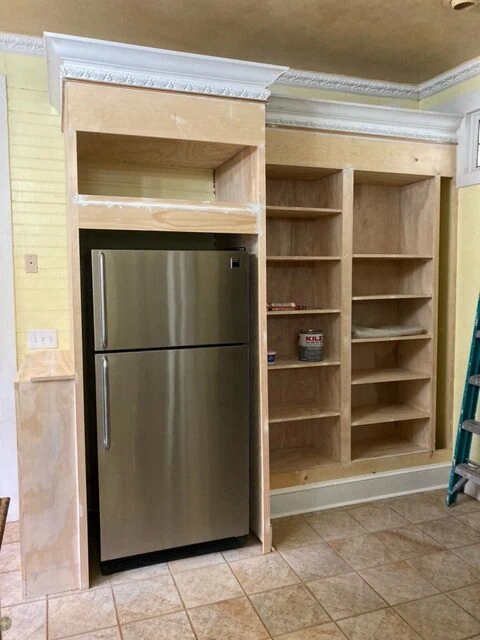
After I had the basic pantry constructed and trimmed out I then installed crown moulding with a decorative urethane trim to match the crown moulding that I already had on my other kitchen cabinets. Renovator’s Supply (resup.com) offers a large selection of urethane mouldings, trim and decorative accessories.

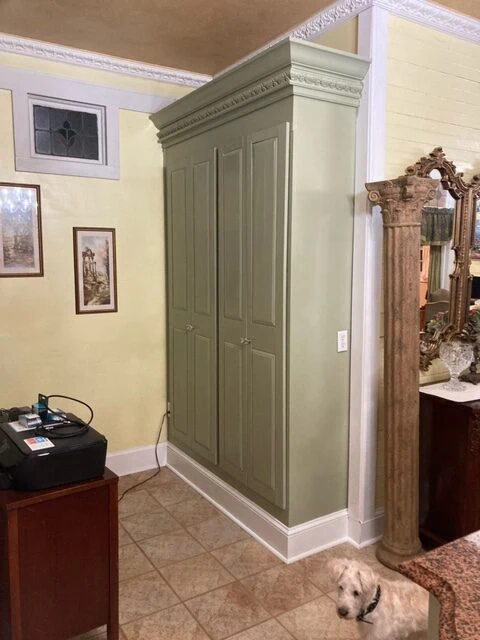
At my wife’s request, I did not install doors on the two pantry units as I had originally planned. Ironically, she got used to using the two pantries without the hindrance of having to open cabinet doors and asked that I not make any other than the small set above the refrigerator.
A custom built kitchen looks really impressive and to the untrained eye can seem like a pipe dream to create yourself. However, just know that it is nothing other than the amalgamation of multiple pieces that come together in the end to form a completed unit. It all begins with a simple box and some shelves. After than, trim work is added followed by decorative moulding to give it that a wow factor. There’s an old saying that the longest journey begins with the first step. The same can be said of building kitchen cabinets. It all begins with a glorified plywood box.