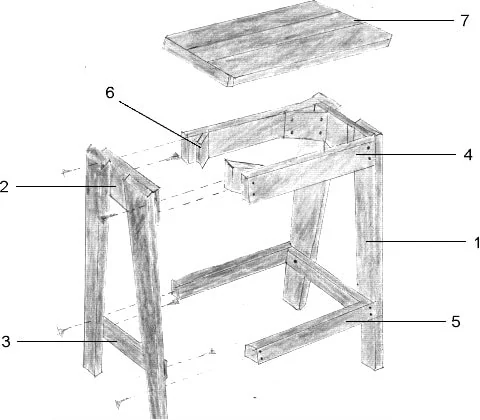
Here are step-by-step instructions for building a wooden stool for your home bar or kitchen diner. It’s always handy to have extra seating for when you’re entertaining guests. This barstool has a simple backless design and can easily be moved around the home to wherever you need a spare seat. Building this wood bar stool is a fairly straightforward project that can be done with hand tools.
Materials & Tools Required Wood: 1 x 4.2m length of 90mm x 19mm 1 x 1.8m length of 70mm x 19mm 1 x 1.8m length of 40mm x 19mm Wood Glue Screws Sliding Bevel Protractor Pencil Saw Tape Measure Plane Dowelling Sandpaper Finish *Step 1* Take the 90mm x 19mm length, from which you will make the legs. Use a sliding bevel and protractor to mark a 5 degree angle at one end and cut with a saw. Measure 630mm along the length and cut another 5 degree angle, to make the first leg. Do this three more times until you have your four legs.
*Step 2* Next, taper the base of each leg. Take one leg and measure 45mm across the bottom and 400mm up the inside. Use a pencil to join these points and then cut along the line. Use a plane to smooth the cut edge. Repeat this step on each of the other three legs.
*Step 3* Once your legs are ready you can cut the 2 x 315mm bottom spreaders out of the length of 40m x 19mm. Cut a 5 degree angle at both ends of the bottom spreaders, to follow the splay of the legs. Then cut the 2 x 230mm top spreaders from the 70mm x 19mm timber. *Step 4* Work with one pair of legs at a time. Mark 19mm in from the outside edge of each leg at the top and 150mm up from the bottom. Use wood glue to fix the top and bottom spreaders to the legs and screw them in place. Repeat this with the other pair of legs and the other top and bottom spreaders.
*Step 5* Cut the 2 x 360mm legs from the 70mm x 19mm to make the top rails and 2 x 360mm lengths from the 40mm x 19mm for the bottom rails. Glue these to the legs in the 19mm spaces left in Step 4. Secure each rail with a screw from the leg into the end of each rail. Then check the stool stands level and make any necessary changes.
*Step 6* From the 70mm x 19mm cut 4 x 100mm pieces and turn them into corner blocks by making a 45 degree mitre cut at each end. Using screws, fix a block into each of the corners between the top spreaders and rails.
*Step 7* You can now make the seat. From what’s left of the 90mm x 19mm, cut 3 x 450mm lengths. Get rid of the sharp outer corners by cutting a very small 45 degree triangle from each of them. Fix the slats to the stool frame, measuring to ensure the center one is fixed centrally before fixing the other two slats in position, using glue and screws.
*Step 8* To hide the recessed screws, plug the holes with pieces of dowelling. Glue the dowelling in place and cut it so it’s flush with the wood.
*Step 9* Sand all the surfaces of the stool until smooth and apply your choice of finish, following the directions on the label.
Key To Diagram:
1 = Legs
2 = Top Spreaders
3 = Bottom Spreaders
4 = Top Rails
5 = Bottom Rails
6 = Corner Blocks
7 = Seat Slats


