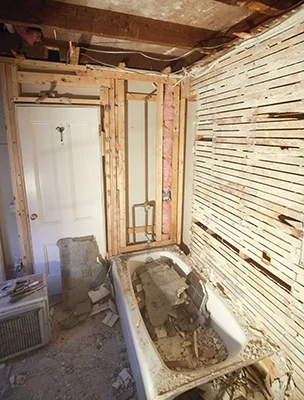
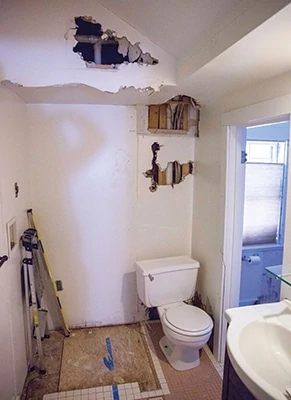
Reconstruction of the walls and floor can present problems for a major bathroom overhaul.
By Rob Robillard
Bathrooms are botched more than any other room in the house. With bathroom remodels people often focus on easy-to-see things like tile colors and layout, or special amenities like heated floors. These are all important, but you also need to think about the stuff behind the tile and under the floors—all the hidden conditions that can derail a project.
It is very common when remodeling a bathroom to find walls that aren’t level, deficient wiring, improperly installed plumbing, and floor joists that have been cut, drilled, notched or even removed to accommodate pipes or drains.
Bad wiring can be a fire hazard and bad plumbing a moisture nightmare. Uneven walls or floors—and floors that aren’t properly supported—can lead to cracked tiles and bigger structural problems.
If you are doing a major upgrade to your bathroom consider doing a “full gut.” Remove all the plaster from the walls and ceilings and remove the subfloor to allow the years of accumulated problems to be rectified.
Expect the Unexpected
When preparing for a bathroom remodel, expect more expense, time, disruption and problems than you planned on. Surprises of one kind or another are so common that they’re actually predictable. When you expect the unexpected, however, you can reduce a lot of stress.
Many people have no clue about the hidden costs of remodeling, and a lot of contractors do not advise their clients of them either. (You can scare away a lot of business that way!) Hidden conditions are things like finding and then needing to repair termite damage, improper wiring, outdated plumbing, abating asbestos, or repairing floor joist damage. Any or all of these can stop a remodel process midway and add time and money to the project. Plan for these situations by setting aside 10-20 percent of your budget to address them.
Old or Corroded Plumbing
A bathroom renovation presents a great time to deal with old, outdated systems, things like corroded cast iron or galvanized drains and water supply lines. Even copper water supply lines can be hiding problems if the joints are corroded. Flexible PEX piping joined with “push-fit” connections offer an easy-to-use alternative to soldering copper lines for DIY’ers who need to make a replacement.
Prior to doing any work, shut off the water to the house and open the faucets at the highest level and lowest level to drain the water lines. For the sink and toilet you can simply remove them from the bathroom and rely on their existing shut-off valves, or you can open the walls and cap the pipes.
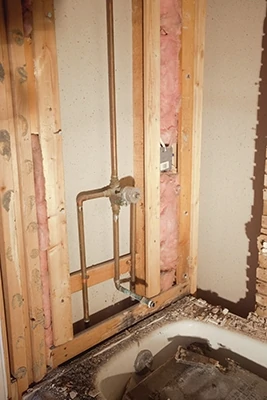
Remodeling a bathroom usually involves some exploratory demolition to locate pipes and wiring hidden behind walls.
From plaster and drywall to old flooring and cabinetry, a full remodel generates a log of demolition debris. Make sure you’ve planned for a way to handle the dispose of all the garbage
Removing Plumbing Fixtures
To disconnect a vanity sink, turn off the two shut-off valves sticking out from the wall connected to the hot and cold water supply lines. Open the faucet and let the water drain out. Disconnect the sink water lines and the drain pipe. Unscrew the countertop mounting hardware (if applicable), and cut away any caulking from the sink, then lift it out of the countertop. With the sink out of the way, you can unscrew and remove the vanity cabinet from wall.
If you’re capping the pipes, open the wall to expose the pipes, cut the pipes and install a push-fit plumbing connector. These simple fittings, such as the SharkBite brand Plumbing Connectors, are brass fittings that use a push-fit technology to seal joints in copper, CPVC or PEX pipe. No soldering is required.
To remove a toilet, first turn off the shut-off valve sticking out from the wall connected to the toilet tank supply lines. Flush the toilet a few times to let the water drain out. Use a wet-vac to remove all excess water. Disconnect the water line. Remove the two mounting bolts at the floor and lift the toilet off the flange.
Doing a retrofit or a remodel is an ideal time to address structural issues with floors, walls or ceilings.
Note: Stuff a rag into the drain stub-out if you plan on using it again. The rag will block sewer gases. If you are capping the pipes in the wall, use the push-fit plumbing connectors.
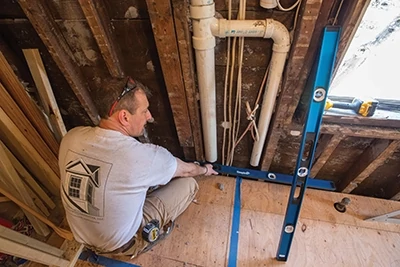
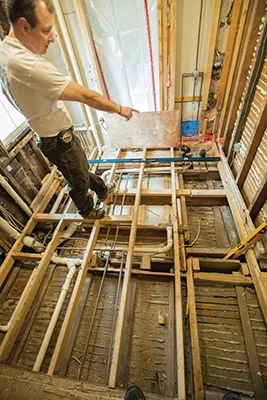
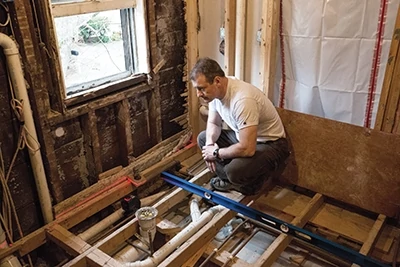
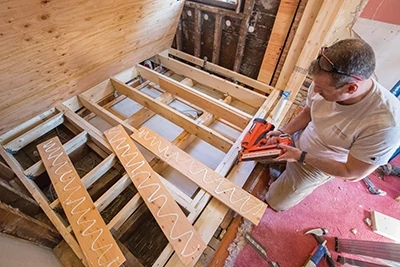
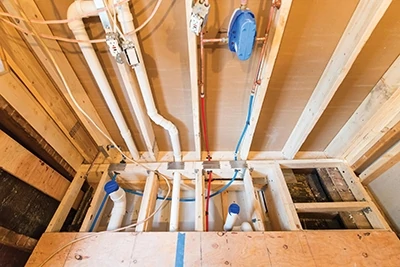
The photos show a recent bathroom remodel where we relocated the tub drain across several floor joists. The floor system is 2×10 joists spaced 12″ on center. Prior to drilling holes in these floor joists we installed 3/4″ on center. Prior to drilling holes in these floor joists we installed 3/4″ plywood to each one. We cut out and doubled up a header where the tub’s P-trap was to be installed.
When reusing existing plumbing locations, make sure that supply and waste pipes don’t need to be extended or modified for the new fixtures.
For showers and tubs, the process is the same. You need to open the wall or floor to expose the water lines and cut them back.
Once all of the plumbing has been disconnected in the bathroom, turn on the main water valve slowly, turn off the open faucets and inspect for leaks. Now you can gut the walls, ceiling and floor as needed to conduct your remodel.
When reusing existing plumbing locations, ensure that supply and waste pipes don’t need to be extended or modified. Recognize that removing old tile floors and sub-floors will affect the floor height, which can affect the pipe positions. Check the dimensions of new toilets, sinks and other fixtures; don’t assume they are the same as the old. Fixtures can vary in size even if they look similar. Wall studs may need blocking or modifying to accommodate shower valves and wall-mounted fixtures. Floors may need to be re-framed or reinforced for new plumbing lines, or for placement of a whirlpool or cast-iron bathtub due to the heavier load.
Venting Issues
Check to ensure your existing plumbing is vented properly. Modern plumbing codes have changed the ways plumbers run vent lines for your sink, tub, shower and toilet. Insufficient venting can cause drains to gurgle or traps to be sucked dry, which contributes to clogs.
Improve air ventilation by installing a bathroom exhaust fan.
Out-of-Level Floors and Walls
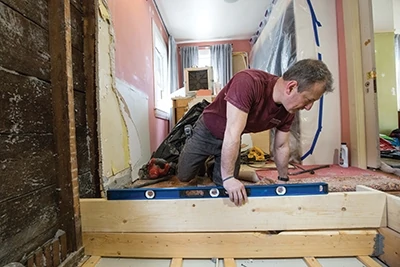
While not always noticeable, an out-of-plumb wall may show itself better when covered with tile and the grout lines taper off. Level construction is also important for one of the amenities that my clients ask me for most often: walk-in glass showers. If you plan on installing glass shower doors and walls, you want to make sure your walls are as straight and plumb as possible. (When installing glass doors, here’s a tip to keep water where it belongs: Install solid strips of a material like granite or Silestone to make a lip against the glass.)
A laser level can help determine the finished height of a new floor. Keep in mind that changes in the floor often affects the position of plumbing fixtures in regard to where they connect to existing water pipes.
Deficiencies in the Floor Framing
Doing a retrofit or a remodel is an ideal time to address structural issues with floors, walls or ceilings.
Homes are built to transfer the structural load down through the framing to the foundation and soil. This is called the “load path,” and it’s where most of the forces in a home are concentrated. Understanding the different types of basic framing methods will help you to identify proper load paths no matter which framing method your home uses.
Being able to locate key “point loads” will also help you know where to look for structural problems. Point loads are loads that are concentrated in a small area, such as where a post supporting a ridge beam rests on a header above a window. Point loads are high-stress areas.
Floors may need to be re-framed or reinforced for new plumbing lines, or for placement of a whirlpool or cast-iron bathtub due to the heavier load.
It’s not necessarily a bad thing if your contractor cuts through your floor joists; a contractor can do this to accommodate plumbing or HVAC mechanical equipment, as long as he properly transfers the floor load to adjoining joists by adding headers made of framing lumber.
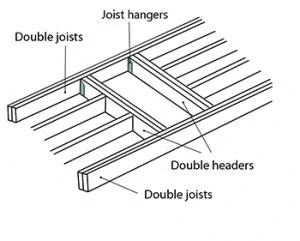
“Headers” can be used to transfer the floor load to the adjacent trimmer joists. In a perfect world, any floor joist that is cut should have a header installed, preferably two, and doubled adjacent joists. All headers should be nailed to the cut joists and their ends attached to two adjacent, uninterrupted floor joists. The use of joist hangers facilitates this repair.
A single header nailed to the cut joist and two uninterrupted joists will work for openings less than 4 feet. If the header spans more than 4 feet, both the header and the trimmer joists should be doubled. We often refer to doubling up of joists or other structural framing as “sistering.” Reinforcing the floor joists is best done by doubling them up. Doubling joists is recommended under walls, heavy objects like tubs, and at large openings.
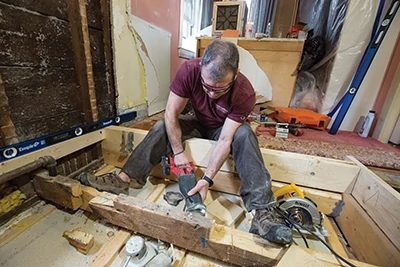
During remodeling the floor joists may need to be notched, and in some cases an entire framing member may need to be removed. If this is necessary, the accommodations must be made to reinforce the floor framing to adequately carry the load. Construction of a double-header is a common technique.
The doubled trimmer and header joists must be nailed together properly with spaced pairs of 16d nails every 16 inches so that they are reinforcing floor joists like beams.
Doubling joists can solve a lot of problems like sagging, uneven or undersized floor joists, especially when you can’t install a full-length floor joist because of plumbing, existing walls, or finished floors or ceilings. In these situations it sometimes makes sense to reinforce a key floor joist or even all of the floor joists.
Openings in a floor should be framed with doubled headers and doubled joists.
Head off a Floor Joist for a Drain
To frame a drain in the floor, first determine the location of your plumbing drain. Then, determine the size of your “plumber’s box.” For a double header, measure back 3 inches from your “plumber’s box” and mark a square line on the joist to be cut. Use a circular saw to start the cut and finish with a reciprocating saw. Measure the distance between the un-cut trimmer joists and cut four headers. Place two joist hangers under the first header prior to fastening anything. (This is important if the ceiling below is covered. If the ceiling is open, you can install the hangers afterward.) Direct-nail the first header through the trimmer joists into the end of the header. Use 16D common nails and make sure the tops of the joists are flush. Add the second header and direct nail this header through the trimmer joists. Nail the double headers to each other with three 16D common nails every foot. Secure the joist hangers to the trimmer joists with nails.
One technique is to use glue and fasteners to scab plywood over existing joists to reinforce the floor framing.
Scabbing a Framing Member with Plywood
Scabbing is an effective technique that allows you to add strength and fix minor problems affecting floor joists. Scabbing involves taking piece of wood and fastening it over the problem area. Many times I will apply scabs to floor joists that were previously or will currently be notched or drilled to install plumbing pipes. Scabbing is also used often with rotted rafters and wall studs.
I use glue and screws to fasten 3/4-in. plywood as scabs to both sides of a joist as far along its length as I can. It fastens easily to the joist with construction adhesive and 12-16d nails spaced every 16 inches on-center.
Once the floor framing is complete, new plumbing lines can be installed. For supply lines, flexible PEX piping that connects with push-fit fasteners can provide an easy DIY alternative to soldering copper pipe.
Plywood is a strong laminate composed of several thin layers of heavily compressed wood glued together. Some people consider it to be inferior to standard lumber, but the opposite is almost always true. A quality piece of plywood is typically stronger than the corresponding amount of standard wood and is an excellent choice for reinforcing weakened joists and even reducing squeaks.
In areas where I know the plumber will drill through my joist, I will add plywood reinforcing and keep my nails out of the pipe path.
Keep these structural considerations in mind when planning your next bathroom remodel, and you will avoid derailing your “budget-train” before it leaves the station!
Side Note
Push-fit Connections
Soldering copper pipe requires hand tools such as a propane torch, a flux brush, a pipe-cleaning tool and a pipe cutter. However, copper pipe can also be installed with the same simple push-fit connections that work with PEX and CPVC.
For new installation and repair of potable water supply lines, push-fit connections provide a quick way to join pipe, requiring no soldering, clamps or glue. Push-fit connections utilize a compression fitting to join the pipes, and are certified up to 200 PSI and 200 degrees F.
To make a push-fit connection, first make a square cut on the end of the pipe. Sand down any rough edges or debris. Mark the depth of the pipe that will be housed in the push-fit connection. Push the fitting together up to the depth mark so it “clicks,” and like magic the connection is complete—it takes all of 3 seconds. (For PEX, use a reinforcement insert shown below in white, so the pipe doesn’t distort.)
Here’s how the connection works: When the pipe is pushed into the fitting, the stainless steel teeth of the fitting bite down on it and grip tight, while a specially formulated O-ring compresses to create a perfect seal. Disassembly is just as fast using a simple disconnect tool that releases the O-ring, so fittings and valves can be easily changed and reused. They can even be rotated after assembly for easier installation in tight spaces. The push-fit connections are permanent connections, some of which come with a 75-year manufacturer’s warranty.


