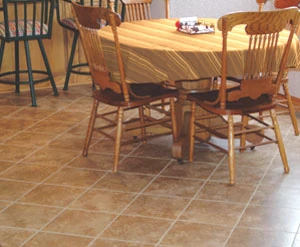
Install a snap-together porcelain tile floor with radiant heat—in a single weekend.
Remodeling a kitchen was only one part of the whole-house renovation my wife and I were undertaking. We wanted to make some significant upgrades, but were also pressed for time, staring down the barrel of dozens of projects to come. This played into our choice of materials. As long as we were covering the kitchen floor with tile, we thought it would be nice to add a radiant heat system, but needed a DIY-friendly setup that we could install quickly without a lot of major reconstruction. So we turned to MP Global Products, a company which distributes a two-component system for do-it-yourself heated tile floors.
The first component is called QuietWarmth, which is a system of low-profile, electric radiant heat underlayments. The underlayment mats line the floor and are butted at the seams to function like a hidden electric blanket beneath the tile. The mats replace typical floating floor underlayments, making the total overall thickness from subfloor to floor surface only around 3/8 inch. Quietwarmth not only deadens impact sound from the hard surface flooring, but it also makes the surface warm enough for bare feet, and assists with heating the room.
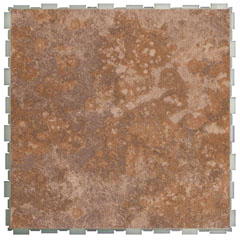
The second component is Avaire Interlocking Tile. Avaire is genuine porcelain tile that is permanently attached to a non-skid, sound-deadening grid. This is a floating tile system, so no thinset or cement board is needed, which saves lots of labor. It installs directly over solid, flat subfloors, including vinyl, wood and concrete, and the rubberized grid absorbs minor imperfections in the surface. Even a first-timer can tile an entire room in a single day, because the tile simply clicks together with a little help from a mallet and block.
Prep Steps
As with any new floor system, take steps to prep your subfloor. Both QuietWarmth and Avaire can be installed on or below grade over most wood, vinyl, concrete and ceramic floors. The floor should be clean, smooth, dry and structurally sound before installing Avaire Tile. It must be flat within a tolerance of 1/4 inch in 10 feet. I used a straight-edge to test the evenness of the floor and was lucky enough not to find any problems. High spots should be sanded, and low spots should be filled using a cement based leveling compound.
Next, remove any carpeting, baseboard or shoe molding against the wall. Keep the trim intact and you can re-install it later. Or, like us, you can take the opportunity to upgrade to a different style.
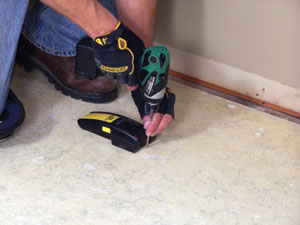
Also, take the chance to eliminate any squeaks in the floor. Use a stud finder to locate the floor joists and drive 3-1/2-inch screws through the subfloor into the framing to tighten any noisy areas.
Electrical Rough-In
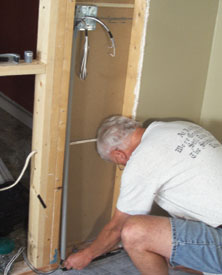
The next step in installation is readying your home electrical system. Although QuietWarmth radiant heat is intended for DIY installation, if you aren’t well versed in electrical work then consult a professional electrician to wire the system. In a nutshell, QuietWarmth operates from a thermostat with a built-in GFCI outlet (highly recommended). The thermostat includes a sensor wire that nests in the floor system to detect the temperature. Each heating mat has a pair of lead wires that run all the way to the thermostat (via a conduit in the wall), where each mat is individually connected. And the thermostat controls it all.

When installing, follow all local building and electrical codes. While it is possible to branch the heat system from an existing circuit, the manufacturer advises against this. The size of the required power supply depends on the total square footage of heated padding. For example, one 3-by-10-foot panel requires 2.2 amps, one 3-by-5-foot panels require 1.1 amps, etc. The seven pads in my installation required 9 amps, so we installed a new dedicated 15-amp breaker for the heating system. We ran the power supply line from the breaker box, which happened to be located in the basement directly below the kitchen floor. Because everyone’s wiring situation is likely to differ, I won’t spend much time on the specifics of wiring, but be prepared to drill some holes and fish some wire. Depending on the amperage requirements of multiple pads, a relay may be required. However, QuietWarmth does supply detailed instructions as well as installation DVDs to help with the electrical work.
Heating Pad Placement
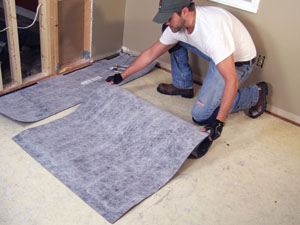
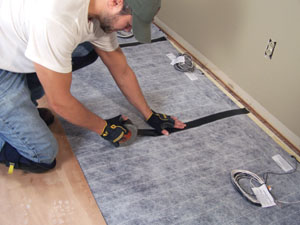
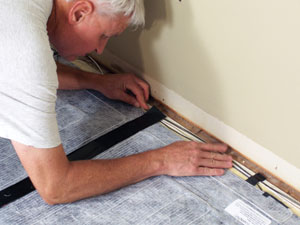
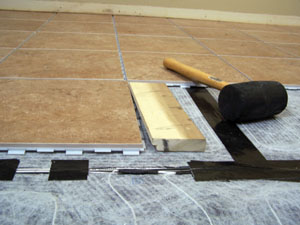
Installing the QuietWarmth heating pads is a fairly straightforward procedure. Unroll the mats so the wires in the underlayment are facing upward. Arrange the pad so the lead wires run to the nearest wall with an electrical box (you’ll make the connections later). Leave roughly 1 inch of floor space between the pads and the surrounding walls to have room to run the lead wires to the conduit. Tape the wires in place with thin strips of duct tape, and avoid running the lead wires over or under the mats. Also, avoid installing the heat mats beneath cabinets, built-ins or any furniture with a solid base, because the excessive heat buildup could damage the elements.

Butt each successive pad against each other, being careful not to overlap the pads, which will result in an uneven surface for the tile to sit on. Seal the butted seams with duct tape, but be careful not to tape over the heating wires. Be sure to use a utility-grade tape with an aggressive adhesive—Gorilla Tape, in our case. Never use staples on the QuietWarmth pads or wiring.
For areas where the heated pads are not installed, you’ll need a filler material to keep the floor even for the tile. I cut multiple sheets of contractor paper to size to fill in the gaps. This was a real hassle and took more time than I anticipated. If I were doing this system, I would use QuietWarmth’s “Insulayment” product, which is a non-heated underlayment padding designed just for this job.

Once all the pads and wires are taped in place, you can then rout the thermostst’s sensor wire about 6 to 12 inches into the underlayment, evenly spaced between two heating wires. It’s okay to notch out a 1/4-by-1-inch piece of padding to embed the sensor (but do not tape over the sensor probe).
Planning the Layout
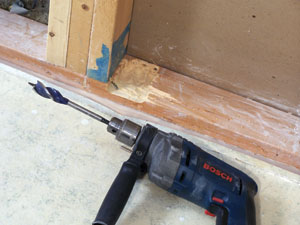
Before placing the tile, check the surrounding door jambs and casings for the appropriate clearance. If there isn’t enough room to accommodate the thickness of the tile, then you’ll have to undercut the jambs. In such a case, use a scrap piece of tile to guide a powered jamb saw—or Japanese-style pull saw—and ensure proper door clearance.
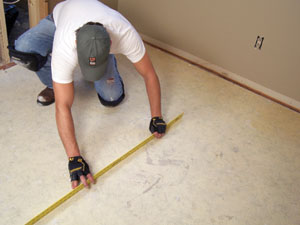
The next step is to layout your design. Avaíre tiles may be installed in straight, diagonal or staggered patterns. We settled with a straight pattern. I then measured the entire room from front to back, from left to right, including the areas where the countertops encroach into the floor space. Divide these measurements by the exposed face of the 12-inch tiles. The idea is to plan your layout so you don’t have a thin, awkward-looking tile along one edge of any wall.
For example, if you start a row with a full tile at one end of a 10-foot, 4-inch wall, then you’ll have enough room for 10 full tiles and a skinny tile at the end. If this is the case, then begin that row with a full tile in the center rather than end, working toward both walls. This will eliminate the single skinny end tile in favor of two larger cut tiles that will bookend the row. Take measurements in every direction and against every obstruction in the room, planning your layout accordingly.

Laying the Tile
Each tile is bordered on every side by plastic interlocking tabs that hook into the tabs of the mating tile. Align the tabs at the corner of each tile, and swing the tiles together so the remaining tabs “click” together in succession. The tile is non-directional, and can be installed to the right or left, but the interlocking tabs prevent inserting a tile between two tiles. Two great advantages of the tab system: Every grout joint is a uniform width, and the entire tile system stays square. Plus, because the Avaire tiles aren’t permanently attached to the subfloor, the system resists cracking as the substructure shifts.

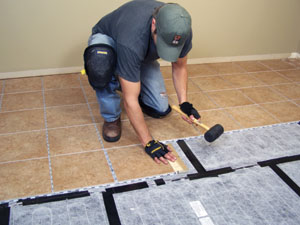
I found it easy to join the first edge of a tile by hand. But when interlocking the second edge of the tile with the tabs on an adjacent row, I needed a rubber mallet and tapping block for some extra encouragement. Be gentle when tapping the tiles into place. Place the tapping block squarely against the tile, never against the plastic tray. I made my block from a soft block of poplar, and cut a notch along its lower edge so the block met the porcelain clear of the plastic tabs.
You can install the tile one piece at a time, or row by row. You can also use the mallet and block to adjust the placement of a row once it has been interlocked.

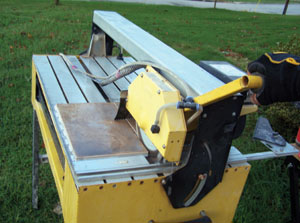
You’ll probably need to cut some tiles to fit along the ends of the rows. For that you’ll need a wet saw with a diamond blade. You can buy these at a hardware store, or rent one from most rental outlets. I borrowed one from my new neighbor, who happens to be a tile contractor (Thanks, Frank). Determine the size of the cut by laying a tile directly over the last full piece installed. Mark the lower piece using the top tabs of the tray as a guide, and cut along the line.
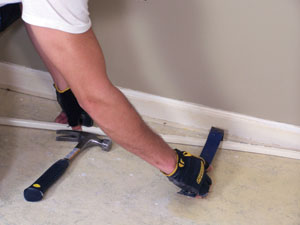
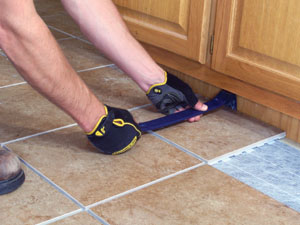
When placing a cut end tile against a wall, there is not enough room to tap it in with the mallet. In this case, carefully use a pry bar (preferably rubber-coated) to hook the edge of the tile and pull it away from the wall until the interlocking tabs snap together.
Flexible Grout
The floating nature of the Avaire tile means the floor has some degree of flexibility. This being the case, using Avaire Flexible Grout is a critical part of installing the tile. No other grout should be used, because it will crack as the floor flexes. Flexible grout comes ready to use right out of the bucket. A 9-pound pail will cover approximately 50-65 square feet of 12-inch tile

Holding a sharp-edged, rubber grout float at a 45-degree angle, spread the grout diagonally, pressing it firmly to ensure the joints are filled completely. Then, holding the float at a 90-degree angle, pull diagonally across joints removing excess grout from tile, using the edge like a squeegee. The angled stoke helps prevent the float from digging into the filled joints and pulling out the grout.

For best results, remove the grout haze as you work, using a sponge and a 5-gallon bucket of water. Just wipe up the grout film, rinse the sponge clean, wring it until damp and repeat. Lightly work the sponge in a circular motion, loosening grout residue while making the joints smooth. Change the cleaning water often. Check the work as you clean, and repair any low spots with additional grout.
Protect finished surface from traffic for at least 24 hours of drying, and then use a sponge and water to remove the final remaining grout haze. A complete cure requires 72 hours.
Ready to Warm
After installing your floor, use an ohmmeter to record the final resistance measurement of the QuietWarmth pads. The resistance should be within 10 percent of the factory recorded resistance. If not, call customer service—damage may have occurred during floor installation).
Route the lead elements up through the electrical conduit and into the 4-inch square thermostat box. Wire the leads in parallel (not series), black to black and white-to white. After all thermostatic controls are installed, power up the system to test the system’s operation. All that’s left is to enjoy the elegant appeal of genuine porcelain and the comfort of a heated floor.
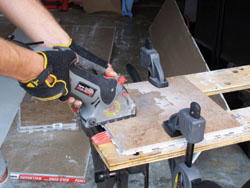
Crocodile Takes a Bite Out of Tile
For small cut-outs in tile, such as fitting pieces around a vent return, I used the new Croccodile mini saw from Clarke Power products fitted with a diamond blade. This mini circular saw, in the shape of an angle grinder, has the ability to cut through a variety of materials—including genuine porcelain—by simply changing the 3-1/4-inch-diameter blade. The blade spins at 4,000 rpm, which is nearly twice as fast as the conventional circular saw. The Crocodile saw weighs only 4 pounds and has an adjustable depth of cut from zero to 1-1/16 inch. The Crocodile Saw is bundled in a kit loaded in a multi-pocketed, soft-sided tool bag for storage. There’s a 24-inch laser level, wet/dry vac adapter, an auxiliary edge guide a variety of blades and more. For more information on the Crocodile Circular saw, visit Clarke Power products at www.clarkeusa.com.