

Specifying Aesthetically Pleasing Grids for Windows
Whether you’re ordering windows for a new home or considering replacing windows in an existing house, sooner or later you’re going to have to make a decision on grids. Think it’s a no-brainer? Think again. There are some definite considerations that should be taken into account when determining the configuration, color and style for window grids.
Decisions you make on grids can positively (or negatively) affect the overall look on both the home’s exterior and interior. For older homes, you may need to capture the historic character of the home’s style with grids fashioned to complement a previous era. For newer homes, you’ll want to consider if the window grids should be a design accent for the home, pull-together the architectural theme of the house and/or provide continuity of adjoining windows within a room or from one room to another.
“Grids can be considered the ‘cherry on top of the sundae’ for windows in the home,” says Simonton Windows. “Anyone can go with clear glass windows and eliminate grid decisions by ordering plain glass. However, those people may sacrifice style and an important design detail on the home.
“For those individuals who want grids on their windows, the key elements are to achieve balance with the grids and to select grid patterns that are aesthetically pleasing. Fortunately there are some tips to help even a novice correctly specify window grids.”
Tips for Success
Simonton offers these suggestions for understanding grids and how to specify them for windows:
Tip #1 – Know where the grids are located. Different window manufacturers attach grids in different ways to a window. The most popular ways are to place the grids between the panes of glass (which eliminates cleaning hassles), affix the grids on top of the glass with an adhesive or to have snap-in grids that are slipped into grooves at the top and bottom of the units.
Tip #2 – Consider the size of the window. If a window looks too large for a room or you want to accent the unit, it’s time to think about grids. Basically, grids (which can sometimes be called grills, grilles or muntins) divide a large window into smaller viewing units, called “lites.”
Tip #3 – Know your terms. Vertical grids go in an “up and down” direction on the glass of the window. Horizontal grids go “side to side” on the glass. You don’t necessarily need to have both vertical and horizontal grids in a window. Also, remember that the meeting rail (the horizontal portion of a Double or Single Hung window where the sashes come together) also provides a visual break in the lines of the window—basically between the top and bottom sash. This meeting rail acts as a horizontal grid in these types of windows.
Tip #4 – Understand your grid locations. Grids are defined within the sash of a window. For example, a Casement window has only one sash, while a Double Hung window has both a top and bottom sash. On the Double Hung, you may choose to have grids on both sash, on the top sash only, or on the bottom sash and not the top.
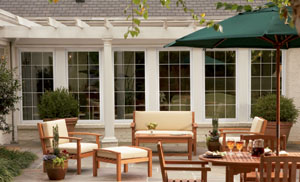
Tip #5 – Think of the whole house. Generally, grid patterns should match in all the windows on the same floor and on the same side of the house. This way, when you view the home from the exterior, you have a unified look.
Tip #6 – Visualize a grid. Take a sheet of notebook paper and bend it in half. The resulting size shows the average size of glass surrounded by grids. Lites in grid patterns should not generally be smaller than 8 inches in width and 6 inches in height. The larger the window size, the more “lites” of glass can be created using grids.
The “Rule of Rectangles” is good to keep in mind when determining grid configurations. This rule of thumb generally states that “less is best” and that grids should be proportional to a window’s size. Some guidelines for the best matches for window grids are:
Square window = Square pattern
Rectangular window = Rectangular pattern
As a cautionary warning, make sure to use the proper terminology when ordering window grids. Someone who has been in the window business may describe a pattern showing six lites of glass on the top of a double hung and six lites of glass on the bottom as a “six over six” window. However, in today’s window ordering system, this description would result in a checker box look that creates 36 small lites on the top of the sash and 36 small lites on the bottom of the glass! The correct way to specify this order would be to say “1V2H (All).” This indicates that you want one vertical grid and two horizontal grids on both of the sash, which would create a “six over six” look on the window.

All About Style
Grids themselves can be thin, flat, sculptured, grooved or even round. Different window manufacturers offer a variety of selections. In general, the more popular and common grids in a home are either flat grids or sculptured grids.
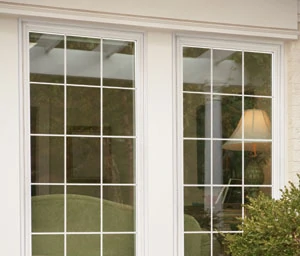
Once the grid style itself has been determined, the next step is to decide on the configuration of the grids. A large assortment of patterns exists that complement the style of most homes. The most common style of grid pattern is a Colonial Square pattern with an equal number of square or rectangle grids on both the top and bottom of the window’s sash.
A variation of the Colonial Square is the Cross Square. This simple style involves one vertical and one horizontal grid on the top half of a sash, creating a cross effect. For a Victorian style home, a Victorian grid style may work best. This involves one horizontal grid at the uppermost area of the window sash separated by several short vertical grids.
With today’s keen interest in Arts and Crafts style homes, both the Perimeter and Prairie style window grids have seen a growth in popularity. Both feature grids around the perimeter of the window intersecting at the top and bottom. For the Perimeter style, the grid encompasses the full window unit; for the Prairie style the grid encompasses each sash.
For a striking accent window or to complement an English Tudor style of home, a Diamond grid window is ideal. The grids are placed on an angle, to simulate diamond patterns on the entire surface of the window.
Helpful Hints
With years of experience behind them, the customer service representatives at Simonton Windows offer the following helpful hints for determining where grids will go in a window and how they’ll look:
Hint #1 – Make a mock-up. Before ordering grids, consider making a mock-up by applying masking tape to the glass of the windows where you think you’d like to have the grids. This way you can see where the grids would be and can make changes. Make sure to use tan masking tape. If you use blue painter’s tape, the blue color will blend with the sky and you won’t get the full impact of the grids.
Hint #2 – Go with the flow. If you already have a grid pattern established in the home and you’re just replacing a few windows, continue with the existing grid pattern to maintain overall eye appeal for the home.
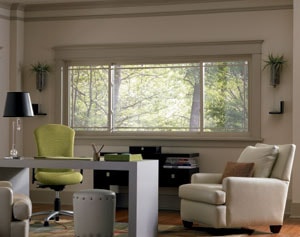
Hint #3 – Picture windows have special needs. If you have a picture window that showcases a spectacular view, consider leaving it without any grids. This works especially well if you have side windows with grids flanking the Picture window.
Hint #4 – Check out the neighborhood. Drive around and look at different windows in the homes of your neighbors. This can help you determine the difference grids can make to the overall appearance of a home and how you like different styles of grids.
Hint #5 – Match or contrast. You may want to either match the color of the grids to the frame of the window for a unified look, or boldly select a grid that strikingly contrasts the frame. Ask the window manufacturer you’re purchasing from what options exist. Many companies have standard color grids along with woodgrain and metallic options.
