Frame a New Home or Addition for Energy Efficiency.
Anyone contemplating an energy-efficient room addition or building their own home has likely given careful thought to the insulation. Which material is best? What thickness should be used? Is the R-value sufficient? But often they ignore the structural framing, which holds everything together. It doesn’t matter how good the insulation is if air leaks around it; the design and placement of the studs, joists, headers and other framing members affects how well the insulation can do its job.
Framing techniques your grandfather didn’t know, and your dad may not have taught you, can help reduce heating and cooling costs—and use less wood. The trick is to lay out the framing in ways that help eliminate gaps in the insulation and that lessen the number of thermal bridges through the framing members. While not difficult to build, these methods require advanced planning. Your building material dealer may be able to assist with software that can turn a basic home plan into detailed drawings showing energy-efficient framing.
Advanced Framing Methods
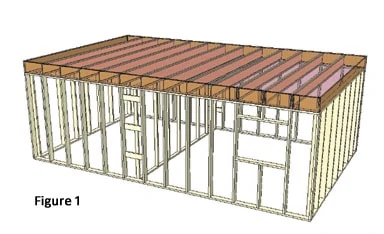
The National Association of Home Builders (NAHB) developed so-called “advanced framing” methods (also known as “optimum value engineering” or OVE) several decades ago. Don’t let the names frighten you. The practices are relatively straightforward, just different from how framing is traditionally constructed. They include (Figure 1):
• 2 x 6 studs at 24-inch on-center (OC) spacing
• Two-stud corners
• Ladder blocking at wall junctions
• Double rim board and insulating foam in lieu of headers
• In-line framing
• Single top plate
• Minimal trimmers or jack studs
As an example of the potential benefits of these methods, iLevel by Weyerhaeuser built a 24-inch OC demonstration wall with 2 x 6 studs that achieved an 86-percent increase in insulation volume and a 58-percent increase in the wall’s overall R-value, compared to a traditional 2 x 4 wall at 16-inch OC spacing. Further, the demonstration wall used 8 percent less wood volume. The U.S. Dept. of Energy estimates that advanced framing can reduce annual heating and cooling costs up to 5 percent, and for a 2,400-square-foot house, save up to $1,000 in materials.
2 x 6 Studs at 24-inch OC Spacing
Increasing stud spacing from the standard 16 inches OC to 24 inches increases the overall insulation in the wall cavity, as well as reduces the thermal bridges through the wood since fewer sticks are involved. Interestingly, the use of 2 x 6’s at 24 inches OC versus 2 x 4’s at 16 inches on center provides the necessary structural support using a similar volume of framing material. Yet, the wider spacing enables fewer interruptions in the insulation, while the deeper studs allow for two more inches of insulation between the outside and inside walls.
As with all advanced framing techniques, be sure to check local code requirements. In some instances, wider stud spacing is not allowed in areas with high winds or earthquakes. Your building material dealer or manufacturer may be able to assist with alternative framing approaches, such as pre-fabricated wood shear braces that can provide the necessary bracing while maintaining a narrow footprint within the wall.
Two-stud Corners
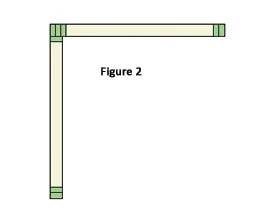
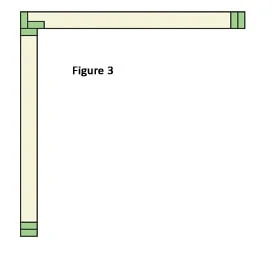
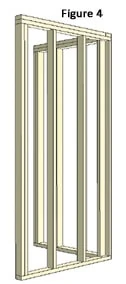
Corners typically involve three studs set back-to-back to create nailing points for the exterior sheathing or siding and interior drywall (Figure 2). However, using two studs placed perpendicular to one another provides the necessary structural support, while enabling attachment of the sheathing (Figures 3 and 4). For the drywall, one of the studs provides the nailing point for the material on one wall, and the material for the intersecting wall is attached with a drywall clip. This approach allows insulation to penetrate farther into the corner, instead of leaving gaps and a large thermal bridge created by multiple studs. Plus, it saves on material by eliminating one extra stud at each corner.
Ladder Blocking at Wall Junctions
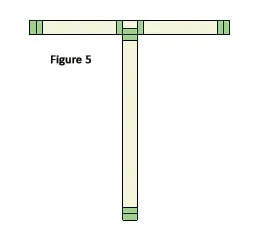
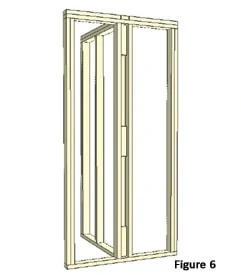
Where interior and exterior walls meet at “T” intersections, extra studs are usually added to provide a nailing surface to join the walls (Figures 5 & 6). The drawback is this creates narrow spaces along the exterior wall that are difficult to insulate effectively. The gaps are either too thin to place insulation in, providing a clear path for air to leak from the home, or require the insulation to be cut to a narrower width, which creates voids. As with three-stud corners, the additional studs on the exterior wall where it connects to the interior wall add to the thermal bridging.
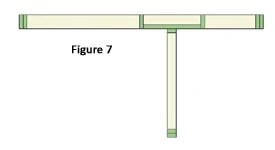
An effective solution is installing horizontal lumber pieces between studs to provide the attachment point for the intersecting wall, resulting in a “ladder”-like appearance (Figures 7 and 8). Scrap lumber can be used for this blocking, helping reduce overall material costs and using pieces that would otherwise end up in the dumpster.
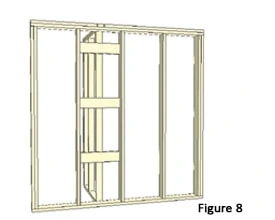
This approach allows the full width of insulation to be placed between the exterior wall studs. This is particularly effective if 2 x 6 studs are used in the exterior wall since there are still several inches of depth behind the ladder blocking for insulation.
Double Rim Board and Insulating Foam in Lieu of Headers
In some cases, door and window headers may not be structurally necessary, especially for interior, non-load-bearing walls. They may also be able to be sized smaller, or removed in some exterior walls. These are difficult judgments and calculations to make, but your building material dealer may have access to structural frame design software that can determine if a header is needed and avoid over-sizing it, while ensuring a sound structure. If in doubt, consult a structural engineer.
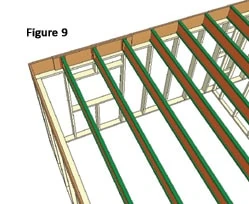
Addressing headers in exterior walls is important because they create a large thermal bridge for heat to escape. You may be able to eliminate headers by using a double thickness of rim board along the top of the wall (Figure 9). Adding 1/2-inch-thick insulating foam to the outside face of the rim provides an effective and simple barrier against heat gain and loss. Laminated strand lumber (LSL) rim board such as TimberStrand LSL works well for such applications since it is strong, dimensionally stable and warp-resistant.
An added benefit is that without a header, there is additional space for insulation above the window or door.
In-line Framing
Also called “stack framing,” in-line framing is a building method where studs, roof trusses and floor joists are all aligned at the same spacing. Because loads transfer directly downward from member to member, this can help reduce or eliminate headers and other materials (see “single top plate” discussion below for one such efficiency).
An added benefit for pride of craftsmanship is that the framing looks more orderly and well planned. Of course it will soon be covered up by exterior and interior finishes, but you will know you have done a good job inside and out.
Another effective practice is modular construction in which the entire addition or home is designed to 2-foot increments. Sizing the structure to match the framing member size helps eliminate scrap from all types of framing members and sheathing stock and can be an effective way to help reduce material costs.
Single Top Plate
If in-line framing is used, it may be structurally sufficient to use one, instead of two, top plates. The reason is that the loads from the roof members go straight down through the top plate into the wall studs. In essence, the top plate becomes a transfer point for the load, instead of a primary carrying member. As with headers, this is another instance where structural frame design software can help determine what is structurally appropriate. Be sure to consult code requirements for attaching the top plate at joints, corners and wall intersections to ensure lateral load transfer through the wall lines.
Minimal trimmers or Jack Studs
Jack studs/cripple studs typically are not necessary when headers are not used, which helps reduce materials and thermal bridges. The challenge can be a narrower nailing surface for siding and trim. If the nailable area is too small, you can add a 2 x 2 nailing block (scrap wood works well) to the outside edge of the window or door opening.
Plan Carefully for Energy Efficiency
Building an energy-efficient home or addition starts on the inside. Carefully planning the framing and insulation can help provide a tighter home that can save up to hundreds of dollars per year in heating and cooling costs. Plus, advanced framing techniques can help reduce material costs as well as dumpster fees since less wood is needed overall and because scrap can be used in places such as ladder blocking.
As with any project where structural design or construction is involved, consult a qualified design professional or engineer, and comply with all applicable building codes.
To get started, contact your building material dealer or framing product manufacturer for information on the design tools and support they offer.
Editor’s Note: Gregg Shea is the division technical support manager and John Stewart is a structural frame specialist for iLevel by Weyerhaeuser. iLevel offers a range of structural framing materials, technical support and software, including Javelin design software. www.ilevel.com, 888-453-8358.

SIDE NOTE 1
Drywall Decisions
Extreme How-To Blog guru, Hal Jones, posed a good question regarding drywall installation over 24-inch stud spacing, as suggested in this article: Are there any important considerations of which DIY’ers should be made aware when hanging panels on studs spaced greater than 16 inches?
The answer is “maybe.” You may have to upgrade the thickness of your drywall panels. Steer clear of 3/8-inch drywall and thinner panels in these applications to avoid sagging. Half-inch drywall can be installed on 24-inch OC framing, unless the panels are hung with their long edges parallel to the ceiling joints. Like 1/2-inch drywall, 5/8-inch thick drywall can be hung on 24-inch stud centers unless it is hung horizontally. The extra thickness improves resistance to sagging and absorbs more sound. In some areas, 5/8-inch drywall is required because of its superior fire resistance.
SIDE NOTE 2
Planning Framing with Software
If advanced framing offers greater energy efficiency and reduced materials, you may ask why it is taking decades for it to be adopted. The primary reason is builders know and trust the old methods. They have been passed down from generation to generation, and they work. With fewer sticks used in advanced framing, there is an obvious visible difference, which can create the perception that the home is not as stable. In reality, much of traditional framing is redundant, but you can’t start removing materials without due consideration. Structural frame design software can provide the peace of mind that the home is adequately designed for all necessary loads, while providing a straightforward way to implement advanced framing.
Fortunately, you do not need to be a software expert to make use of these tools. A design technician at your building material dealer can take basic plans or sketches and work up a detailed framing plan showing the placement of every member. They can provide plan printouts and material lists, as well as show you on screen a 3-D rendering that allows viewing of the frame from all angles. These plans can be shared with your building design professional for review and approval.
In addition to supporting advanced framing techniques, programs such as iLevel Javelin design software enable designers to solve potential building conflicts before construction begins. This helps eliminate rework in the field when you discover problems like a misplaced drop beam or column that is too short. The software allows for design of walls, floors and roofs as an integrated system, and accurately tracks gravity (vertical) loads from the ridge to the sill plate to help ensure a strong and stable structure.
The program also provides the flexibility to meet local building requirements and practices, as well as evolving standards. For example, in 2011 the U.S. Dept. of Energy (DOE) is scheduled to release Energy Star for Homes Version 3, which includes requirements for advanced framing (applicable to projects seeking an Energy Star rating). Designers can readily incorporate these and other optional or mandated standards.


