

A good friend of mine converted his unfinished basement into his own personal sports bar. Football and rugby memorabilia covered almost every square inch of the bare block walls, and the ceiling joists were spider-webbed with extension cords that power his multiple neon beer signs, three television sets and a stack of stereo components. We had a lot of fun in that loveably messy watering hole during his bachelor days, but my friend recently got married. While his new wife also enjoys the lax atmosphere of the barroom, she wasn’t too keen on the unorganized mess that was the décor. So, it was time to give the bar an overhaul – a complete renovation with a finished floor, ceiling and walls, and a bathroom.
However, the only plumbing stump on the concrete slab floor was located directly behind the bar we had built. And the bar wasn’t going anywhere. We wanted the bathroom located out of the way, beneath the staircase that led down to the basement. But without a drain outlet, my friend wasn’t sure how to go about installing the toilet. At first glance he was afraid the only way to tackle the project would be to hire a contractor to rip up the slab and install drain lines – a major project that came with a high price tag and a lot of at-home inconvenience.
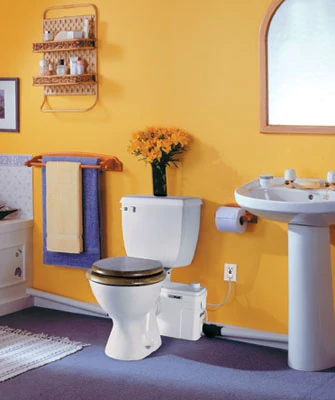
I suggested he take a different approach: Use a macerating toilet. A macerator looks very much like a standard toilet and occupies about the same amount of floor space. But instead of draining the flushed water down into the floor, the system transports it through a pump contained in a small box, typically located behind the toilet and against the wall. Much like a garbage disposal, the system uses a spinning “macerating” blade that liquefies the solid waste. The liquid waste is then forced through the discharge pipes by the pressure of the pump. The discharge pipes tie into the soil stack and voila! – you have a fully operational flushing toilet with no need to tear up the concrete slab. While the macerating toilets do cost more than a conventional toilet, the money saved over a conventional plumbing installation easily justifies the cost.

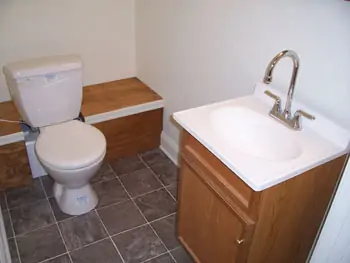
Macerating toilets can be installed on any finished floor in the home, wherever it is most convenient for the homeowner. These fixtures will pump up to 12 feet vertically or up to 150 feet horizontally (with minimum 1/4-inch per foot gravity fall). Install a macerator in a spare bedroom, a garage, inside a closet, or in this case, beneath a staircase in the basement. In fact, thanks to the quick work of M&R Plumbing, in less than four hours we had a fully operational flushing toilet installed where there was none before. Plus, there is no need to leave accessible space, as required by an in-floor sump system. And a properly sized macerating system can handle all the fixtures in a bathroom, including the sink, shower, tub and toilet, even on a septic-tank system.
How it Works
The unit installed in this case was the Saniplus model from SFA Saniflo Inc., which corners the market on macerating toilets. Saniflo is the only company currently manufacturing the macerating units, which the company pioneered nearly a half-century ago.
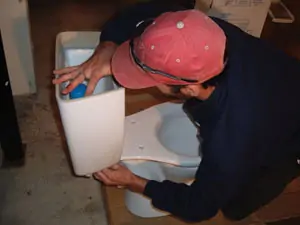
The Saniplus model arrived at the house as three major components: the macerator pump, the toilet bowl and the toilet tank. Just assemble the toilet as you would most standard models and attach the macerator to the rear of the bowl via a rubber connection gasket.
The macerator also consists of three major parts: the container, which houses the operating mechanism; a pressure chamber that automatically activates and deactivates; and the induction motor that drives the cutter blade and the impeller pump.
The Saniplus system can simultaneously receive wastewater from several sanitary fixtures, such as a shower, bathtub or hand basin, but only one toilet per unit. As the flush is operated, or as the bath or shower discharges, the water and waste matter enter the unit and the water level begins to rise, triggering the micro-switch in the pressure chamber. This in turn activates the motor and pump. The shredder blade rotates at 3,600 RPM, shredding the solid waste and passing on to the impeller pump. The impeller pump discharges the waste through a 3/4-inch outlet pipe to a sewer or soil stack.
While this may sound a bit complicated, the pump itself comes as a fully assembled and enclosed unit, so there’s no need to worry about putting that together.
Assembling a Macerating Toilet
Michael Martin and Brent Adkins, the plumbers that installed the Saniplus unit, began by assembling the bowl and tank. The unit comes complete with a “tank-to-bowl” kit that includes all the necessary fasteners. Their first step was to place the foam gasket on the spud of the flush valve and over the nut. Then, as with any conventional toilet, place the tank on top of the bowl. Insert the screws and the gasket through the tank and tighten nuts to the screws on the underside of the tank. Do not overtighten.
Next step is to prep the macerator. Fit the supplied adjustable discharge elbow to the top of the macerator by pressing the elbow in the round opening of the lid and turning it at the same time. The Saniplus macerating unit has a PVC hose connection. Use the supplied gear clamp to fasten the hose to the elbow, making sure not to kink or twist it, as this will restrict the flow. The other side of the hose will be connected to the discharge pipe system. At the lower corner of the macerator, Martin installed the supplied 1-1/2-inch gravity feed inlet to accept the drainage of the sink that was to be installed in the bathroom.


Martin connected the toilet to the macerator by placing the supplied stainless steel band onto the spigot outlet of the toilet bowl. He then placed the bowl in front of the macerator and pulled the accordion gasket all the way onto the rear spigot outlet. He pulled the band back over the accordion gasket and tightened the connections. This completed the assembly of the macerating toilet.
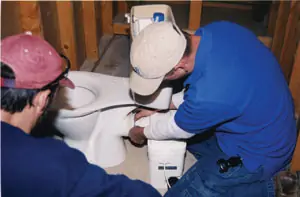
The pump connects to the toilet by means of an accordion gasket and a spigot outlet.Next step is to fasten all the inlet and outlet waste piping and fasten the toilet to the floor. Once you’ve determined the toilet’s location, mark the mounting holes and remove the unit. Bore two holes in the floor approximately 2-1/4-inch deep with a 5/16-inch masonry bit, and insert plastic plugs into the holes. Move the bowl over the holes, slip plastic protectors over the lag screws and insert. Tighten the lag screws and snap the plastic cover caps in place.
Connecting the System
While the toilet assembly is easily accomplished by the do-it-yourselfer, the plumbing installation gets a little more “extreme.” In fact, some localities prohibit plumbing work without a certified plumber’s license. And because a macerating toilet flushes “up,” there are some important things to consider when designing the drainage system.


For starters, be sure the system is located no more than 12 feet below sewer level or 150 feet from the soil stack. Also, if a vertical lift is necessary in the drainage piping, Saniflo recommends that it comes before any horizontal run. For every 3 feet of vertical distance the discharge pipe must travel, you must subtract 30 feet of horizontal distance from the maximum of 150-feet. Also, diagonal uphill pipe runs are frowned upon because solid materials will settle over time and block the pipe.


Additionally, all discharge pipe must be rigid wall pipe and protected against freezing. It must run at least 3 feet before switching to a larger-sized pipe to allow the macerator to operate properly. The discharge pipe must be connected to a sewer or soil stack with an approved T-Y fitting, using an appropriately sized reducing bushing for the discharge pipe connection.
Aside from that, the rest of the plumbing connections are utilized just as with any plumbing fixture. Just connect the toilet to a water supply by connecting the supply hose to the fill valve. Connect any gravity-feed drain lines, such as those from a bathroom sink, to the inlet tubes on the side of the macerator. Then connect the pump’s power cord to a single-phase 120-volt, 15-Amp electrical supply, and the new macerating toilet is ready for use.
FAQ’s for Up-flushing Toilets
Because macerating technology is still new to most American homeowners, questions are not uncommon. Saniflo offers a few of the most frequent queries:
How much water does the system use? All models in the Saniflo line are low-consumption water closets. Both the Sanipro and the Saniplus use 1.6 gallons per flush.
Can I install a shower or a bathtub? When installing a tub, you must create a 2-by-6-inch platform to allow for the installation of a P-trap and pipe with some gravity flow toward the macerating unit on the floor below.
Does the system need regular maintenance? No. The macerator motor has no gears or brushes to wear out. The motor is filled with oil and sealed for life. The bathroom will be changed out before the macerator needs replacement.
Can I hide the unit, drain pipes and vents in a wall? Yes, Saniflo does manufacture a 15-inch extension kit for installing the pump behind the wall.
Editor’s Note: Thanks to M&R Plumbing, LLC, for help with this article.
