Many a homeowner has ripped up old carpeting to discover a beautiful, if sometimes marred or worn, solid wood floor. The question then becomes whether to restore or recover. Repairing and refinishing either hardwood or softwood solid wood floors is doable for the Extreme How-To’er. But, doing the job requires time, work and specialized tools. The tools can be rented, although even renting is not cheap, and the tools are heavy and awkward to handle. You’ll need something to transport the tools, as the larger floor sanders won’t fit in an automobile trunk. And, along with size, there’s the weight to consider.
The most important consideration, however, is the floor. The first step is to carefully examine the floor. In some cases wood floors were put down as the only flooring, without a subfloor. In this case the floor will be extremely cold, and you may want to carpet for warmth. How much of the floor is damaged? Termites can cause problems when solid wood floors are covered with some materials. Are there other major rotting problems? The next factor is the species and type of floor. Can matching flooring be purchased to replace bad areas? If, on the other hand, the flooring is fairly well preserved, a solid subfloor exists, and you have time and a strong back, go for it.
It takes time to refinish a floor. After the floor is repaired and sanded, several coats of finish must be applied, with drying time between each coat. As a result, the room or rooms will be unoccupied for at least two weeks and under some weather conditions, maybe longer. If you’re doing more than one room and they join at the doorways, all rooms must be refinished at the same time to prevent start and stop marks at the doorways.
Remove all furniture, rugs and draperies from the room. If other remodeling is to be done, such as painting ceilings or walls, applying wallpaper, or major chores such as wallboard installation, do those chores first. The mess that drips on the floor will then be cleaned up during the sanding operation.
Tools
To remove and repair boards you’ll need a circular saw, chisel, pry bar, hand saw, block plane, utility knife and drill. Other hand tools needed include: a broom, hammer, nail set, nail puller, pliers, long-handled paint scraper, putty knife, hand sanding block and sandpaper.
For removing old finish and sanding, use a rented drum or belt wood-floor sanding machine. The best models have a separate lever for raising and lowering the sanding drum. This provides additional control during the sanding operation. You will also need sanding belts, and it could take several depending on the condition of the floor, size and number of rooms. An edger or spinner sander with appropriate sanding discs is also required, and again you’ll need several types of discs, including coarse, medium and fine. A 200-rpm or less, 15- to 17-inch-diameter floor polisher with a sanding-disc attachment is required. Plus, you’ll need sanding discs or screens with fine grit, as well as buffing pads. A good shop vacuum is a must for many operations. And a dust mask and hearing protection should be worn during all machine-driven sanding operations. Apply finishes with rags, brushes or preferably with a long-handled lamb’s wool applicator.
Repairing Damaged Flooring
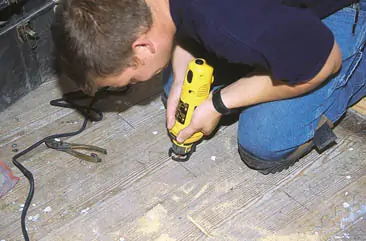
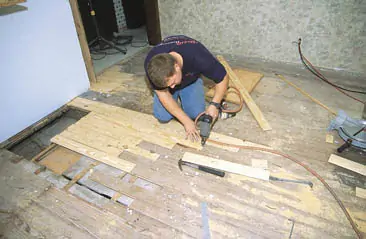
Sweep all debris off the floor and examine carefully. Tighten loose boards by face nailing with size 6D or 8D flooring nails, preferably into the joists. Countersink the nails well below the wood surface with a nail set. Then get down on your hands and knees, and examine the flooring for any exposed nails or nails not driven well below the wood surface. (Note: The sanding process can be a fire hazard if the belt strikes exposed nails or carpet staples. Sparks can be directed dangerously into the sander dust bag.)
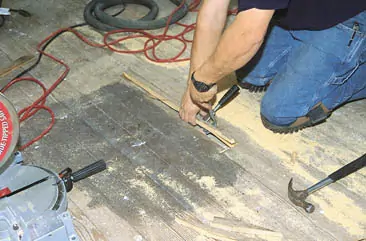
Replace any damaged or defective flooring boards. Use a plunge router or rotary tool such as the RotoZip to cut across the ends of the boards that must be removed. Make sure you stagger the lengths of any joining boards that must be removed.
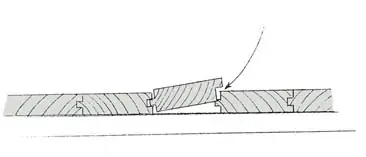
Use a circular saw to make parallel cuts about 1 inch apart, in the center of the board or boards to be removed. Make the cuts as close to the routed cuts as possible. Then use a chisel to finish the cuts. Remove the center cut-out strip. Solid flooring is tongue-and-grooved, and this allows you to pry the outer edges away and remove them.
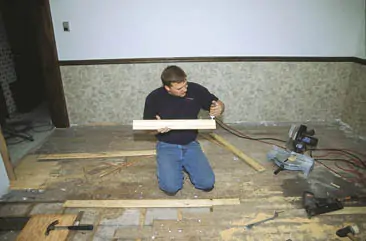
Cut the replacement board to the correct length and cut off the lower edge of the grooved side. This allows you to push the tongue of the new board into the groove of the old board, and drop the overlapping edge down in place on the tongue of the other joining board.
Fasten in place with glue and face-nail with size 6D or 8D flooring nails. Set the nails well below the wood surface. Use prepared wood putty to fill any cracks between the newly installed and old boards and to fill over the nail heads.
Remove the base shoe around the entire room using a wood wedge behind a pry bar to protect the baseboard from damage by the pry bar. If the base molding and base shoe have been painted many times, you may be better off replacing it. If necessary the base shoe can be left in place, but this will require more careful edge finishing.
Most flooring, especially hardwoods such as oak, are 3/4-inch thick when they are laid. They can usually be sanded and refinished several times. Thinner, 3/8- or 1/2-inch-thick floors should be approached with caution. Repeated sanding can wear down the joining edge and expose nails. If the flooring is laminated, professional help is necessary. If unsure of the floor’s thickness, remove a floor-heating register or the shoe mold and baseboard to expose an edge of the flooring so it can be measured.
Sanding
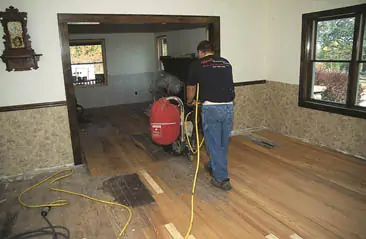
Remove the old finish using the drum floor sander. A very coarse, “open coat” sandpaper is often required for this operation. But first, try a regular paper to determine if it will suffice. If the floor has been painted several times, it may require the use of a paint stripper to first uncover the wood surface.
The amount of sanding required depends on the condition of the old floor and the thickness of the finish and wax buildup. A floor with finish that is in very good shape, with only a few dents and scratches and with no wax buildup, will usually only require one pass with a disc sander. An old floor that is scarred, dished, or has a number of finish or wax coats may require several passes with a belt floor sander. If the floor is badly scarred or abused, as with burn marks from fireplaces, leave some of the blemishes in the floor. Too much sanding will remove too much flooring material.
For an average floor, make the first cut at a 45-degree angle to the floor direction with medium-grit sand paper. This will level the floor and remove 90 percent of the finish. Then sand in the longest direction of the room, starting at the right-side wall. Begin about two-thirds the length of the room. Start the motor with the drum raised off the floor, and walk slowly forward at an even pace, easing the drum down to the floor. As you approach the wall at the end of the pass, gradually raise the drum off the floor. It’s a good idea to practice the technique before actually sanding. Then repeat the same path you made on the forward cut by pulling the machine backward and easing the drum back down to the floor as you begin a backward pass. Once you reach your original starting point, ease the machine to the left about 4 inches and repeat the process. Move to the left about 4 inches each time. You only sand 3 to 4 inches of unsanded floor with each pass. Once you’ve sanded two-thirds of the floor, turn the machine around and sand the remaining third.
The next step is to use the edger to sand along the baseboards, into the corners, inside the closets and other areas the drum sander can’t reach. Use the edger in quarter-circle patterns at the end walls, overlapping into the drum sanded area 4 to 6 inches and following the direction of the wood grain. Along walls, parallel to the flooring direction, move back and forth with the direction of the flooring.
After drum sanding the floor with coarse-grit sandpaper, repeat with a medium-grit paper. Finally, go over the entire floor with fine-grit sandpaper on the drum sander and use fine-grit sandpaper for the edger as well. As the edger leaves the corners, use a hand scraper to clean these areas. Always scrape in the direction of the flooring grain. A sanding block can also be used to finish the tight spots. Normally, three sanding cuts are required, and it’s best to fill all nail holes, blemishes and cracks before the final fine-sanding operation. Use a commercially prepared wood flooring filler. On older floors with numerous cracks, it may be necessary to trowel the entire floor. Allow the filler to dry overnight before the final sanding.
Finishing
It’s best to apply the first coat of finish the same day the last sanding cut is made. This prevents a raised grain condition and a rough floor. Wipe down or vacuum all dust from windowsills, doors, door frames and trim. Spot-fill any missed cracks or nail holes. When the fills are dry, sand with fine sandpaper.
A wide variety of materials can be used to finish the floor. Follow all manufacturers’ directions concerning compatibility with other products, safety concerns and disposal. Following are some of the choices:
Penetrating Sealer: This sealer soaks into the wood pores and hardens to seal the floor. It wears only as the wood wears and will not chip or scratch. This finish is maintained by thin applications of wax.
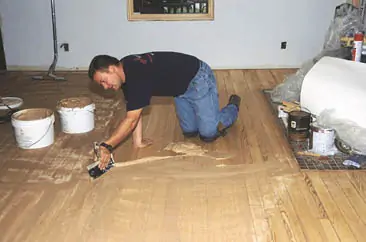
Stain or Stain Sealer Combinations: Apply stains if other than a natural finish is desired. An oil stain with a penetrating sealer combined is generally the easiest to apply. This combination colors and seals the floor in one application. Stain requires careful application to ensure even coloration and prevent lap marks. Stains are best applied using a lamb’s wool applicator. Spread generously in the direction of the grain and wipe up any excess. Allow the first coat to dry overnight, and then use a fiber buffing pad on a floor buffer to buff the floor. Vacuum and clean away dust residue. If the sealer wax finish has been applied, apply a second coat, allow to dry, then buff and clean. Then apply paste or liquid buffing wax.
Surface Finishes: Surface finishes remain on the surface of the wood to provide a protective coating. These include polyurethane (Swedish Finish), moisture-cured urethane and water-based urethanes. The most common surface finish is the oil-modified polyurethane. Polyurethane is durable and moisture-resistant and generally the easiest finish to apply. This finish does tend to become amber as it ages. Water-based finishes including urethane and/or acrylic combinations are clear, durable and resist yellowing. They have some advantages over oil-modified urethanes. They are nonflammable at the time of application, they do not have the odor of mineral spirits and they dry much faster. Other finishes, such as moisture-cured urethane, are best applied by professionals.
If using oil-modified polyurethane, make sure all open flames are extinguished, including pilot lights and air conditioning/ heating units. To apply with an applicator, fill the applicator and tap off the excess. Apply across the strip direction in short strokes. Then straighten the cross strokes with a single gliding stroke along the strip direction. Always work toward the previously wet area, feathering into the previously applied wet area and lifting up the applicator as you feather into it. Don’t attempt to retouch areas once the finish has been skimmed over. Allow to dry overnight or until completely dry. Lightly buff the dry finish with No. 2 steel wool or a used 120-grit sanding screen. Use the latter for water-based finishes to prevent rust spots from steel-wool fibers. Vacuum all dust and touch up the floor with a towel dampened with water and mineral spirits. Allow it to dry and apply a second coat. Apply a third coat if desired, buffing between the second and third coats.
Most water-based finishes are applied by pouring the finish in a small “river” along the starting wall. Use the applicator to spread the material along the direction of the flooring the length of the room, with the excess directed toward the unfinished area. As the finish is used, pour more material. Follow manufacturers’ directions for buffing.


