

Suspension systems are a classic example of how we end up with certain equipment on our stock vehicles. It’s all about compromise. With suspension the compromise is often between ride and performance. Generally, a car that handles corners well with a minimum of body roll is also rough riding. Since the average consumer would rather be comfortable than take a corner at speed, the suspension is designed to favor ride comfort.
Other suspension compromises are price related. Quality costs. Lighter and stronger materials are more expensive. Adjustable suspension components have more parts, which makes them less cost-effective for the manufacturer.
At the same time, closer tolerances require more time and specialized equipment, which also comes with a price tag. Most car manufacturers watch costs-per-vehicle like a hawk watches a mouse ambling across a field; if a cost for a part can be reduced while keeping the average buyer happy, cost wins.
Companies like Subaru, however, are the exception to that rule. They do offer multiple levels of performance in their car models and price them accordingly. Subaru’s Impreza line has a base model, a sportier WRX and a STi version. The WRX handles better than the base model, but for another $10k over the WRX price you can buy a WRX STi, which comes with a number of performance upgrades.

For enthusiasts who can’t afford the race version, or who want more control over performance components like suspension, buying a base model and adding aftermarket parts makes a lot of sense. Subaru in particular can be a good choice because OEM components from the various model levels can be quite interchangeable, and several specialty companies make performance aftermarket parts that fit the Impreza.
Upgrading the coilover suspension is one way enthusiasts improve the handling characteristics of their cars. Coilover is short for “coil spring over shock absorber.”
These aftermarket upgrades lower the ride height and reduce body roll for more precise cornering. Many allow for adjustments in height, suspension dampening, and wheel camber—handling turning areas not available with stock strut systems.
Smaller overall coil spring diameters can also make more room for wider wheels with greater offset to fit wider tires inside the fenders.
Only the Beginning
Before ordering suspension parts for your car, make sure you understand that you will be giving up some ride characteristics that the very smart engineers put into the car originally.
Also, the old domino theory applies here; one thing tends to lead to another when modifying your car. For optimal results, coilovers need a new wheel and tire combination because increased cornering speeds require a speed-rated tire with lower profile side walls. Strut tower braces and anti-sway bars also add stiffness to the set up.
Suspension changes also affect alignment, so the car will need to be taken to a shop with the proper calibrating equipment to make sure those new tires don’t go south in the first month your car is back on the street.
We recently did a home-garage install of a set of aftermarket coilovers as part of a project build on a 1993 Subaru Impreza wagon. This Impreza is also receiving a high-performance engine, bigger brakes and more suspension parts. Here’s how we did the initial coilover suspension install:
1: We used a set of four previously raced Tein coilovers to make the suspension change.
2: Break lug nuts loose while the tires are still on the ground.
3: Chock the rear wheels and jack up the front of the car by aligning a floor jack with the jack plate just behind the oil pan in the center of the car. Place properly rated jack stands at the jacking points on the outer rails on both sides of the car.
4: Jack up the rear of the car by aligning a floor jack with the rear differential. Place jack stands on both sides of the rear of the car in the designated positions.

5: Remove the lug nuts and remove all four wheels.
6: At the front, break loose the nuts holding the stock struts to the spindle assembly.
7: Remove the nuts and bolts from the lower end of the struts.
8: Remove the nuts from the top of the strut towers inside the engine bay.
9: Locate the brake line bracket near the back at the bottom of the strut.
10: Use a hacksaw to carefully cut the bracket level with the top of the brake line.

11: Use pliers to bend the bracket back enough to allow the brake line to clear.
12: Remove the brake line from the bracket on the stock strut.

13. Remove the stock strut.
14: Check the label on the coilover components to make sure you have the correct one for each corner of the car. In this case “GC8” denotes the model of car while “FR” indicates front right.
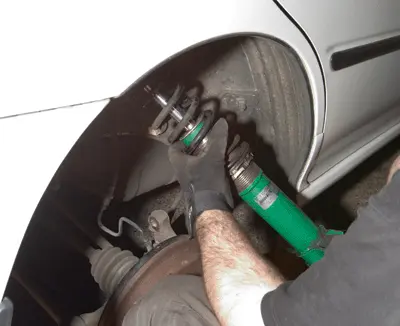
15: Feed the coilover up through the strut tower opening and start a nut on each bolt.
16: Align the mounting holes on the coilover with those on the spindle assembly.
17: A floor jack placed under the A-arm can help in aligning the bolt holes.
18: With bolts in place, crank down the nuts with a socket while holding the bolt heads with a box-end wrench.
19: Put the brake line in position on the bracket and slide the retainer clips into place. Tap the retainer clip into position using a hammer.
20: Go back to the top of the strut tower and finish tightening the nuts.
21: Reinstall the wheels and tires. Remove the car from the jack stands in reverse order of how you started (back first, jack at rear dif; then front, jack at jack plate). Use a torque wrench to tighten the lug nuts to the manufacturers recommended torque setting. Bring all of the nuts part way to spec while using a cross pattern to avoid tightening adjacent nuts without first torquing a nut across the wheel. Check for tire clearance inside the fenders. Have the alignment checked and adjusted immediately.
SIDE NOTE 1
Tools and Materials:
- aftermarket coilovers
- sockets (metric)
- wrenches (metric)
- hammer
- screwdrivers
- hacksaw
- pliers
- floor jack
- jack stands
- torque wrench
SIDE NOTE 2
In Search of Strut Towers
Repeat the process for the other corners of the car. The process is very similar for the rear of the car with these added hints: It takes a little search to find the top of the rear strut towers, which on the wagon are hidden below this speaker cover. Use a screw driver to pop out the round trim cap above the front inside strut tower bolt. Remove the insulating cover cap from above the strut tower and below the interior trim pieces. Each of the strut tower bolts should now be accessible. Use a deep socket of a regular socket with an extension to remove the nuts from the strut tower bolts. As with the front, feed the aftermarket coilover up under the fender well and into position at the top. Start the nuts on the top of the strut tower but do not tighten until the lower bolts are attached. Replace the trim covers when all components have been tightened.
