Fine-tuning Engine Efficiency with Electronic Controls.
By Tim Walton-
The single biggest advance in fuel-injection technology has been electronic control systems. The introduction of computer management has improved engine efficiency and fuel economy while also adding more power and torque. Turbo-charged diesel engines have benefitted the most from these innovations. When combined with free-flowing intake and exhaust systems, fine-tuning for more power or fuel economy becomes a very viable goal for a turbo-charged diesel.
The factory tune is designed to meet specific power and emission goals. Specially designed around test setups, which rate the vehicle on a variety of benchmarks, these stock settings may not match your particular situation. Optimal tuning for your personal driving style can be achieved with an aftermarket tuning system, which can unleash more power, give you better throttle response, or squeeze out more miles per tank of fuel.
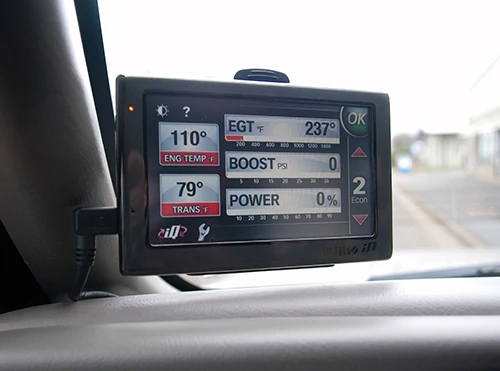
Banks is a well-known electronic tuner company in the diesel market and for good reason. The Banks Six-Gun diesel tuner not only adds up to 155 horsepower and 385 lb-ft. of torque (with the recommended airflow improvements), but also features the company’s CleanTune technology to provide all that power without the soot. Banks ActiveSafety technology monitors your engine and transmission with built-in safeguards. Plus, the iQ Dashboard PC always gives you custom tune-ability, and you can change power levels with a touch of the screen.
Here’s how we installed the Banks Six-Gun Tuner on a Duramax.
Step by Step Installation
Removing the passenger-side fender liner allows access to the exhaust manifold for installing the pyrometer, which adds extra safety to the programmer setup.
When drilling the access hole, use grease on the end of the drill bit to catch the metal shavings and reduce cleanup. Use a liberal amount of grease. Clean and reapply fresh grease to make sure it continues to catch shavings.
Using the grease leaves a clean hole without debris inside the exhaust manifold, which is ready to be tapped. Use the correct size of bit for the tap. Starting with smaller sizes and stepping up size can help by reducing drill torque and minimizing friction.
Make sure the tap is straight and square, which will affect the angle of the bung and sensor once installed. A socket adapter with an extension can be used in place of the conventional “T” wrench to get past obstructions.
Once you’ve tapped the hole and used a magnet to ensure you got all the metal shavings, insert the bung that will accept the sensor into the manifold.
The exhaust gas temperature (EGT) sensor tightens into the already inserted bung.
After routing the lead-wire for the EGT across the engine bay and safely down the engine to the EGT sensor, you can connect the wires. Be sure to put shrink-wrap over the wires first so you can seal them from the elements.
Run the mass air flow (MAF) harness adapter and put the stock plug into the Banks male plug. The Banks female connector plugs into the sensor.
Find the large engine plugs on the driver’s side of the engine bay. Figure out which way will make the plugs sit close to the stock configuration and out of the way.
Connect the EGT lead-wire to the harness on this side of the engine bay, making sure to feed the shrink-wrap over the wiring prior to connecting.
Use a heat gun to shrink the wrap onto the wires.
Secure the control unit of the Banks Six-Gun using the provided tape and hook-and-loop style fastener. Locate the rubber grommet in the driver’s side firewall and feed the wiring harness through the firewall into the passenger compartment.
Remove the screws from the lower portion of the interior panel (near the parking brake and close to the center console) to access the under-dash area for fastening the wires and components.
Connect the Banks OBD II interface connector harness to the harness you ran through the firewall from the Power Tuner.
Plug the Banks OBD II interface into the OBD II port on the truck. This allows the unit to use and display a variety of parameters from the pickup’s stock computer control unit.
Use the supplied cable ties to secure the Banks iQ Bridge Module and other wiring out of the way from damage or potential interference with your feet and pedals. Route the power connector for the IQ unit up the weather stripping edge of the dash to wherever you’re going to mount the unit.
Find a good mounting spot that doesn’t block your vision but allows you to easily see the gauges and settings the iQ has to offer. The functions of the iQ all work wirelessly so you only need the unit to be plugged in to power it.


![[01] TW_12_0121](https://extremehowto.com/wp-content/uploads/2015/06/01-TW_12_0121.webp)
![[02] TW_12_0132](https://extremehowto.com/wp-content/uploads/2015/06/02-TW_12_0132.webp)
![[03] TW_12_0133](https://extremehowto.com/wp-content/uploads/2015/06/03-TW_12_0133.webp)
![[04] TW_12_0134](https://extremehowto.com/wp-content/uploads/2015/06/04-TW_12_0134.webp)
![[05] TW_12_0135](https://extremehowto.com/wp-content/uploads/2015/06/05-TW_12_0135.webp)
![[06] TW_12_0136](https://extremehowto.com/wp-content/uploads/2015/06/06-TW_12_0136.webp)
![[07] TW_12_0137](https://extremehowto.com/wp-content/uploads/2015/06/07-TW_12_0137.webp)
![[08] TW_12_0140](https://extremehowto.com/wp-content/uploads/2015/06/08-TW_12_0140.webp)
![[09] TW_12_0143](https://extremehowto.com/wp-content/uploads/2015/06/09-TW_12_0143.webp)
![[10] TW_12_0148](https://extremehowto.com/wp-content/uploads/2015/06/10-TW_12_0148.webp)
![[11] TW_12_0153](https://extremehowto.com/wp-content/uploads/2015/06/11-TW_12_0153.webp)
![[12] TW_12_0157](https://extremehowto.com/wp-content/uploads/2015/06/12-TW_12_0157.webp)
![[13] TW_12_0162](https://extremehowto.com/wp-content/uploads/2015/06/13-TW_12_0162.webp)
![[14] TW_12_0166](https://extremehowto.com/wp-content/uploads/2015/06/14-TW_12_0166.webp)
![[15] TW_12_0167](https://extremehowto.com/wp-content/uploads/2015/06/15-TW_12_0167.webp)
![[16] TW_12_0168](https://extremehowto.com/wp-content/uploads/2015/06/16-TW_12_0168.webp)
![[17] TW_12_0192](https://extremehowto.com/wp-content/uploads/2015/06/17-TW_12_0192.webp)
