

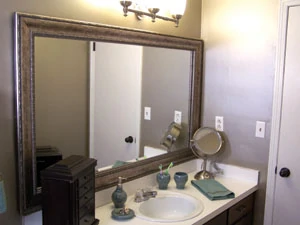
Retrofit mirror frames make bathroom remodeling easier.
When it comes to DIY bathroom remodeling, most people agree that the easier the job, the better. When researching a simple way to dress up a bathroom mirror, our staff came across a couple of easy-to-install products that can really add pizzazz to an otherwise unremarkable, builder-grade mirror.
MirrorMate Frames
One artfully decorative solution to retrofitting a mirror frame comes from MirrorMate LLC. Homeowners can choose from more than 40 frame styles at www.mirrormate.com. Simply provide the company the dimensions of your mirror, along with its clearance from surrounding walls, and MirrorMate will be custom cut the frame to fit the mirror. The company ships the frame directly to the homeowner, where it can be installed in under an hour directly to the mirror, with no need to remove the mirror from the wall. The frame is milled with channels on the rear that cover all clips and edges.


To install the MirrorMate Frame, first lay all four frame sections face down on a sturdy, flat surface and arrange the pieces as they should be assembled.

Each mirror installation kit includes plastic corner connectors, glue, adhesive foam tape, replacement mirror clips and cardboard placement corners. Remove the plastic corner connectors and find their corresponding slots. (There may be different connector lengths for different slot depths, depending on the style of frame).


Apply glue to the adjoining miters, spreading it evenly to coat the ends entirely. Be sure to lay down paper or cloth to catch your drips. Align the glued ends and insert the plastic connectors into the corresponding slots. Press in with your thumb and then use a small hammer to tap the connectors flush with the rear of the frame. Repeat the process for each corner.
Turn the frame over and inspect the joints. Make sure each corner is properly aligned and adjust accordingly before the glue dries. Wipe away any excess adhesive with a damp cloth.


Allow the frame to dry for at least an hour. Some times a frame corner will show a thin white line at the miter, even when professionally constructed. If this is the case, you can easily disguise it like the pros do—use a water-based marker with a similar color as the frame to stain the miter line.
Once the glue is dry, the frame is ready for installation. Begin by folding the two cardboard placement corners according to the instructions provided with the kit. Apply the short strips of two-sided foam tape to the rear of the corners.

Then carry the frame to the bathroom and test-fit the frame, ensuring the rear channels fit over the mirror clips. The back of the frame should contact the mirror surface on all sides.
Note: If your mirror clips don’t fit into the frame’s channels, you may have to replace the clips with the smaller clips that are included with the installation kit. Secure the mirror with at least two clips on both the top and bottom that mount into wall studs. Additional clips that miss a stud should be anchored into the plaster or drywall with the appropriate plastic screw anchors.

Position the frame against the mirror so that each edge contacts the mirror and use a hand level to level the frame on the wall. When you’re confident in the mirror’s position, apply the two placement corners inside the upper right and left corners of the frame, adhering them to the face of the mirror. You’ll need some assistance to hold the frame while placing the cardboard corners.

Now, remove the frame but leave the cardboard templates in place. Peel off the backing from the two-sided adhesive strips and place them evenly along the rear of the frame sections. These strips are what anchor the frame to the mirror.

Return to the bathroom mirror and carefully place the mirror back over the cardboard placement corners. Before sticking it to the wall, double-check with the level. Then press the frame firmly against the mirror to permanently affix it.
That’s all there is to it—just step back and admire the beauty.
MirrEdge
Another framing alternative is MirrEdge (www.mirredge.com), which is now available at most Lowe’s Home Improvement Stores. MirrEdge is the quickest-to-install mirror frame product on the market. This is a system of edge strips and corner plates that are easy to apply around the perimeter of your mirror, while it remains in place on the wall. The framing strips are made from either woodgrain-finished polymer or Mirror Acrylic to match the mirror face. In addition to the clear acrylic mirror finish, choose from eight woodgrain tones, from contemporary Royal Oak to the new Decorative Dove White. Select either ornate or contemporary corner plates to make installation virtually effortless. The 1-1/2-inch wide mirror acrylic strips are available in 36-, 48-, 60-inch Lengths. The 1-1/2-inch wide woodgrain polymer strips are available in 36- and 59-1/2-inch lengths.


The only tools required to install the frames are a razor knife and a measuring tape, and the job can be completed in four easy steps. First, measure the mirror. Then measure and mark the MirrEdge strips to size. Score the strips at the desired length with a razor knife. Firmly hold the strip and snap it along the scored line. Lastly, apply adhesive pads and glue to the rear of the strips and set in place. You can transform a mirror of any size, and the cost is less than $50 for mirrors up to 63 by 63 inches.
