


When doing woodworking there are many instances in which solid wood pieces are needed in widths wider than those that are available to make a cabinet side or a table top. Or, in the case of butcher blocks, wood pieces need to be glued together to create thickness rather than width. In each instance, smaller pieces of wood must be joined to make wider pieces. Several tactics can be used, depending on the desired end result of the piece you are constructing.
Metal Fasteners
Simple wood shelves and “rough,” or unfinished, projects can easily be joined by using a number of metal fasteners. Corrugated fasteners are ribbed metal pieces with one sharpened end, and they are usually used for fastening rough-framed projects where appearance is not important. They can also be used for edge-fastening stock, as well as on wide stock for some rough work. The wood pieces are held tightly together and the fastener is started in one piece of the wood. Then, the fastener is started in the other piece and tapped on alternate sides until it is driven in place. The fastener should penetrate to about half the wood’s thickness. Corrugated fasteners should not be positioned with the wood grain as they will split the wood, and they should not be used with hard woods. For proper holding power, drive corrugated fasteners in from both sides of the stock, staggering them along the joint line.
Chevrons are used in much the same way as corrugated fasteners. Chevrons are designed to recess below the surface of the wood, and then they can be covered with wood putty. They are also available in an L-shape that gives a bit more holding power on corner joints. “Skotch” fasteners are a flat piece of metal with sharp feet on both ends. These are simply driven down into the wood to provide holding power. Teenuts are threaded metal nuts that are actually driven into the wood: A bolt hole is drilled first, and then the metal threaded “nut,” which has teeth on one side, is driven into place. Turning the bolt from the opposite side pulls the nut tightly in place, holding the two pieces of wood together. A similar fastening device is the Rosan wood insert, which is threaded to receive a common stove bolt. The “Tite-Joint” is another threaded-type fastener, but it is a bit more complicated. The Tite-Joint also bolts two pieces of wood together but, in this case, the bolt is built into the fastener. Hanger bolts are used to fasten table legs in place. They have a wood-screw thread on one end and a bolt thread on the other. Hanger bolts can be bolted in placed or turned into metal leg-holding plates. Dowel screws are like hanger bolts except they have wood screw threads on each end. Dowel screws are installed by boring slightly under-sized holes and then turning the screw threads into both pieces. Metal corner braces can be used to brace a 90-degree corner. They can also be used as a holding fastener for a leg.
Glue and Wood Fasteners
In many instances glue and wooden fasteners are used to join smaller wood pieces to create a wide stock for things like wooden tabletops or cabinet or furniture sides, ends and even tops. While glue alone can be used, a stronger, longer-lasting joint utilizes glue as well as some sort of wooden fastener.
Tongue-and-Groove
One of the most common means of joining wood is with a tongue-and-groove joint, in which a groove is cut on one piece of wood and a matching tongue is cut on another piece. When the job calls for several pieces of wood that must be joined together, a tongue is cut on one side of the wood with a groove on the opposite side to permit insertion. Both cuts can be made using a dado head on a radial-arm or table saw, or with a router or shaper. The tongue should be just slightly smaller than the groove to allow for a glue line all around.
Biscuit Joinery
Another method of joining wood utilizes a plate or biscuit joiner and small wooden discs. A plate or biscuit joiner is a portable power tool that uses a blade pushed into the wood stock to cut a disc-shaped slot in the joining edges of the wood. Small wood “biscuits” are then glued into these slots. Quality cutters can be adjusted to cut slots to join wood in several different joints, including edge-to-edge, butt, T, miter, flat miter and hinge.
The first step in this process is to align the wood pieces and mark across the joint to locate the positions for the biscuits. Place the workpiece on a flat, smooth surface so the bottom of the plate cutter is flat with the bottom of the work surface. Turn on the plate cutter, and push it into the wood stock to make the cuts. A stop block fastened to the bench behind the workpiece will keep the workpiece from shifting or sliding during the cutting operation. Once all the pieces have slots cut for the biscuits, the pieces are then glued together with the biscuits in the slots. The biscuits fit semi-snug into the slots, which allows for proper alignment of the wooden pieces and glue.
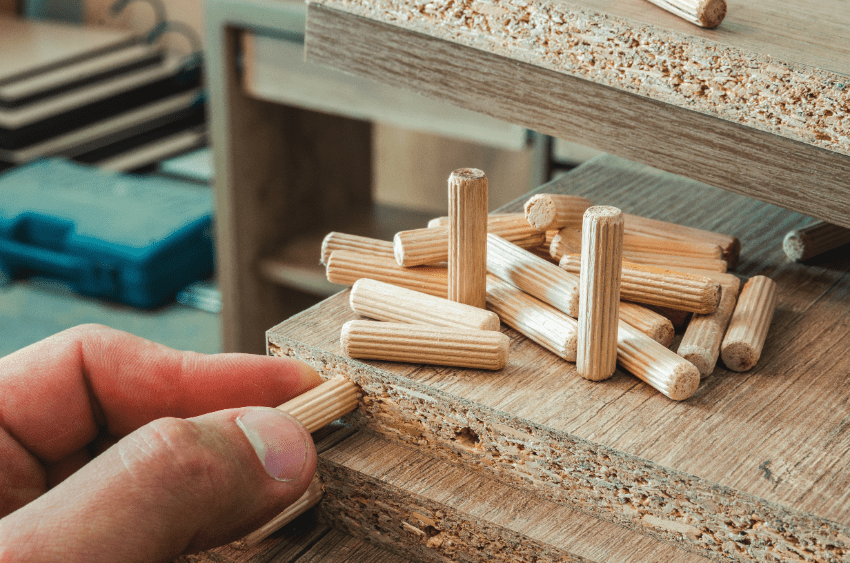
Doweling
A more precise method of joining wood is the use of a doweling jig and wooden dowels. Again, the wood pieces are positioned, and pencil marks are made across the joining surfaces. A secondary mark is made on the edge at each mark. The doweling jig is positioned over the edge of the stock, aligning the jig’s mark with the pencil mark. A drill bit is then used to bore a hole for the dowel. The drilling depth should be slightly longer than half the length of the dowel. Most dowel jigs have depth adjustment collars. I simply wrap a piece of masking tape around the drill bit to mark the proper depth. Although you can cut dowel stock to the lengths needed, precut dowels with glue slots in them are the best choice. The dowels and boards are then glued together.
Gluing and Clamping
Regardless of the method used for joining wood with glue, it’s important to make sure all edges are smooth and clean of dirt and debris. Examine the edges of all stock that is to be joined to make sure they don’t have nicks, burrs and other obstacles that could prevent a good joint. Also, sight down the board to determine if any crown or irregular surface will prevent smooth, tight joints. Position the boards to be joined together. Make sure the grain runs in the direction you desire and all the joints will come together evenly. You may need to joint some edges to create perfectly smooth and straight-joining wood edges. The wood stock and wooden joinery must be clamped tightly together to create a strong joint. Next, all surfaces should be coated with a high-quality woodworker’s glue. Then, tap the dowels or biscuits in place, and tap the wooden pieces together using a wooden mallet on the edges, being careful not to damage the outside edges of the wood. Tongue-and-groove joints are simply glued and tapped together. Position the bar clamps on a smooth, flat surface. Protect the surface from glue drops with newspaper. Place the assembled wood stock down on the bar clamps, and use thin strips of wood on each side to protect the edges from the clamp pressure. Make sure the stock is not twisted or warped, and then gently squeeze the pieces together until the joint is tight and smooth. Wipe away any excess glue with a cloth that has been dipped in warm water and the excess water squeezed out. Allow the glue to set overnight. Use a belt sander to smooth the joints and remove any dried glue.
Butcher Block
Butcher block counter tops, table tops or even cutting boards can be assembled and glued in the same manner. In this instance the wood strips are glued together on edge, face-to-face, rather than edge-to-edge. Waterproof glue should be used to glue the pieces together, and no other wood joinery accessories are used. Once the stock has cured, the upper and lower surfaces are smoothed with a belt sander or a planer.
