

Install a programmable thermostat for increased temperature control and energy savings.
If you’ve not yet upgraded your thermostat to a programmable unit, then you’re behind the times like parachute pants. You’re probably throwing away money on unnecessarily high energy bills. And you aren’t doing Mother Earth any favors, either.
Programmable thermostats automatically adjust your home’s temperature settings several times a day to fit your lifestyle. These units contain no mercury and are more accurate than manual thermostats. According to the U.S. Department of Energy, when used properly programmable thermostats can save about $150 per year. This means the extra money spent on a programmable unit is usually recouped in a year. Plus, these thermostats are better for the environment, since using less energy helps reduce greenhouse gas emissions associated with energy production.
When selecting a thermostat, look for the Energy Star logo, which is the U.S. government’s cattle brand indicating the product meets strict energy-efficiency guidelines. These thermostats offer four pre-programmed energy temperature settings that anticipate when the system should scale back heating or cooling. In the winter, program the heat to kick on during your commute homeward, so you step into a warm, comfortable house. In the summer, keep air conditioning low in the morning so your system isn’t cooling an empty house while you’re at work. The versatile programming also benefits the many homeowners who work outside the home during the week but keep a different schedule on the weekend.
Features and Models
All of the Energy Star-qualified programmable thermostats include four default program periods per day, allowing you to save money while you’re away or sleeping. They maintain accuracy within 2 degrees to keep the temperature at an even level. Programmable thermostats typically feature digital, backlit displays; touch-pad screen programming; voice and/or phone programming; “hold/vacation” features; indicators that notify when it’s time to change air filters; and indicators that signal malfunctioning of the HVAC system. With so many options and features, it’s easy to create a heating/cooling schedule to fit individual needs.
The D.O.E’s Energy Star program qualifies the following three types of programmable units:
7-day models. These units are the best choice if your daily schedule has a tendency to change. By letting you set different programs for different days, these models offer the most flexibility—with four possible temperature periods per day.
5+2-day models. These units use the same schedule every weekday and another schedule for weekends.
5-1-1 models. This third type allows you to keep one schedule Monday through Friday, another schedule on Saturdays, and a third on Sundays.

Installation
Thermostat installation is a fairly simple chore. Typically, all that’s required is a slotted screwdriver, small Philips screwdriver, hammer, electric drill/driver, a 3/16-inch bit and two AA batteries. First step is to cut off the electricity to the thermostat and furnace. Remove the existing thermostat cover, thermostat and wall plate, which are usually fastened with screws and plastic push tabs.


Wires may be attached to the thermostat or wall plate with mounting screws. Each wire will be wrapped in color-coded insulation, which corresponds to the color-coded terminals on the rear of the new thermostat (or wall plate). Additionally, when connected to the existing thermostat, these wires are usually marked with a code letter, i.e. “W,” “G,” “Y,” etc. It may help to label the wires to avoid confusion. The number of wires in your system can vary from two (for heat only) to as many as eight. Clip the wires so they do not slide back through the hole. Then disconnect the wires from the old unit.


Attach the wires to the mounting screws of the new unit. Ignore any wires that may be present but were not connected to the old thermostat. Push the excess wiring back into the hole. If the hole in the wall behind the wall plate is larger than necessary for the wiring, use some insulating materials to plug the wall cavity. This will prevent hot or cold air from drafting into the back of the thermostat and affecting its temperature reading.
Then level and plumb the wall plate with a torpedo level and fasten to the wall. Mounting in drywall requires first pre-drilling the anchor holes with a 3/16-inch bit and hammering in drywall anchors to house the screws. Or, you may get lucky as in the installation shown, where the pre-existing drywall anchors from the old thermostat happen to line up with the screw holes on the new unit. If no new drilling is required, simply line up the mount holes and drive home the screws.

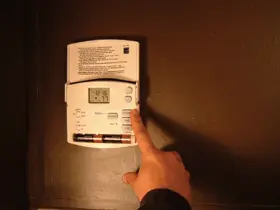
With the unit shown, the thermostat attaches and detaches to the wall plate via press-release tabs at the top and bottom of the unit. Make sure the thermostat is set to OFF and the fan switch is set to AUTO. Insert the two AA batteries. Switch on the main power to the furnace.
Program the thermostat according to the manufacturer’s guidelines. You’ll soon be saving energy, saving money and helping the environment.
Side Note
 Seven Tools in One
For this thermostat replacement, the EHT staff used Black and Decker’s new Powered Multi-Tool. The new tool includes a power-assisted screwdriver, LED task lights, needle nose pliers with integrated 12-18 gauge solid wire cutter and stripper, cable-jacket slitting tool and a non-contact voltage detector. Purchasing all these tools individually would cost approximately $60, while the Powered Multi-Tool retails for only $39.97—and you don’t have to pack a work kit full of seven different gadgets. Powered by a 9-volt alkaline battery, it’s a handy device for all sorts of around-the-house electrical jobs. For more information, visit www.blackanddecker.com or call 1-800-54-HOW-TO.
