

By Mark Clement
An “above the fold” bedroom upgrade.
“Above the fold,” I learned a few years ago, is something that merits extra attention.
The “fold” being referenced, of course, is the fold of a newspaper. Something above it, and therefore seen first, is taken to be more important, interesting, or otherwise meritorious of our attention.
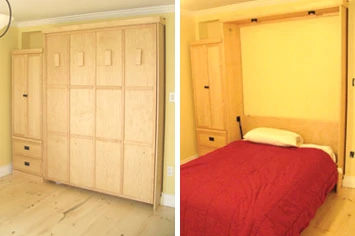
Well, I’m hijacking that phrase and repurposing it to describe a home-improvement project I’ve recently completed—one that folds away, no less. It’s a Murphy bed—or wall-bed—and now that it’s in, this furniture-grade upgrade gets and deserves a lot of attention in my house.
When my wife and I designed the room (our son’s room; he’ll be just a few months old when you read this … please wire your cash gifts to my Grand Cayman account; thank you in advance), we knew we would like the wall-bed. As designed, it would enable us to optimize the pace in the room. But now that this bad boy is in, it’s 10 times better than we expected—now there’s a good deal.
And, while I customized our room to accommodate the bed, installing the bed unit itself, manufactured by The Old Creek Wall Bed Factory, proved fast and fun. Let’s get to it.
Design
The Old Creek Wallbed Factory where we got our bed, has several finishes to choose from. We selected the clear maple in the Mission style. It’s sleek, slick profile and crisp, classic lines fit nicely with the room’s color and decor. The muted, but classic wood grain gives us design options in the future, like re-painting some years hence.
Because our boy is the youngest, his room is also our designated guest room, so when Grandma comes to visit, he gets the boot and she gets a refined place to lay her head. We also included a maple side-tower, or cabinet, that matches the bed’s trim package. Here, of course, we can store not only his things but bedding and the like, thereby maximizing limited space—both in this room and in the house—attractively.

Making Sure It Fits. A queen size bed worked best for our space, and that’s what we ordered. The key piece of design information related to bed size is this: Make sure it fits into—and through—your house.

The tray (the compartment in which the mattress rests) is a single and very large piece. You must be certain it not only gets through your doors en route to the final resting place, but up stairs, around landings, and through all the hallways involved in moving furniture. It’s bigger than the mattress that will rest on it, and doesn’t bend around corners or squeeze to get through low ceiling clearances like mattresses do.
If your house is undergoing the kind of remodel as mine, then the shortest distance between two points might be a straight line—like straight up through the floor joists. First floor to second: straight shot. If you really do this (I did), then wrap the rough-opening in the floor/ceiling with carpet samples to protect the tray’s face-side.
By the way, the tray is heavy. Having some muscle on hand will both help move it and minimize the risk of damaging it.
Taking Delivery
My wall bed was delivered by common carrier, i.e. a tractor trailer. That meant I not only needed to be home when it came, but I needed to be prepared so that I could either take the unit indoors—out of the weather—or hermetically seal it in tarps until I was ready for it. And, as I pointed out above, the tray is heavy and any help carrying it … well … helps. Check with Old Creek for other delivery and assembly options.

Pieces and Parts
The key to a quick and sound installation on a project like this is to have a good plan and to be organized.
Site-Prep. With a unit like this, I like to spread out all the parts in an “exploded view” so I can see everything. The challenge with that, especially with a queen-sized bed, is that it takes up most of the floor space in a 12-by-12-foot room, so it helps to have all your stuff where you can find it, and in one place. It’s not that much fun to run 6,000 laps around your bedroom chasing down your cordless drill. Get organized to get it done.

I not only organize my tools, but I organize all the little parts like screws and fasteners included with the Old Creek Wall Bed. I take them all out of the little plastic bags so I don’t have to do it later when I’m busy assembling the bed. This saves time and keeps me from having to search for a little bag of stuff I misplaced.
Tools. I used just a few more tools from my tool pouch than I thought when getting the unit together, but basically, all you really need is a cordless drill, flat-head screwdriver and maybe a stud-finder.

Tip: if you’re worried about scratching wood floors (very possible with something this big and heavy) the wall-bed comes packaged in a lot of cardboard. You can spread the cardboard out over the floor to help protect it. And for future home-improvement plans, I find having a few large pieces of cardboard around eminently handy—it’s better than a drop cloth for small jobs, and when you’re done, just fold the cardboard in half and pour the debris into a trash can. This is much faster and easier than wrangling a smelly, old drop cloth.

Sides and Tray. Orient the side panels along the tray such that the side panels’ front edges are facing the floor. Next, pop the e-clips from the pivot bar rods and slide them through the holes in the bed-frame tray. Replace the e-clips, securing the pieces. Repeat for the other side.
Prop the Tray Up. This is when it’s good to be active in home-improvement, because you need a block of 4-by-6 or 6-by-6 lumber. If you’re never doing anything, it’s unlikely you’ll have any lying around and will have to make a run to the store. As luck would have it, I did. If I didn’t however, I would have cobbled something together from scraps. Again, it’s handy to have a helper here, because you need three hands to lift the tray and slide the block in.

Once you’ve propped up the bed tray, install the pistons over the pivot ball making sure the skinny end is down. I had a little trouble with this and had to “convince” the piston to be a little shorter with my hammer, but it worked.

Headboard. Without removing the tray from the block, raise each side panel and hook it on the tray using the pre-installed brass stops as the cleats.
Now install the headboard itself. Make sure the face side is oriented towards the floor. Make sure the top of the headboard is facing the top of the wall bed. Install the headboard by inserting the Allen screws through the pre-drilled holes and tightening.
Note: We installed our headboard with the hole for the light sensor on the bottom of the headboard. Part of it was confusion. The directions weren’t entirely clear about which side of the headboard was intended as the top side, but once we figured it out, we liked it there. Technically, having the light-sensor at the bottom is upside down.
Crown Piece. Zap on the crown piece using the screws provided. Since the crown fits over the side panels, it’s simply a matter of sinking the screws. Note: since you’re working in hardwood, overdriving the screws is a recipe for shearing the heads off. All you need to do is snug them.

Lights. I spec’ed a light kit on my wall bed and I’m glad I did. I like that the included puck lights in the crown-piece light the bed space for reading or low-lighting the room. I also like that I don’t need my electrician to hardwire anything. I can use an existing outlet to energize the light package. Nice.
I do wish, however, the installation instructions were a little clearer. The first thing to do is install the touch sensor puck in the pre-drilled hole in the head board—easy. Next, you have to chase a wire across the back of the headboard and up a channel in the side panel, which didn’t quite hold the wire. I was able to stabilize the wire by snugging a drywall screw at the corner as a fulcrum. Needless to say I neither punctured the wire nor over tightened the screw. Then, by the time the wire reached the transformer where it was to be plugged in, it was barely long enough. Long story short, it took some reverse engineering, but I made it work—and I tested it before raising the bed into place.

I also took pause at this time to make sure my layout was right on the alcove I built, and that both the side tower and the bed unit would fit. Turns out I was dead-on, unless you count the base and shoe molding that I ran into the alcove. Once I stripped that, we were good to go. Please don’t tell anyone I made such a mistake.
Now, however, comes the payoff … Raising the bed!
Ready, Set Lift
Stud Location. Find and mark your wall studs first. And, if you don’t know, make sure you find out what kind of wall studs you’ve got. Most houses, of course, have wood, but if you’re installing this in a city apartment (for which they were invented by the famous Murphy, no less!) or basement remodel, then you may well have steel studs and need the proper fasteners to anchor the bed. This is not a detail to be skipped or skimped on.

It appears that stud finders work for everyone but me, so I still use echo-location (I knock on the wall until the sound or feel changes) and a scratch-awl to drive through the drywall to make sure I’m on the money. Of course, I’m careful punch the holes where no eyes can find them.

To make life a little easier, I transferred my stud locations to the back of the crown piece before lifting the unit into place, and then took a little extra time to predrill and countersink my screw holes. It’s almost always easier to do this kind of thing on the ground than on a ladder.

Raising Bed. This is another area where helpers help. Should you be flying solo, however, the bed unit is in the realm of liftable, and I was able to muscle it into place.
Check the Reveals—Then Fasten. An out-of-level floor can deform the wall-bed and make opening or closing hard. Before fastening, double check that the reveals around the side-panels and tray are the same all the way around. My floor, for example, dropped 3/4 inch from one side of the bed to the other, and I had to shim the bottom with a maple block. Once you’re comfortable that the reveal is primo, fasten the wall bed to the wall studs through the back of the crown piece. By the way, kudos to Old Creek on the screws they provided—they were no ordinary drywall screws; they were made for working in hardwoods.
Test. After you drive the last screw, give the unit a couple of healthy tugs to make sure it stays stock still.
Side Tower. While I was locating the studs for the bed unit, I also located them (inconspicuously) for the side tower. I then measured their distance from the outside wall and transferred that measurement inside the cabinet. I then used cabinet screws to secure the side-tower to the wall.
And never one to under-build anything, I also predrilled and countersunk a few screws between the cabinet’s face frame and the bed unit’s face frame. This bed will see a lot of ups and downs as our son grows up, and I want to be sure he can depend on it staying where his old man put it.
Placing the Mattress. So we got the bed in and lowered the tray to accept the mattress. It was at least 9 o’clock at night, and I had worked all day on another job. I was dirty, sweaty and tired, so you can imagine my disappointment when I lowered the mattress-less tray and it wouldn’t stay down!
Oh no! I did something wrong—or did I?
Running on vapors by this point, I lugged the mattress in from the other room. My wife held the tray down to the floor (it didn’t take much effort) while I loaded the mattress on-board. That was it! The weight of the mattress resists the tension of the pistons perfectly!
Delighted
And that was all it took. The tray raises and lowers into a primo maple cabinet sweetly. Indeed, “raises” is even the wrong word; it glides. The hardware designed into the bed unit is totally hidden and operates with plush ease, which the craftsman in me really loves. And the dad in me hopes our son loves it too. I can’t wait to show him.
Editor’s Note: Mark Clement is a remodeler, live-action trade show demonstrator and author of The Carpenter’s Notebook, A Novel. Visit www.FormalFarmHouse.com.
SIDE NOTE 1
Double Duty and More
When we designed the Old Creek Wall Bed into our new son’s bedroom design, we were thinking about making the most of the space we have—not only in his bedroom—but in our house as a whole. The wall-bed opened the gate for a bunch of cool stuff for us.
First, while our boy is an infant, there will be no bed to either find another room for or wedge a crib around. His big-boy bed is there, of course, but folded neatly out of the way behind a furniture-grade panel, which is easy on the eyes. The wall-bed also enables us to use his bedroom—the last free room we have—as a guest room. When he’s an infant, he’ll bunk with us, and as a toddler he gets to crash with his sister (I’m sure they’ll both love that).
But, imagine my surprise that the wall-bed is already paying off. My 8-month pregnant wife needs more room in our bed (and by “more room” I mean “the entire bed”), and I’m crashing on the wall-bed instead of the pre-back-surgery-unit otherwise known as my couch. I can tell you, it’s great. And the side-tower is already active as a stash for the bedding and the baby stuff that’s starting to accumulate.
It’s great when you get more than you bargained for—in a good way. And when our son is old enough, how cool will it be for him to show his friends that his bed comes out of the wall? Seriously, he’ll be like a super-hero to his friends. (Editor’s Note: Clam down Mark. You’re not the only one who as children.)
–M.C.
