

By Matt Weber
There are hundreds of ways to make a headboard. Here’s one—a custom creation combining style and function.
On some of my home projects, I’m just winging it. Case in point: making a headboard for a bed. According to my wife, a headboard is a crucial decorative element for a bedroom. It was absolutely imperative that we got one. I had never given the matter of headboards much thought, but I’ve since learned that it’s a hot topic for interior designers, with some specialty outlets offering a product line of nothing but headboards in a wide range of materials, sizes and prices.
Most of the headboards I found online range from about $120 to $400, and even higher. You can find headboards made from metal, wood, leather, wood and more. Some styles are strictly decorative, and some are functional with storage shelves.
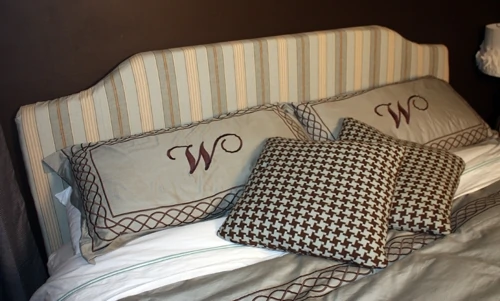
My wife, Shanna, wanted the headboard colors to harmonize with the bedroom’s chocolate walls and turquoise window and bed dressings. The right tones would provide a splash of color to offset the otherwise dark scheme of the room, but Shanna also wanted the headboard to be upholstered to provide a soft, comfortable headrest for nighttime reading. This combination of features proved difficult to find, so we decided to invent our own.
Plywood Frame
Building this style of headboard is a fairly straightforward project and well within the skill set of the average DIY’er. The backbone of the project is a sheet of 3/4-inch sheathing-grade plywood. We decided that a height of about 22 inches above the surface of the mattress provided adequate room for a headrest. I decided to give it an additional 18 inches of height that extended below the bed surface (behind the mattress and box-spring), so the headrest would look like an integrated component of the bed when viewed from the side. This gave me a full frame height of roughly 40 inches. I made the width of the plywood frame 80 inches—a few inches wider than the width of the king-size mattress. I cross-cut and ripped the plywood to size on a couple of sawhorses, using a circular saw and a straight-edge guide.

The cuts provided the rough dimensions of the frame, but we wanted to add some scalloped corners to give this basic box shape a little decorative flair. I used a template made from cardboard to create the matching corners.


To make the pattern, cut a sheet of cardboard into a rectangle the exact same width as the headboard. The cardboard doesn’t need to be the full height of the headboard, but it must encompass the entire shape of your decorative pattern. Use a pencil to sketch the shape of your accent corner on one side of the cardboard sheet. There’s not necessarily a right or wrong method of determining your corner pattern, but keep an eye on the shape’s visual proportion in relation to the size of the overall headboard. It took me a couple of attempts to draw a contour I was satisfied with. If you’ll be upholstering the headboard, it’s also a good idea to ease the corners with sloped curves rather than sharp angles that risk cutting through the fabric over time. Once you’re happy with the shape, trace the final pattern with a marker to distinguish it from the other pencil marks of your earlier attempts.


Fold the cardboard sheet in half so the edges are perfectly flush. Tape the folds together so it doesn’t slip. Use a utility knife to cut both halves of the folded cardboard, following your marked pattern. When you unfold the cut cardboard, you will have a symmetrical template.

Tape the template to the plywood, with the top and sides flush. Trace the template onto the corners of the plywood, and cut out the shapes along the marked lines with a jigsaw.


I first tried to glue the foam to the frame with some spray-on adhesive commonly used for upholstery. I don’t know if it was poor-quality glue, not intended for plywood, or that the thick foam was too heavy, but the spray stuff didn’t work. I then tried polyurethane construction adhesive, and the foam wasn’t going anywhere.

When it came time to decorate the headboard, my wife and mother-in-law took over. This step requires a large, uncluttered work area; they chose an empty room that was being remodeled. They laid the plywood frame foam-side down and centered over a sheet of batting on the floor. The batting sheet was about 10 inches larger than the frame around its entire perimeter. They folded the material back over the plywood, pulled it tight and stapled it securely along all the edges. The batting is a plusher material than the foam, providing some extra softness while also rounding out the rough edges of the cut foam.

The surface fabric was applied next, and fabric stores offer a vast array of colors and styles. Shanna actually co-opted a linen duvet color, which she liked for the pattern and coordinating colors, striped with light greens and tans that complemented the bedroom’s design scheme. Just like the batting, the fabric was pulled back tightly over the frame to remove any wrinkles, folded along the back and fastened tightly to the plywood with a staple gun.


To mount the headboard to the wall, I installed two heavy-duty D-rings with picture hangers rated to support 100 lbs. each, providing an ample 200-lb. capacity. However, these hangers only support that weight if they’re properly anchored into the wall studs—not drywall. Unless your headboard mounting location happens to be centered over a stud, you’re hanger locations will not be located symmetrically on the rear of the headboard.

To determine the hanger locations, lean the headboard against the wall where it will be mounted. Mark the midpoint of the headboard, and mark the wall at this midpoint as well. Then, working outward from the midpoint with a stud finder, mark the stud centers along each side of headboard. Find the outermost studs that fall within the span of the headboard, and mark those two spots on the top of the headboard with tape. Remove the headboard, turn it over, and on its back draw a plumb line down from each mark to match the centers of the wall studs. The two D-ring hangers should be installed at an equal height along these lines using two wood screws each. The D-rings should be located approximately 2/3 up the height of the headboard.


The two heavy-duty picture hooks should be installed level on the corresponding stud centers. The installed height of a homemade headboard depends on its design and personal taste. When measuring for height, remember that the top of the D-rings will hang on the bracket hooks a full inch lower than their nail holes.

Have an assistant help to lift the headboard and fasten the D-rings over the picture hooks. The hooks and D-rings supported the vertical load, and once we slid the bed against the headboard it fully stabilized any lateral or back-and-forth movement. The headboard was holding steady, and by inventing our own design we got exactly the look we had in mind.


