

By Matt Weber
A PVC decking and handrail system serves as an attractive, low-maintenance alternative to traditional building materials.
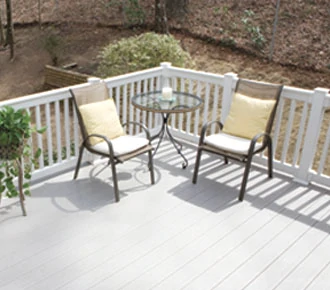
When selecting materials to remodel his deck, the maintenance requirements of the product is often a major consideration. The deck in question was located in a shady backyard with a lot of tree cover, making it susceptible to collecting leaves and other debris that can cause surface staining to wooden deck boards. The homeowners wanted a stain-resistant deck that was easy to install and required little more than an occasional cleaning to keep it looking good as new. He decided to use a tongue-and-groove decking system made from solid PVC.
PVC (Polyvinyl chloride) is a moisture-resistant building material that is not subject to bacterial rot, nor does it split or swell from water absorption as wood does. This moisture-resistance is especially useful on flat, exterior surfaces, such as decks, that provide a place for standing water to accumulate. PVC decking is also lightweight and easy to cut and install. Standard woodworking tools are generally all that is required to saw it, glue it, drill it and fasten it.
Additionally, PVC has another significant maintenance-saving advantage over wood: color retention. Whereas wood needs to be sealed or stained periodically to combat moisture, protect from UV rays and impart a durable color tone, the latest integrated color technology for PVC promises a lifetime of weather ability with a low-gloss, wood-grain surface. The prospect of easy upkeep combined with DIY-friendly installation and the availability of a complementary deck-railing system sold the homeowners on the PVC decking system.

First Steps in Installation
The Genovations line of PVC deck boards from Genova Products, which interconnects along each seam in a tongue-and-groove fashion to conceal the deck-fasteners. As with any deck project, before beginning installation check your local building department regarding codes and regulations for deck framing, hand rail construction and stairway installations. This project entailed re-decking a previously constructed deck that was built with joists on 16-inch centers, which is a requirement for the 5/4-inch PVC decking that he selected.
With the old deck boards and fasteners completely removed, the installation of new decking began with the placement of a PVC Deck Starter strip, which features a groove to accept the tongue of the first deck board. Before installing, make sure your deck ledger board is properly flashed to the house wall to prevent any future water damage to that critical framing connection. Screw the deck starter strip along the ledger board, flush with the edge closest to the house.

When fastening the PVC components, each piece features a flange with slots for the screws. Much like vinyl siding, the slots on the starter strip, deck boards and trim pieces allow flexibility in placing screws for expansion and contraction of the material as temperatures fluctuate. Generally it’s advisable to place a screw in the center of the slot to allow the deck board to move in either lineal direction. If you want to restrict movement at a certain point, drill a hole in the fastening flange and anchor that hole with a screw. Use pan-head deck screws that are coated for use in pressure-treated lumber or made from stainless steel.
With the starter strip down, we installed a C-channel trim strip on the adjacent rim joist to accept one end of the deck boards to conceal their profile and provide a neat, finished appearance to the deck.
Board Installation
With the two starter strips in place, the PVC deck boards go down next. To install the decking, place the tongue of the first board into the groove of the starter strip. Align the slots of the deck board over the center of the joists. If the slots don’t align, you can add a wooden nailing block along the edge of the joist and flush with its top to prove a solid anchoring surface. Fasten the deck board to every joist.


Repeat this procedure for the remaining deck boards, inserting the tongue of the new board into the groove of the preceding one, which conceals the nailing flange for a deck surface that appears free of any fasteners.

It may be necessary to rip the last board to width before fastening. Once installed, the exposed edge of the last board can be concealed with another trim strip and/or a fascia board.
It may also be necessary to notch the boards to accept deck-rail posts. The PVC can easily be cut with a jigsaw, using predrilled holes at the intersection of the cuts to allow room to turn the jigsaw blade. (The notches cut in the deck boards can be concealed with 4-by-4 PVC trim pieces included with Genova’s rail system, which slide over the posts and collar them at the bottom.)


We ran the deck boards “wild,” meaning he left the ends of the boards hanging over the edge of the framing to be trimmed all at once after the decking was complete. Where the deck boards crossed the rim joist, Dunlap snapped a chalk line over their surfaces flush with the edge of the deck. He then cut all the boards along the chalk line for an even installation, and then concealed the exposed ends of the decking with a final PVC trim piece. This final step completed his new deck surface.
PVC Deck Railing
Although Genova Products does offer railing systems colored to match its deck boards, the homeowners opted for a white-colored system that matched the existing trim of his house. The Genova railing system gets its strength from the use of solid, pressure -treated posts and aluminum rail channels that are concealed in PVC sleeves. The railing system is offered in three styles and four colors, available in 6- or 8-foot sections. The package includes all the hidden brackets and hardware needed for installation.
The deck must be built in accordance with local codes with treated wood posts installed on 71-3/4-inch centers (maximum). The wood posts should be cut 36 inches above the deck surface.


Begin installation of the PVC system by sliding the 4-by-38-inch Post Cover over the posts just like a sleeve. Shim the covers as necessary to hold them plumb. Then, slide the Post Trim Base over the post cover and push it down flush with the deck.
Attach the metal Mounting Brackets to the posts using the corrosion-resistant lag screws included with the kit. Predrill the holes for the 1/4-by-1-1/2-inch screws, using two per bracket and ensuring they are mounted level and plumb and centered on the posts. The bottom bracket should be 1-3/4-inch from the deck surface, and the top bracket should be 32-3/8-inch from the surface.

Measure the distance between each two opposing brackets, and if necessary cut the aluminum P-channel Rail Inserts to the appropriate length.
Next, subtract 1-3/8-inch from the cut aluminum P-channel and use this new measurement to cut (if necessary) the corresponding 2-by-4 PVC rail and rail cover to length. The PVC rails are manufactured with uniformly spaced slots to accept the balusters of the rail system, so when trimming the rails to size, cut off equal amounts of material from each side to maintain symmetrical baluster spacing.

Insert the aluminum P-Channels into the PVC rails. Orientation of the railing components are key because the aluminum insert and the PVC rails must be positioned to accept the balusters. Furthermore, the long legs of the aluminum P-channel must face the inside of the deck. It’s always a good idea to test the fit of a railing system before final installation. The top rail includes a PVC Rail Cover, which features a symmetrical chamfered profile for decorative appeal and a comfortable grip. Attach the rail cover to the PVC rail with vinyl adhesive. Then, slip the PVC bracket covers onto each end of each rail.
With the rails assembled, we first installed the bottom rail onto the brackets with the baluster holes facing upward. The balusters then slip into the routed holes of the bottom rail. Cap the balusters with the top rail, threading them into the holes on the underside of the rail.

At this point, the system should have a little wiggle room to slide the rails to the left or right until the balusters are perfectly plumb. Dunlap then drove No. 10 sheet-metal screws through the mounting brackets and into predrilled holes in the aluminum P-channel inserts. The PVC bracket covers simply slide over the ends of the rails to conceal the exposed metal connection.


The end result is a weather-resistant deck with minimal maintenance requirements and a strong, complementary railing system that the homeowners will enjoy as long as they own the house.
