


Homeowners are constantly repairing minor blemishes in and around their homes, but many people do not know how to properly fix these minor problems. In fact, some basic research and preparation can make the hardest weekend home projects seem simple.
Is there a hole in the drywall where your bedroom door swung open too fast? Does the living room paint job look like your little Michelangelo practiced a few new brush strokes? Have you had to call the city department of public works to fix the potholes in your driveway?
Below are step-by-step instructions on three popular home-repair projects.
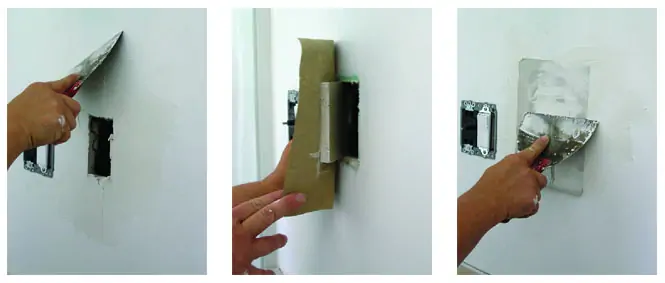
Patching a Hole in the Drywall
Tools you’ll need: pencil, 12-inch straight edge, 4-inch putty knife, utility knife, sandpaper, small bucket of drywall mud, piece of drywall (at least six inches larger than the hole), paint.
First– measure the diameter of your hole to be repaired. From your extra piece of drywall, cut a square, four inches larger than the hole. Place the square face down on a table and draw a line two inches from the edge on all four sides. Score the drawn lines with your razor blade and break-off the excess drywall, leaving the front paper in tact. Place the drywall patch over the hole in the wall and use your pencil to outline the square on the wall. Cut the traced square from the wall. Apply a light coat of drywall mud around the edges of the newly cut square hole and place the patch into the wall. Squeeze out excess drywall mud with your putty knife and let dry overnight. Re-putty the patched area, again allowing the mud to dry overnight. Sand away excess mud and smooth out the wall. Paint the area and you’re done.
TIPS: use this repair method on holes two to 12 inches in diameter.
Degree of difficulty: Easy.
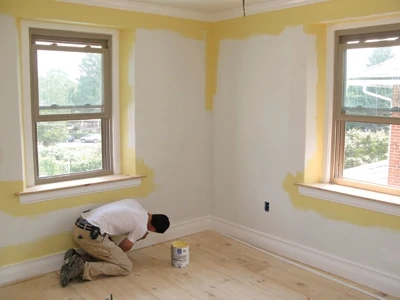
Painting a room
Tools you’ll need: sandpaper (120 and 220 grit), screwdriver, paint roller, paint pan, extension pole, stir sticks, 1 ½-inch masking tape, painter’s tape (blue), caulking gun (with painter’s caulk), spackle compound, dust mask, hammer and nail set, varnish or stain, paint brushes (2 ½ flat and 1 ½ angle brush), putty knife, utility knife, disposable paint tarp.
First– wipe down any surfaces that will be painted with household cleaners. Use the hammer and nail set to secure any protruding nails or screws in the walls and trim. Lay down your disposable tarp and cover any furniture. Sand each surface that will be painted including trim, molding and doors. Use 120-grit sandpaper for this part of the project. Dust all surfaces and wipe with a damp cloth. Apply one coat of stain-killing primer to all surfaces that will be painted. Let dry. Seal any wood surface with a varnish or stain. Apply painter’s caulk to molding and trim, scraping off any excess with a knife. Let dry. Cover all trim and woodwork with painter’s tape. First, paint the ceiling, and then move on to the walls. Paint around trim and molding first, and then paint the large surfaces. Move from the top, down on each wall. Imagine a four-foot by four-foot surface when applying the paint.
TIPS: do not use “elbow-grease” when sanding. Use a block of wood and press lightly. If you drip paint on a window, do not wipe it off immediately. Wait for the paint to dry and scrape it off with a razor blade. After your first coat of paint is dry, hold a flashlight against the wall and spread the light beam across the wall. This will “show” you where paint touch-ups are needed. Use the 220-grit sandpaper to smooth any drips or rough spots before the final coat of paint.
Degree of difficulty: Hard.
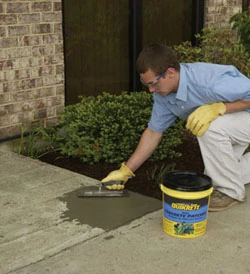
Sealing a Crack in Cement
Tools you’ll need: soft paint brush, caulking gun (with silicon caulk), bucket of sand (dry), backer rod.
First– push the backer rod into the cracked portion of the cement. Fill the backer rod and leave ¾ of an inch to the surface of the cement. With the remaining ¾-inch, fill in the crack with silicon caulk, only caulking six-foot increments. Spread the sand over the caulk and let dry. Wipe off excess sand (the sand dries in the caulk and looks like cement when dry). That’s it.
TIPS: use this repair method for cracks ½-inch wide or less. Do not use quick-dry cement or other sealers to repair cracks in cement. Using backer rod and silicon caulk allow for a waterproof seal, which is the only way to properly fix cracked cement.
Degree of difficulty: Easy.
