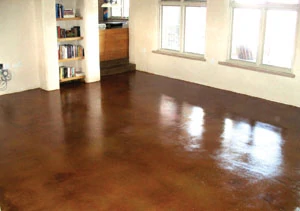
By Gaye Goodman
Master Concrete Stainer, Gaye Goodman, explains the staining procedure in step-by-step detail.
This article will take you from beginning to end through a typical acid-staining job for concrete floors. We will first review the steps you must take before the crew gets to the jobsite, from how to best prepare and finish the slab, to the stain samples you will do months in advance. We will then go into some detail on the seven steps of acid staining once you’re ready to begin the project.
Educating Your Contractor
For acid-stained concrete, builders generally want to know how to best finish the new slab for you, when you would like to appear on the scene to do your work, and what sort of slab protection you recommend until that time. To simplify matters I devised a tear-sheet called “Warnings to Contractors,” which follows:
1. Do not use any liquid curing compound! Anything oily or waxy completely blocks penetration of the acid stain.
2. Use normal, moderate troweling. Do not allow burnishing with metal trowels.
3. If possible, avoid use of a power troweling machine. If the slab is too smooth, the pores are closed and staining becomes spotty. A “garage floor finish” gives us just the right amount of tooth in the slab for attractive acid staining.
4. We advise against using concrete with short reinforcing fibers. The slab ends up looking a bit “hairy,” usually in clumps.
5. You will need to protect the slab from tar and paint spots. For new concrete, let the slab cure for at least two weeks, then lay down plastic.
6. When covering the slab, do not use sticky tape to hold the covering down. This leaves dark, blocky marks in the concrete, which are permanent.
7. Avoid framer’s markings, such as red framer’s chalk or crayon, which seems to be completely permanent and can show through the translucent stain.
8. It’s best to stain the floor after the walls are painted but before toilets, kitchen cabinets, interior doors and baseboards are installed.
9. The acid stain can be wicked up and turn wood black, so it is good to have wood door frames painted or sealed before floor staining begins.
Where to Get Stain and Sealers
True acid stains, which do the best job of enhancing the slab, are completely translucent. One can see all the curing anomalies in the slab right through the stain, so the result looks truly like a stone or marble floor. True acid stains are not purchased at a paint store or hardware store. Due to the acid content in the stain they are considered “hazardous materials” for shipping purposes. They are also fairly tricky to use, so retail stores do not want to deal with problems caused by amateurs using the product. You will need to go to a Concrete Equipment and Supplies Store to buy the stains. These stores have the HAZMAT rating necessary to ship and deal with such stains. Concrete stores are used to dealing with professional contractors; although some will not sell stain to the general public, most of them will.
There are now hybrid stains sold at a few paint and hardware stores, which contain some acid and metallic salts that react with the slab, but also some pigment colors (which are opaque and conceal the beauty of the concrete). You may find these satisfactory, although the instructions in this article apply to true acid stains.
Real acid stains only come in eight or ten colors—and most of those are browns or blue-greens. If your retailer hands you a color chart with a far greater range of bright primary colors, you can be sure he is trying to sell what I call a “hybrid stain.”
While at your local concrete supply store, ask what clear sealers they sell to apply over acid-stained concrete. These will either be odor-free, water-based acrylics or the more durable and deep-looking solvent-based acrylics. Never use an epoxy or polyurethane on stained concrete floors. Most of them do not “breathe,” and that can be catastrophic. It is important that the brand and type of sealer matches the climate where you live. It does not need to be produced by the same manufacturer who made your acid stain. Therefore, while you might find a place on the web that can ship some real acid stains to your home, you should not order your sealer online. In some very humid climates, such as Houston, Texas, or New Orleans, a water-based acrylic cannot be used at all, since it will not cure properly. (More on sealers later.)
The Color Sample
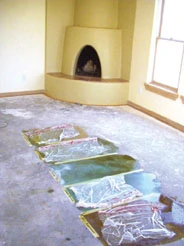
One concrete slab may look a great deal like another, but you must never be tempted to skip doing color samples. Stain sample results can vary widely from those on the color chart of the stain manufacturer. Color samples allow you to assess the character of your slab. Each slab is different, and will react differently to stain.
To create a sample template, divide the area into sections using masking tape, label them, and clean inside the boxes. This will allow you to test various elements of your stain: color, color mixture, manner of application, and laid-on textures. Pour stain on one of the sample areas; quickly brush it around. There should be fizzing when the stain hits the slab. You will need to give the stain samples four hours to develop, and then return to the jobsite to scrub stain residue from the surface, rinse it off, and check the colors and patterns. If the slab is strongly reactive and all your colors seem too dark, you can perform some more samples with diluted stain. We often use a ten-to-one water to acid solution to dilute our stain. Some stain companies manufacture a “stain extender” that comes in gallon bottles. We have found that using extender to dilute our stain can make it flow and etch the color more evenly than our homemade dilutions, particularly with dark colors.
Note that many slabs are power-troweled, which does not make them impervious to stain, but they will be slick. If parts of the slab appear charcoal gray and have sheen when you look across them, you can be fairly certain that the finish has been “burned in” by too much troweling. This makes the stain roll off the high places, causing a spotty look. Such a slab needs to be well sanded or acid-washed prior to staining.
Masking Walls and Woodwork
Before cleaning the slab, carefully mask off every surface contiguous to the stain area with plastic sheeting and a high-quality painter’s tape. Acid is a corrosive and invasive compound. It will affect almost any surface it touches, and walls and woodwork are especially susceptible. Acid, and the metallic salts which make it stain well, will turn wood black, corrode metal, and even stain porcelain. (If your walls are accidentally stained, cover these spots with a lacquer-based, stain-blocking primer like Kilz before repainting.)
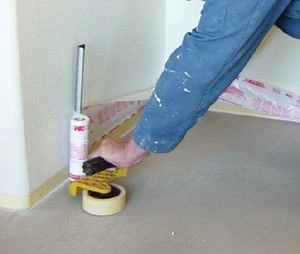
Plaster walls require a bit more prep than drywall. These walls are best protected when they have been finished with their topcoat and sealed with an invisible waterproof sealer. If you have any doubt about the resistance of any surface to the acid stain, then mask it.
Cleaning the Slab
I can’t stress enough how important it is to thoroughly clean the slab before staining. The condition of the slab is so vital that I estimate wall masking and floor preparation to be 80 percent of the labor of staining. Any spot of paint, tar or mastic left on the slab will mar your stain finish.
To clean the slab after masking, first scrape away any drywall mud from the slab and vacuum up debris. Use TSP (TriSodium Phosphate, sold in the paint department at hardware stores). Use about 2 Tablespoons of liquid TSP or TSP Substitute to 4 gallons of water to power-scrub the entire floor, using a power rotary floor buffer fitted with a coarse black pad. Rinse well. Do corners and edges by hand. If plaster residue or latex paint is spotting the slab, it will be necessary to soak these sections for 40 minutes, then power-scrub. Follow the power scrubber with a wet-dry vacuum, and mop behind the vacuum with clean rinse water. A newer type of mop made with tubes of microfiber fabric sold at janitorial supply stores will work twice as well as the old type of string mop. Work small areas at a time, otherwise concrete slurry is likely to dry before you get to it. Dried slurry will show through the stain.
If your first TSP scrub reveals spots of white paint or black tar on the floor, scrape them up with a 3-inch wide razor scraper and clean off the residue with a bit of lacquer thinner or xylene rubbed on with a rag. Wear chemical gloves and a mask for this part; most smelly solvents are carcinogenic. (Even if there is enamel or oil-based paint on the slab, do not try to use paint thinner. It doesn’t work well and leaves an oily residue on the slab.) You want nothing oily or waxy on your clean slab, since the acid stain will roll away from those spots. TSP is great for cutting through oily spots.
Filling Holes and Cracks
Once you have properly cleared the debris and power-scrubbed the slab, you can move on to filling holes and cracks. It’s fairly easy to judge what needs to be filled—anything wide enough to hold a credit card. Hairline cracks are of no concern; they add to the overall interest of the surface.
First, remove any “islands” and loose particles from the crack, using a cold chisel. You want to create a void within the crack to allow proper filling. Vacuum the crack. Inject concrete glue into the crack, wiping up any excess. Wait about 30 minutes for the glue to set up.
Mix a cementitious floor topping compound, which comes in dry form from your concrete supply store, to a “heavy cream” consistency by adding water, and then press it into the crack with a spatula. When the filler has dried, scrape off the high spots, and sand along the crack with a drywaller’s sanding screen.
Note that our staining company does not use products that are sold as patching compounds, because they are generally too sandy and rough. Most patching products sold at home-improvement stores will create a texture that is obviously at variance with the rest of the slab. Also, do not use latex or acrylic to fill cracks; it will not accept stain.
If filled areas are extensive across the floor, it may be necessary to scrub and rinse the entire slab again, with the rotary floor buffer and a red (medium) pad. If filled areas are infrequent, residue can be scrubbed from the sides of the cracks by hand with a piece of plastic steel wool and some water, sponging up the filler when it is still in suspension. Filler should only be seen in the cracks and holes and not as a wide dusty swath surrounding the repair, as it will take the stain color differently. Most fillers accept stain but look much lighter than the rest of the floor. They often need to be touched up later on with artist’s acrylic paints mixed to match the surrounding floor.
Finally, the Staining
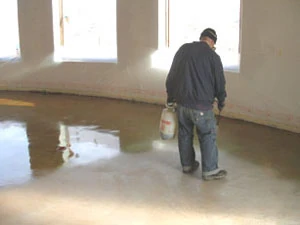
The method of application depends on the look you want. If you want an evenly stained, “leather” look, you will need to apply stain with a sprayer. We use a pump-up garden sprayer. Filter the stain through a paint strainer as it goes into the tank. Otherwise, small particles can clog the spray tip and lead to a very spotty stain job. The sprayer should be set to a fine mist. Be sure to buy a sprayer that has all-plastic parts. Any metal parts in a sprayer will quickly corrode from the acid, and a metal tank may even explode!
When the floor is dry enough to walk across, you will need to spray again, and perhaps a third time. Eventually, the spray speckles will integrate into a uniform looking floor color. If you are spraying a very reactive slab, you might first have to dampen the floor with a well wrung mop. The spray speckles will spread and even out on a damp floor.
Acid stain can also be applied by pouring. Staining this way is definitely a two-person job. If you pour on the stain, be sure that one worker prepares a wet spot of water on the slab into which the second worker pours the stain. Otherwise you will have a darker spot where the fresh stain sat and reacted before you could spread it out. The pouring technique uses more stain than spraying, but gives a marbled look that we find quite interesting.
If texturing devices are being laid into the wet stain, a third worker should be on hand to accomplish that. Whether you are laying down “veins and rags,” thin plastic, or alfalfa or straw soaked in a darker color; nothing will make a mark if the floor is already dry.
Before loading all of your tools and buckets onto the slab, get a small cart—a child’s wagon will do. Use this to shuttle your buckets and tools around the slab; the bottoms of buckets and stain bottles can leave rings on the prepared floor. We use one rolling cart for our stain implements and another cart that holds a five-gallon bucket half full of water. This is where we place the staining brush during pauses. Each person in your crew will need a respirator fitted with a cartridge rated for inorganic gases, specifically for chlorine-type gas, which is a byproduct of the staining process. They will also need skin and eye protection.
To begin staining, the first person applies a damp spot of water using the staining brush, and then stands aside, while a second worker pours stain in a puddle on the damp spot. The stain should be spread out immediately (use a professional quality, plastic-bristled brush with bristles of medium stiffness), using a circular, or figure eight, motion. You should see some fizzing, which is the chemical reaction. After one section of floor has been stained, a third worker may lay texturing elements down while the stain is still wet. This worker is often assigned to detailing as well.
Use a small China bristle brush to paint stain into saw cuts, corners and around doorframes. Some colors may be mixed right on the floor, while others can be mixed in the bottle. Keep in mind that blues and greens are the most fragile colors. They should be applied first. If the color is too intense, you can cancel out blue or green with a spray of brown. (Test first—some strong blue colors will “erase” the dark walnut brown colors).
Be careful not to overwork the stain, and do not spread it too far. Pour new stain for each new area. Scrubbing already-reacted stain onto a fresh gray area will leave visible brush marks at the end of the staining job. If you are working with large saw-cut squares, we recommend you work square-by-square.
On a slab without saw cuts, stain contiguous areas of about 12 square feet, and apply an edge of water around areas already stained. Work your way around the floor in a fish-scale pattern. You want to avoid working in rectangles—overlaps or seams could result in an unnatural grid effect. Be sure the stain you are applying in section B overlaps the water border you put down around section A.
Stain needs a full four hours to react properly, so be patient. At the end of the dry time, you may notice some pale spots where the floor is either high or slick. This is bound to happen, but it’s very hard to determine where, and on which floors. We find that some pulling away of stain usually happens near wall edges. To restain these areas, use a plastic spray bottle filled with stain and spray them about 45 minutes before scrubbing. Second stainings seem to “take” more rapidly than initial applications.
You can also use this as an opportunity to add color accents to the gray (high) spots in the floor. Just be sure that the accent color isn’t too much darker than the original base color. For a brown floor with subtle accents of green, we apply the green to the high spots with a sprayer the next morning when we can see where the stain has rolled away.
If the stain is blotchy across the entire floor, the entire slab should be stained again to even out the surface. The second staining should be done by sprayer. We have to re-stain the entire floor about 60 percent of the time.
Scrubbing after Staining
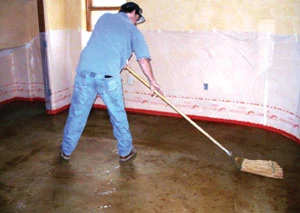
After allowing four hours for the stain to react with the concrete, the post-stain scrub is another three-person job, and is similar to the primary cleaning. The difference is that during this scrub you should use a soft (white) buffing pad and a small amount of pH-neutral floor detergent instead of TSP.
Washing the stain will reactivate it. Be sure all masking is still in place, and wear protective gear. Closely following the scrubber, use a wet-dry vacuum and follow that immediately with a rinse mop. It is important to get in corners and rinse well. Any cloudy chemical “dust” left on the surface may damage the adherence of the clear sealer or show up beneath it. Most stain manufacturers recommend that baking soda or mild ammonia be added to the final rinse water to “neutralize” the acidity of the slab. In over a decade of floor staining, my company has never used anything but a janitorial detergent labeled “pH-neutral,” and we suffered no ill effects from this. We feel that the concrete slab is so alkaline to begin with that staining with acid and scrubbing renders it neutral.
It is a simple matter to neutralize the acid staining residue in your vacuum: You add baking soda, TSP or washing soda (all caustic bases) in small amounts and let them dissolve in the residue. Some stain manufacturers say that the residue from acid staining is nontoxic. However, in some parts of the country where controls are rigorous, you will have to dispose of the stain residue by pouring it into a homemade “evaporation pond” made of black plastic lining a 2-by-4 framework and then depositing it in a toxic waste dump once most of the water has evaporated.
Sealing the Slab
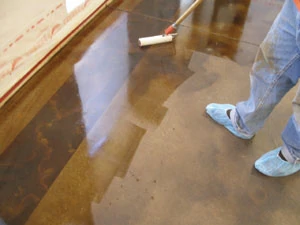
Acid-stained concrete must be sealed to be durable, glossy, spot-resistant and easy to maintain. Most stain manufacturers make a sealer that they feel is best to use over their stain. The durability of water-based acrylic sealers is not as high as that of solvent-based acrylics, but there is a trade-off with toxicity. In general, we use water-based clear acrylic sealers for residential use and solvent-based acrylic sealers (more scratch-resistant) in commercial areas where very high traffic is anticipated. Solvent-based sealers are not only more hazardous, and can cause lung and liver damage, but application requires equipment such as a respirator rated for organic compounds, a phenolic-core paint roller, it and takes 36 to 48 hours to “gas off” before you can apply a water-based final finish. For this reason, we generally recommend the use of only water-based sealers for DIY applications, leaving solvent sealers to the professionals.
The stained slab must be clean, dry and at least 40 degrees Fahrenheit in order to be sealed. Before you start, be sure joints and cracks are dry. For residences we often use two coats of Scofield’s Cementone Clear Sealer with two coats of Terra Glaze Final Finish by Spartan Chemical Company on top of it. A sealer alone is susceptible to scratching.
Never use a polyurethane sealer made for wood floors; wood floors do not respire water for years the way a new concrete slab does. The hydrostatic pressure from water in a slab will bubble and lift any urethane, epoxy or paint product which forms a solid film on the surface. That is why, when you look at nice enamel-painted concrete a year later, it is almost always flaking. Your clear sealer must be semi-permeable—it must “breathe.”
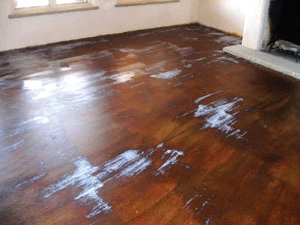
Water-based sealers are applied with a lambswool applicator, a microfiber mop, or a rayon string mop. Be sure to get the proper instructions and applicators for your type of sealer from your dealer.
To go along walls, or around toilets and cabinet edges, use a china bristle brush dipped into a smaller container of sealer. Since it is often difficult to get very close to walls and around toilets with the normal applicators, someone has to be willing to get on their hands and kneepads with a small brush and do all these areas by hand, first. Door frames, closets and kitchen cabinets are all outlined with a 2-inch wide brush. The worker who follows with the larger applicator can then move through the house quickly and efficiently.
Once your concrete has been stained, cleaned and sealed, it is not usually possible to improve problem areas by a reapplication of stain. The stain will not successfully penetrate unless all sealer is removed chemically. In some instances, touch-ups with artist’s acrylic paints will be the best way to conceal certain unavoidable blemishes. These touch-ups are best performed by an artist familiar with faux painting and color matching. They are performed over the first coat of cured sealer so that the background color is known and can be matched. Subsequent coatings of sealer or wax may then be applied to protect the acrylic touch-ups themselves.
Once staining and sealing are complete, you may want to protect the slab if further work by other trades is scheduled on the property. Protect the floors with rosin paper, applying tape only to the paper itself and never onto the stained surface. (Masking tape will remove both the sealant and the stain it has bonded with once it is torn away.)
“Waxing” the Floor
We use acrylic janitorial final finishes as an added layer of protection on all floors that we have sealed. I still refer to janitorial top coatings for floors as “waxes,” but I do so only to distinguish between them and the two coats of acrylic sealer beneath.
Janitorial floor finishes no longer contain petroleum-based or true natural waxes and do not require buffing. A janitorial quality final finish is a water-based acrylic coating quite similar to the acrylic sealers made for acid-stained floors, but usually glossier and more scratch-resistant. These add extra depth and protection to the floors, they are fairly easy to purchase locally for continued maintenance, and there are wax-strippers that can be used to remove them, if it should become necessary.
We frequently carry the floor staining process through two coats of sealer, let these dry, and then cover the entire floor with paper as a protection against all the finishing tradesmen who will be working over our floors. Once construction is fully complete, we return to remove the paper, vacuum and rinse the floors, dry them with fans, and apply two coats of janitorial final finish.
Wait until your sealer has cured overnight to apply final finish. A floor must be at least 50 degrees Fahrenheit to be waxed (even warmer than for sealing). The final finish is poured directly on the floor and then spread out with a flat microfiber applicator or a lambs-wool clamp applicator. Be sure that your applicator is dry. A wet applicator will cause many waxes to fail or streak. The final finish dries in about half an hour but continues to harden for three days, so it is best to delay heavy traffic on your new floors for three days.
You can apply a second coat as soon as the first coat is firm enough to be walked upon. The second coat of finish may be applied at right angles to the first; this way you’re more likely to catch “holidays” (missed spots). Acrylic final finish does not need to be stripped or buffed out. Homes need re-finishing once or twice per year. (Heavy traffic areas, in restaurants for example, may need re-finishing monthly.)
Editor’s Note: This article appears in an abridged format, courtesy of master concrete stainer, Gaye Goodman. Visit gayegoodman.com for more info.
SIDE NOTE
Keep It Looking New
As with any flooring surface, proper care is necessary to maintain a fresh appearance for stained concrete floors.
What follows is a list of some maintenance warnings about waxed concrete floors.
• Never apply masking tape or other sticky tape to your floors as it can remove all coatings and some of the stain.
• Never lay plastic or acrylic mats or air mattresses on your floors. The final finish can bond to acrylic or plastic materials and be pulled up by them when they are later lifted away.
• Do not apply final finish if your floors are colder than 50 degrees Fahrenheit; the finish will fail, turning to a white powder and ruining the sealer beneath it. The floor should be completely dry when you begin application.
• Never use ammonia, bleach, or extremely hot water to clean your floors as they can have a clouding effect on the final finish. Tepid water on a mop is good for most jobs. Use a pH-neutral detergent, found at janitorial supply stores.
• Do not apply silicone dusting sprays to the floors since silicone will repel the next coat of final finish. If you are unsure, read the label before applying the product to your stained floors.


