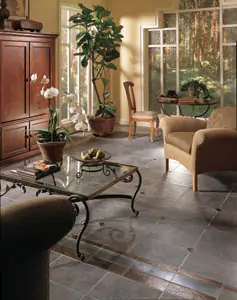
For ages strength and style have made ceramic tile a great choice for flooring material. Available in a vast array of colors, patterns, sizes and finishes, ceramic tile has the design flexibility to indulge any decorator while offering the durability to stand up to the high demands of heavy foot traffic.
Tile sizes range from 1/4-inch squares to 12-inch squares and larger. The latest available tile shapes include rectangular, triangular, hexagonal, octagonal, round and others. And floor tiles are manufactured in practically any color in the spectrum, with neutral colors being the most popular choice for residential use. The many choices in tile appearance coupled with dramatic installation patterns make a new ceramic floor a canvas for the creativity of the designer.
While an attractive material for any room in your home, the strength of ceramic makes it ideally suited for entryways, kitchens, bathrooms and other areas prone to heavy traffic or exposure to dirt and moisture. Ceramic tile is easy to clean, requiring little more than a damp cloth for dirty or greasy surfaces. The tiles are naturally resistant to chemical and biological agents, and the ability of ceramic surfaces to prevent humidity also reduces the presence of dust mites and fungi.
With just a little patience and the proper installation procedure, placing a ceramic tile floor may be an attractive and rewarding addition to your list of upcoming remodeling projects.
Toolbox:
Tile cutter; Chalk line; Pull saw; Grout float; Tape measure; Rubber mallet; Tile nippers; Notched trowel; Level
Tiling Materials
To determine the amount of tile needed for a floor using square, uniform tile, draw the room’s layout plan on graph paper with each 1/4-inch square representing a tile on the floor plan. Check and double-check the measurements of your floor to ensure accuracy when ordering your tile. And then order approximately 5 to 8 percent more tile than is actually required for the layout. This will allow for some damaged tile. Plus, the color of the glazing will often vary based on production cycle, so if you need to add more tile later, this will help ensure a match.
Choosing the proper thinset mortar for the installation will add years of life to your new flooring. Use a gray thinset mortar if using a dark grout; use a white thinset mortar if using a light grout. Almost any sanded thinset mortar will be adequate for installing floors with fired clay ceramic tiles on a cement substrate. A 50-pound bag of sanded thinset will install 75 to 100 square feet of flooring. For installing ceramic tile over vinyl flooring or wooden substrates, use a high-quality latex-modified thinset mortar.
Grout, which is available in a variety of colors, is another design consideration. If using colored grout, choose one that won’t stain your tile selection. For entryways, kitchens or other heavily trafficked areas, a dark grout may be a practical selection to help hide dirt.
Subfloor Preparation
After gathering the materials, the major prerequisite is a smooth, rigid subfloor to support the tiles. Ceramic tiles offer no flexibility, and voids from a rough subsurface can cause the tile to crack when bearing a load. The most difficult phase of the installation is cleaning and preparing the existing floor to accept the tile. Temporarily remove baseboards and trim molding. Use a pull saw to trim door casings and jambs to accept the thickness of the tile. Remove all appliances and furniture that contact the floor, including the toilet if tiling a bathroom.
If vinyl flooring is already in place, most professionals recommend removing the vinyl, which may create undesired flexibility in the supporting surface of the tile. Note: If there are concerns that the vinyl or linoleum flooring in question may contain asbestos fibers, it should be tested before attempting removal. For more information on asbestos, visit www.epa.gov/asbestos.
The exterior-grade plywood subfloor should be at least 1 1/8-inch thick and installed over floor joists spaced at a maximum of 16 inches on center to provide for a structurally solid foundation.
Because plywood’s smooth surface can swell and warp, many professionals also recommend installing 1/4- or 1/2-inch-thick ceramic tile backerboards as an underlayment over wood subfloors. Use 1 1/4-inch corrosion-resistant roofing nails or 1 1/4-inch ribbed wafer-head screws in combination with a thinset mortar bed to install the backerboards. The fasteners should be installed every 6 to 8 inches on center. Keep in mind that the addition of ceramic tile backerboards will increase the height of your new floor and may require adjustment of the transitions where the floor meets the wall.
If installing over a concrete slab, remove all paints, adhesives, gypsum-based levelers or other chemically treated substrates. Thoroughly clean the concrete to remove dust and dirt. Use only water to mop the floor, and allow it to dry completely. Fill any dips or waves with a Portland cement-based floor leveler. Very smooth concrete can be roughened with an acid-based solution prior to installation to strengthen the mechanical bond of the mortar.
The Layout Plan
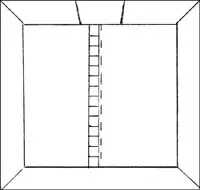
The layout design of a tile floor can be simple or artistically intricate. The following explains steps to achieve a simple grid pattern using square, uniform tile. With a smooth, prepared subsurface, snap a chalk guideline, and then lay a row of tiles without adhesive. Snap the line perpendicular to the room’s main entrance. Use a square to ensure the line is at a 90-degree angle to the entrance. Lay out the tile from the main door, allowing a full row of tiles to be visible when someone enters the room. Use a spacer between each tile. Plastic spacers are available, although many DIY’ers simply use the edge of a tile – just make sure the spacing is uniform.
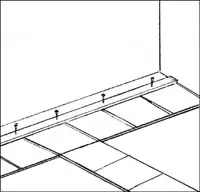
At the other end of the room, when no more full tiles will fit in the row, lay a 1-inch-thick board perpendicular to the row of tiles, temporarily fastening it into place along the far wall (or the border of your tile floor plan). Then lay tile along the board in both directions, creating a “T” formation. This board provides a stationary, square reference for laying the field tile. It can be removed later to finish laying the remaining tile along the wall.
Determine how much you’ll need to shift the center row of tiles to the right or left based on the amount of space remaining at the ends of the row of tiles along the far wall. Shifting the first row is to achieve equal borders on both sides of the room. Snap another chalk line based on this measurement (disregard the first line). The intersection of the new chalk line and the 1-inch board will be the starting point for installing the tile.
Time to Tile
Before laying the tile, skim a thin coat of thinset mortar onto the substrate. Mix the thinset to the consistency of smooth peanut butter and apply with the flat side of a thinset trowel to enhance the mechanical bond of the adhesive. Install the tile and mortar while this skim coat is wet.
Many professionals suggest applying thinset to the tile instead of the floor to achieve a flatter, cleaner floor, eliminating the potential for subfloor air pockets. This technique is most effective for tiles larger than 8-by-8 inches. Evenly skim the entire tile with thinset, with the depth of thinset never exceeding the depth of the notches in the thinset trowel. This helps to ensure an even set with no weak spots in the installed ceramic.
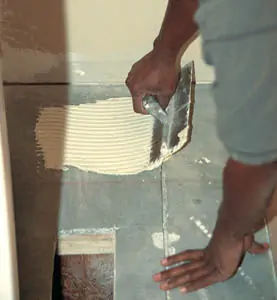
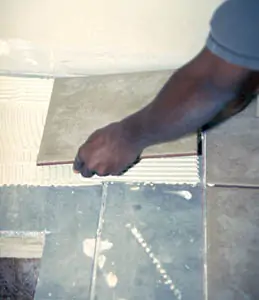
If applying mortar directly to the substrate, use a notched trowel to spread the thinset over the starting point of the floor. Holding the trowel at a slight angle, push down and outward to spread the mortar bed evenly with the ridges of the thinset laid in a uniform direction. Install the tile according to the chalk guidelines, keeping them evenly spaced and square and using a level to make sure the tile faces are flush. Tap down any uneven tiles with a rubber mallet.
Whether applying thinset to the mortar or substrate, apply a minimum of 1/4-inch-thick mortar bed, usually achieved with 1/4-inch notches in the thinset trowel. Use a wet toothbrush to scrub thinset from the grout joints between tiles as you install. This will provide a deeper base for the grout to anchor the tile. Continue this process, working back and forth across the room and covering 2-foot square areas at a time.
On the Border
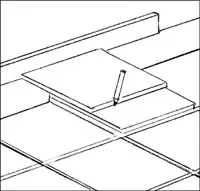
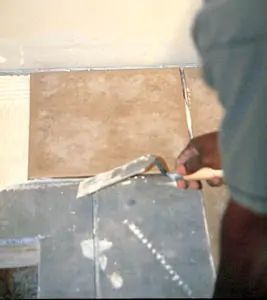
Use a glasscutter or special tile cutter to cut border tiles. To measure the cut, first stack a tile over the last full tile next to the wall, aligning all four edges exactly. Place the spacer against the wall. Then, over that tile, stack a third tile aligning the top and bottom edges, but shifting the third tile all the way over until it stops at the spacer. The exposed face of the second tile is the area you need to cut. Mark the tile with a line and score it with a cutting device.
Outdoor Issues
One of Extreme How-To’s readers recently asked if there were any differences between outdoor and indoor tile installation. Great question! You can upgrade an ordinary, gray outdoor patio by giving it a new tile surface. But first check with tile-store personnel regarding tile suitable for outdoor use — there’s a wide array of choices for exterior applications.
Step one is to prepare the surface with a concrete cleaner and pressure washer or stiff-bristled brush. If the surface is painted or otherwise finished, you may have to grind the surface with a walk-behind scarifying machine. These are available at most equipment-rental outlets.
Make sure the concrete is level with no dips or humps, or tiling will be nightmare, and it will have potential weak spots where the tile may break in the future. Also isolate any cracks. Use a liquid-based membrane system available at most tile dealers to cover the cracks. To apply, just brush on the liquid, lay the membrane over the crack, apply another coat and let it dry.
The acrtual process of laying out and installing the tile the patio is virtually the same as indoor jobs. However, Tim J. Bolby, driector of technical services for Crossville Ceramics offers a few basic guidelines for exterior tile installation that help to accommodate weather and temperature changes:
Expansion Joint Sealants
Class-25 (expansion ability in %)
Grade-P (for joints on horizontal surfaces)
Decisions, Decisions
Choosing the right ceramic tile for your home can seem a monumental undertaking, given the vast design options available. To assist the selection process Crossville Ceramics offers Cross-Vision. No, it’s not an optical disorder – Cross-Vision is a Web-based tool that allows the user to apply different tile colors, textures and patterns to a variety of virtual living spaces. First, with the click of a mouse, select from a variety of kitchens, bedrooms, living areas or other rooms. Next, select from a wide array of tile, tile sizes, layout patterns, and even grout and border designs. Your choices are then depicted on the on-screen living space. Compare and contrast one design option to the next, stretching your imagination and finding the look that works best for you. Once you’ve determined your selection, contact a tile distributor to specify the materials for your new ceramic flooring.


