

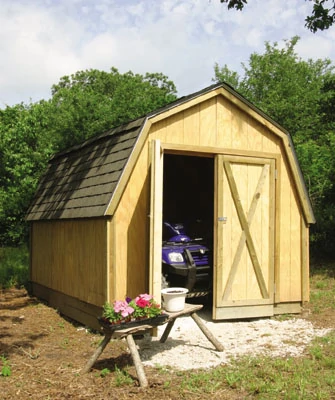
Pole-style construction provides an economical method of building a drive-thru shed, even if the shed is built on a sloping lot.
Tired of moving the riding mower every time I wanted to get to the tiller and vice-versa, I originally designed this garden shed with doors on each end. This would allow easy access to garden tools. Or, if you wished to pull a garden tractor with implement or trailer behind it, you can drive in one door. When you wanted to use the tractor again, simply open the opposite door and drive out. However, another problem had to be solved. The only location for the shed was on a slope. I could have constructed a wooden-floored shed, or used a concrete pad. In both cases, this would have added to the cost, and my desire was for an economical, easy-to-drive-into shed. The solution: a “mini” pole-barn. Pole construction is one of the most economical methods of building construction, and it’s also relatively easy.
Basic construction consists of setting poles in holes in the ground and anchoring the poles in place with concrete. Pole barns are often made of round poles, but square posts can also be used, as in the shed shown. The poles or posts must be pressure treated or otherwise suitable for in-ground use. After the posts are set, girts, or horizontal nailing boards, are nailed to the posts and siding is anchored to the girts. Typically, a truss roof is then used to construct an open-type building. The small pole shed shown is also an excellent “practice” project for anyone wishing to construct a large pole building. The basic construction techniques shown can also be used to construct a larger garden building.
Before you begin construction, contact your local building authorities regarding any rules and regulations for pole buildings, as well as the recommended depth for the holes containing the poles. Also check for any standard rules, regulations and permits needed for constructing any building. The shed shown is permanent, not movable, so it may be subject to additional permits and regulations.
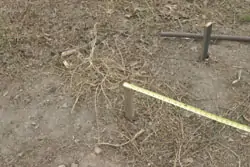
First step is to lay out the building. Use short stakes to locate the poles. Measure diagonally between the corner stakes to establish a square building.
Dig the holes to the depth needed for your particular soil and region.
Girts and Skirts
The first step is to lay out the building. Determine the direction of the building, aligning it with existing buildings as desired. Drive small stakes at each of the four corner locations as per the wall lengths, with the outside corners of the stakes the outside measurements of the poles. Note; this is not the final building size, as the 2 x 4 horizontals must also be figured in the final measurement. Measure diagonally from the outside edge of a stake corner to the opposite and then repeat for the other diagonal. These measurements should be the same to ensure a square building. If the measurements are not the same, shift the stakes until they are equal.
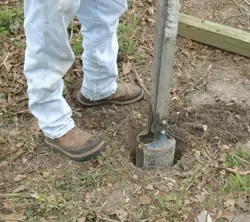
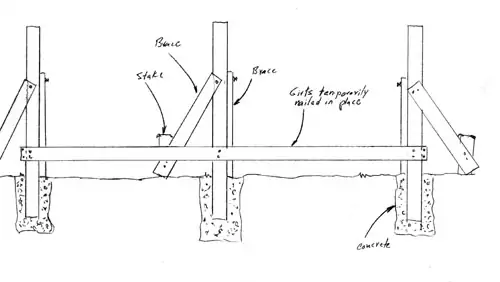
Dig the holes to the recommended depth. This may vary, but 2 feet would be considered adequate for this size building in most locations. Position the poles in place in the holes. On sloping lots, make sure the lower slope poles are not set so deep their tops are not high enough. Plumb the posts and brace them in place. Measure diagonally, inside to inside of the corner posts, and relocate them to reestablish a square building. Tack-nail a temporary girt to the posts about a foot off the ground. This not only helps to maintain the correct distance between the posts, but also aligns the post sides. Locate the door posts and additional side posts, and make sure they are the correct distance from the other posts as well as plumb. Brace them in place. Once all posts are properly located and braced, mix concrete and pour around the posts. Smooth the top of the concrete flush or slightly above ground level. Allow the concrete to cure for several days, and then remove the braces and temporary girts.
Posts are loacted int the proper possition, Plumbed and braced. A temporary “girt” board helps establish location. Then pour concrete around the posts.
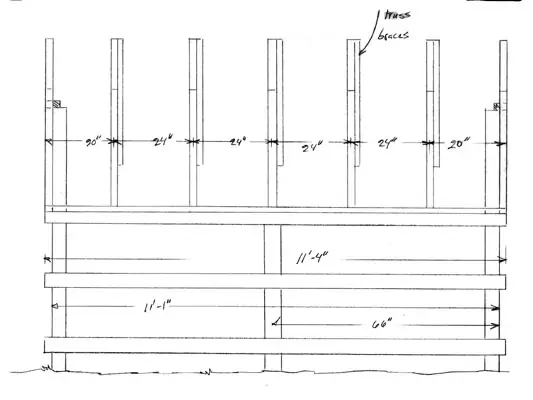
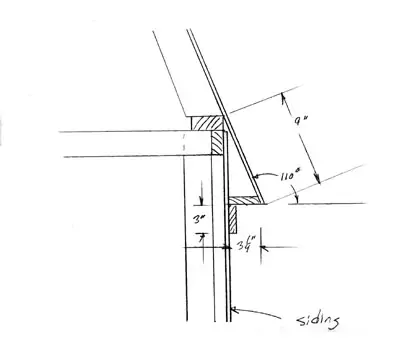
If on a sloping lot, position the lowest-to-ground-level, bottom side girt in place. Make sure it is level. Install the end girts, positioning them flush with the ends of the side girts and then positioning them level. Note; the girts are installed in place and the siding added, then the door openings cut out. Finally, install the next lower side girt. Once the bottom girts are in place, install the “skirting” boards of treated materials. On a sloping lot this may entail cutting some bottom edges of the skirting boards at an angle. Leave off the end skirt board until the siding is installed and doors are cut out.
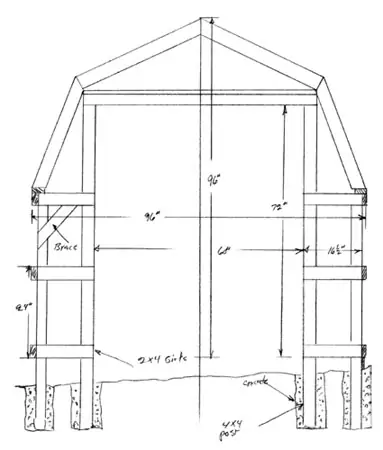
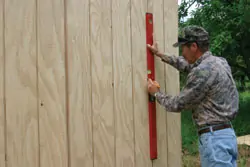
Fasten the lower girts in place, making sure they are level. Measure up for the side posts and mark their heights, making sure these are level all around the building. Then mark around the posts and cut them off at the correct height.
Measure up from the bottom girts, and mark the locations of the top side girts on each end post and the center side posts. Make sure the girts are level. A string level and line can be used for establishing these final pole heights, or you can use a girt, held in place and level, to mark the locations. Square around the posts and cut them to the correct height. Fasten the top side girts in place. These will protrude 1-1/2 inches past each post end. Then position a top side plate flush with the outside edges of the top girt and fasten it down on the top side girts and to the tops of the posts. Add the middle girts. Fasten a girt to the end, starting at the top side girt, and fasten to the opposite corner post. Make sure it is level. Repeat for the opposite end. Then locate and position the middle end girts. Finally, position and anchor the opposite top side girt and the middle girt.
Measure the height needed for the over-the-door girt on the door posts. Make sure this is level and then cut each door post off to the correct height. Fasten the girt in place, then again nail a top plate down on each and flush with the outside edge of the girt. Repeat for the opposite end. Pole barns are typically braced with 45-degree angle braces anchored to each post and toe-nailed or screwed to the underside of the top girts. This creates the “wind-bracing” needed.
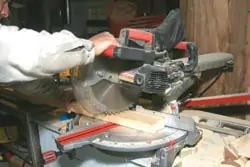
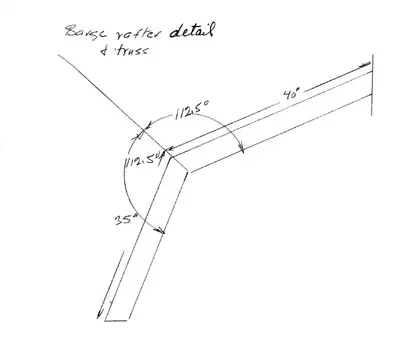
The roof is constructed of trusses. A miter saw makes cutting the angles precise and easy.
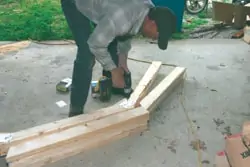
Make a master truss and try-fit in place. Then build the remaining trusses by laying the pieces of another truss on top of the master truss and using it as a pattern.
Roof Framing
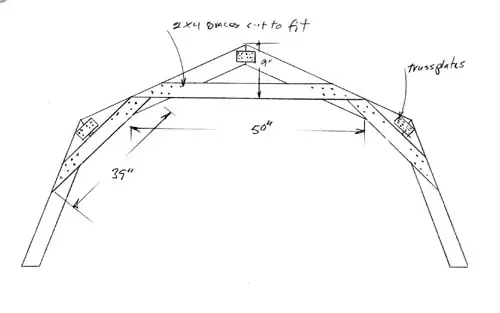
The next step is to build the trusses for the roof. Although construction is fairly simple, properly laying out the trusses and making the cuts at the proper angles is extremely important. Make a “try-fit” truss. Cut each piece to the correct size and angle. A radial arm or miter saw is excellent for this as the angles can be set precisely. Or you can use a bevel square set to the proper angles and make the cuts with a portable circular saw. Lay the pieces on a flat, smooth surface and fasten together with metal truss plates or hardboard plywood braces. Make sure the outside bottom corners are at 8 feet. Do not add the 2-by-4 braces at this time.
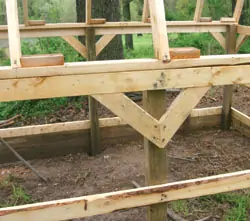
The basic shed framing is complete. Not the 45-degree angle braces on the girts and posts. The trusses are nailed to blocks on the top plate for additional stability.
Install the siding
Try-fit the sample truss on both ends as well as in the middle of the building. You’ll need a helper for this chore. Adjust any angles or lengths as needed. Once you’re satisfied with the fit, lay the sample truss on a smooth, flat surface. To speed up the process and provide more accurate truss construction, set up the saw and make all same-angle cuts. Then set up for the next angle and make all those cuts. Once all pieces are cut, position them down on the “master” truss and fasten together with truss plates on both sides, as well as with the 2-by-4 braces. Note the two end trusses do not have the 2-by-4 braces.
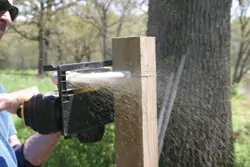
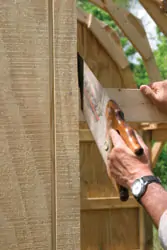
Mark the angles cuts and door openings from the inside using a small drill bit. Use a straight edge between the holes on the outside to mark the cuts.

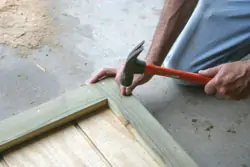
Then make the door cuts with a portable circular saw.
With a helper, erect one end truss. Toe-nail it to the top plate. Use a 2-by-4 end brace temporarily nailed to the end girts and to the top corner of the truss, to hold the truss in place. For additional strength, nail short blocks down on the top side plates and nail the trusses into the blocks. Position two more trusses in place, making sure they are located in the proper position. Then tack-nail a temporary 2-by-4 brace across their tops, again making sure they are positioned properly. Repeat for the opposite side. Then erect and install the remaining trusses, anchoring the end truss again with a temporary 2-by-4 brace to the end girts.
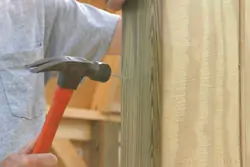
Complete the cuts on the girts with a handsaw.
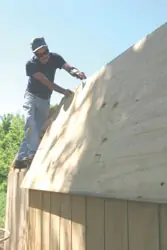
Install sheathing and shingles on the roof.
Exterior Construction
Now you’re ready to install the siding. Position the end siding panels in place and anchor them solidly. Locate the corners of the door openings and the roof truss angles by boring small holes through the siding at the proper locations from the inside. Use a straight edge to mark between the holes. A portable circular saw, saber saw or even a reciprocating saw can then be used to cut off the excess plywood at the top ends and to make the door cut-outs. Once the door openings have been made, use 2-by-4 blocking flush with the outside edges of the posts, between the girts and between the posts and the siding. Cut the siding for the sides and install it 1/2 inch lower than the top edge of the top side plates.
Finish details include adding the trim ripped from 1×12’s
Construct the doors from the cut-out siding pieces.
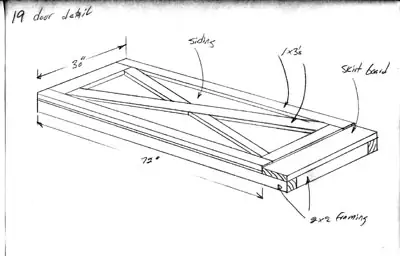
Final construction step is to assemble the doors and hang them in place. The doors are constructed using the siding cut-outs from the ends. 2-by-2 backing is used for strength and 1-by-3 trim boards are added to the door fronts. The building can now be painted in traditional “barn-red” and white trim, or painted or stained any color pattern desired to match or complement existing buildings.
