Building a bridge for a volunteer project demonstrates DIY takeaways for every job.
By Mark & Theresa Clement
When Theresa and I were asked if we could help out at Rebuilding Together’s Annual National Project called Building a Better Neighborhood, our assignment was to build a small bridge. You know the kind: one that usually spans a small creek or gulley in a back yard.
Small or large, we’ve always wanted to build a bridge, but having seen some pretty awesome—and pretty grim—backyard crossings, we wanted this one to rock.
And even though this bridge is a one-off project, there are some cool things you can use to both build a bridge of your own and solve other home improvement headaches from footings to flooring projects to leaving your city better than you found it, which we’re calling “DIY takeaways.”

Design
We built the bridge for a neighborhood community center, kind of an anchor point to an urban neighborhood that was rebuilding itself. Our mighty span of 14 feet is over a shallow “bio-swale” that collects and naturally filters run-off from the parking lot and the playground area above—a micro-wetland in the middle of America’s 5th largest city, Philadelphia.
We needed a bridge that could accommodate everything from wheelbarrows to wheelchairs and look good doing it.
Bridge Deck. One key was to make the crossing be part of the landscape rather than something “applied” over the top of it. The building-side of the bridge span (where the walking path and community center were located) was the highest point, and we used that as our layout control point. Because it’s about 12 inches higher than the parking lot, it became important to terminate the building-side into grade (i.e. the level of the existing ground). This makes a smooth transition and lowers the bridge on the parking lot-side for a more accommodating ramp down to the macadam.
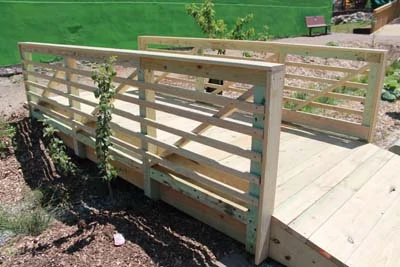
Rail. We made the guardrail look cool, but not too busy—and not exactly like a backyard deck or store-bought bridge. At the same time, we wanted it to do the same job of a backyard deck safety-wise.
How-To
The bio-swale proved both easy and challenging to build in.
It was easy because the span wasn’t that long, and we could use solid-sawn, pressure-treated dimensional lumber (donated by Culpepper Wood Preservers.)
It was, however, a layout challenge because the tops of the footings were about 16 inches below grade. In other words, our holes were in holes—weird.
On the parking lot side, we could set the joists on the sidewalk curb.

DIY Take-Away—Footing Layout. Whenever I’m building something where there’s nothing dependable to measure to or from, I know there will be problems later if I’m not extremely careful. The best way to short-circuit this problem is with full-size templates. In this case, we built a giant square from super-straight Western Red Cedar 2×4 so that we could locate and mark our footing posts the same distance away from the curb as one another and be confident they were the correct distance apart (4 feet).
Grade Beam Attachment. I’m not a big fan of J-Bolts and wet concrete no matter how carefully I lay out. Using post-bases and drop-in anchors like the galvanized Red Head sleeve anchors works better. To set them we measured again, marked the center of the hole, then drilled 1/2-in. diameter holes in the cured concrete with a Bosch Bulldog rotary hammer. We inserted the anchors and socked them up tight, dead-money on layout.
Next, we set our 4×4 grade beam and fastened through the bracket flange with hanger nails. This method is fast, solid and rated for ground contact.


Bridge Deck Framing
The best way to frame a structure like this isn’t joist-by-joist over the span, but all at once on a flat surface. Because the parking lot was right there, we spared ourselves the headache of setting 12 ft. 2×12’s individually and built the box (flushing the framing to the top side if there was variation in board thickness), nailing with galvanized ring-shank nails.
Were we to build a bridge in a back yard, we would consider employing this technique if it were close enough to a drive-way or other flat surface—and we had enough muscle to move it later.
Joists are 2×12—oversized for this span but worth their weight by ensuring a solid structure over time. They are laid out left to right with 16-in. on-center spacing.


Next step is to pull diagonals on the box to square it up. Once square, nail on 2x diagonal bracing. Then, recruit enough strong-backs/weak-minds to lift and set the unit as a whole. Double-check that you’re on layout and nail to the grade beam.


Decking
Before laying decking, ensure the outside joists are straight. You might have to install blocking between the joists to true-up a curved board. Also, if you’re using 2×8 or 2×10 framing, intermediate blocking stiffens up joists.
We alternated two 2×6’s and two 2×10’s for our decking pattern, again to make the project special and buildable all at the same time. Most lumber manufacturers don’t recommend boards wider than 2×6 for a deck because they say wider boards are more prone to movement. However, I’ve used 2×10 on a 3-ft. wide play-set bridge we built, and it has performed just like 2×6 decking
I installed elsewhere on the structure.
The installation trick is to get 10-ft. deck boards and cut them in half before installation. Next, set each board a few inches wild over each side then snap lines and trim all at once just like a deck.


Guard Rail
The 4×4 guard posts are installed equidistant from each other every four feet. What this means for layout is that we marked the centerline of the bridge span, then pulled 24 inches on either side of that, which signifies the centers of next two posts. Next, we pulled 48 in. from those lines, which is the center of the outside two posts. Between the posts at the bottom, we LedgerLOKed 4×4’s for a beefy trim board.
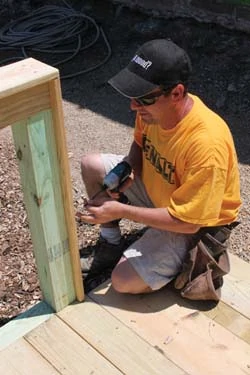
We installed the guardposts with FastenMaster’s ThruLOKs which are the best thing to happen to guard rail installation since impact drivers—which is what you should use to install them.

However, a bridge is a horizontal structure by nature, and Theresa wanted the look to reflect that, so instead of running vertical 2×2 she specified horizontal rails. We made them by ripping down 5/4×6 deck boards 2 inches wide (we routed roundovers on the saw-cut edges) and installed them with 2-1/2-in. deck screws at 5 in. on center per the DCA-6 Prescriptive Deck Code. The reason for this spacing is so that a 4-in. sphere (for parents, read: infant’s head) can’t pass through the opening.
DIY Takeaway—Got a deck to build?Use the DCA-6 for all your details and code requirements to make sure your structure is compliant for the building inspector.

Theresa spec’ed 2×4 diagonals between the posts to join the vertical and horizontal lines—homage, if you will, to larger trestle bridges and structures. Finally, we wrapped the end posts and 4×4 guardrail with a 5/4×6 trim board.

Terminations
To minimize digging and to clear the rest of our span, we built a bridge extension on the building-side of the span to take us the remaining 24 inches.
At grade, we dug a trench 8-in. wide and 10-in. deep, filled it with about 6 in. of pea gravel then tamped another 4×4 grade beam into it level. We packed around that with pea gravel and dirt.


On the bridge side we locked it to the band joist with LedgerLOKs then decked it.
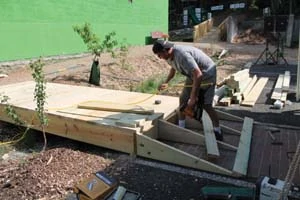
The parking lot side of the bridge posed a challenge. The goal was to frame a ramp that was in-plane with the bridge decking and easy to roll onto in a wheelchair or with a wheelbarrow. However, because the parking lot surface pitched in two directions, the geometry was a little befuddling. It’s so site-specific that it’s hard to draw a general lesson from it, but in order to keep the ramp level we had to scribe each joist level with the first joist we set. To keep it level—and in plane—the ramp is slightly pie-shaped.


At the top of the ramp, we ripped a 12-deg. angle off the last ramp board where it meets the horizontal decking to mate up the pieces without a trip step.
Where the boards met the parking lot, we made a taper. I do this on custom thresholds in flooring projects all the time, what you do is: Tilt the table saw blade to 12 degrees then run your piece through on–edge. This is a great way to make custom thresholds in flooring projects as well. (For interiors, it is critical that you sand out the saw marks before staining.)

And here’s the bridge theme again. An unintended consequence of working on volunteer projects, such as this bridge build, is that you’re sometimes solving problems on the fly. And, sometimes you need to bring your entire bag of tricks with you to get the job done. But what you might find working with a stranger on a volunteer project is that they may have their own bag of tricks to share with you… helping you to “cross over.”
Editor’s Note: Mark and Theresa Clement host MyFixitUpLife.com
Side Note 1
Volunteering
Theresa and I have volunteered on a number of different home and community improvement projects. Some are small like planting trees in our neighborhood; some off the charts like Extreme Makeover: Home Edition project in Joplin, Missouri. On these projects we’ve met champions of endurance who don’t know how to quit, no matter how bad things are. Those are winners worth a weekend in my book—nevermind the opportunity to meet and hang out with other cool Extreme How-To-minded people who we’d never otherwise meet. This is one of the reasons why Theresa and I dig working with Rebuilding Together.
The organization’s approach is founded in neighborhoods and home-owners that are invested—people who own the homes and are committed to turning the page not just for themselves but for their community. More and more, the organization is taking on “cluster builds”—entire neighborhoods rather than a single home. These projects are making a critical change … crossing over.
The economy is tough for everyone and it is toughest on those with the least to lose. That’s math, not politics in my view. I believe that the markof a civilized society is that it judiciously helps those willing to help themselves, and that’s what Rebuilding Together aims to do—one house, one neighborhood at a time, one life at a time. Learn more at www.rebuildingtogether.com.
Side Note 2
DIY Takeaway: Pulling Diagonals
If you’re an EHT’er you likely know that “pulling diagonals” is the way to check if a square-shaped or rectangular-shaped structure is “square,” i.e. has 90-deg. corners.
Put another way, if you pull two tapes from opposite corners of the structure (like an X across the structure) and get the same measurement on both tapes, the structure is square. If you don’t, you have to rack it one way or the other until it is square.
However, there is nuance to this measurement that if you don’t know can come back and bite you later. Here are some tips:
Pull your tape tight. A deck frame, for example, is a long enough distance that if your tape sags a little, it can through you off by inches.
Don’t twist the tape. Same as a sag—deforming the tape can throw off your measurement.
Hook and read from the same edge of the tape blade. This might be the trickiest one. I always read my tape from the side of the blade the numbers are on, what I call the top. If you’re pulling diagonals with a helper and you’re both reading the tape from a different edge, then your measurement is off.


