

By Monte Burch
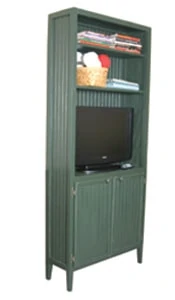
Need a new place to keep books, a television or hobby supplies? Then build a Beadboard Bookcase.
I call it the “Hobby Lobby room.” My wife, Joan, calls it her sewing room. In any case with the kids grown and gone, it’s a bedroom turned into a room for her hobbies and occasional guests. She also likes to watch some of the crafting, sewing and quilting shows on television, so we looked at all the prefab, put-together TV cabinets available in stores. I made the mistake of saying I could build it better and cheaper.


Joan wanted something to hold a TV and also store her collection of craft books, magazines and other crafting and sewing supplies. I decided to build a dual-purpose case from stock construction lumber, including white pine or fir 2-by-4’s and 1-by-12’s, except for the back. I really didn’t want to use pine plywood, and then I saw a sheet of beadboard at the lumber yard while sorting through wood for the frame. Beadboard is decorative, yet fairly economical and can provide a good strong back to help hold the casework together. Joan wanted to paint the case a dark color, the in-look in the decorator stores these days, and chose a dark green to match the wallpaper border in the room.


Legs and Frame
First step is to obtain the materials. The legs and frame are ripped from stock 2-by-4’s, and it will probably take some sorting through the lumber pile to obtain straight lumber with little or no knots. Minor defects can be covered with wood filler, but loose knots and major cracks can’t be patched.

Rip the stock 2-by-4’s into 1-5/8-inch thicknesses. Two 8-footers will make the four long leg posts and the four top and bottom cross-pieces. Once ripped, smooth the sawn edges and cut the posts to 1-1/2 inches, creating 1-1/2-by-1-1/2-inch posts. A jointer, hand plane or power planer can be used for this chore. Rip the front and back cross-pieces in the same manner.


Mark the location of the top end of the tapered legs, or 6 inches up from one end of each leg post. Using a plunge router and a 3/8-inch straight bit, rout a dado from this mark to the end of the leg post. Then cut off the leg posts to 78 inches and cut the 8-1/2 inch side cross-pieces to length from the remainder of the board. Using a small square, mark the bottom front and inside edge of each leg post at one inch, then cut the tapered feet using a saber saw. Using a belt sander, smooth up the cut edges, and then finish-sand.


Beadboard Components
Place the beadboard on two sawhorses with 2-by-4 spacers underneath. Set a circular saw blade to cut just through the beadboard. Cut crosswise at 6 feet. This will create the back and two sides, with the short cut-off end piece used for the doors. Cut the side beadboard pieces to width and length. The sides fit into the dadoes in the leg posts and side cross pieces.

Try-fit all parts of one side, place glue in the dadoes and assemble the pieces. Clamp, making sure the assembly is held square, and leave overnight. Assemble the opposite side in the same manner.


It’s much easier to paint the pieces before final assembly. Paint both the inside and outside of the assembled side frames. Lay the side frames together and mark the inside back edges of each. Then, using a plunge router, cut a 1/4-inch deep by 3/8-inch rabbet on each inside back edge, stopping at the top of the feet.

Fastening the Casing
Much of the remainder of the case is assembled with pocket screws, using a Kreg Pocket Screw Set.

Cut the front cross-pieces to length, paint them and drill the pocket holes using the Kreg jig and bit. Place towels or other soft padding on a smooth, flat surface and fasten the front cross-pieces to one side using pocket-hole screws. Fasten the opposite side in place in the same manner. Note that you are assembling the case front-side down, so make sure you keep the jointing edges flush on the front.


Cut the bottom, center shelf and top to the correct length and width. Then, drill the pocket holes using the Kreg jig. Position these components and anchor with pocket screws.

Rip the back cross-pieces to 1-1/2 inch thickness, and fasten them in place with pocket-hole screws from the bottom to the center shelves and top. Drive No. 8 finish nails from the leg posts into their ends. Set the nail head below the surface and apply wood putty.

Cut the bottom and two upper shelves to width and length. Note they extend from inside the front side leg posts, past the back side leg posts to the rabbet in the back leg posts. These must be notched to fit around the back leg posts. Fasten in place with No. 6 finish nails through the side beadboard into the ends of the shelves.

Cut the back to correct width, paint it and fasten it down on the back cross-supports and into the side rabbets. Use No. 4 cement-coated nails or one-inch staples with an air-fastener. Use a carpenter’s square to make sure the assembly is square. Also fasten the back to the back edges of the bottom and upper shelves.

Door Construction
The doors are frame-and-panel style, using beadboard for the panels. The frames consist of 1-1/2 inch rails and stiles. The rails and stiles are joined using a CMT rail-and-style bit in a router table. The bit used is a one-piece bit, rather than a two-piece with separate bits for both rails and stiles. Simply set the bit at the correct height for the stiles, cut those, then set the bit lower for the rails and cut those to match. The set automatically cuts the dadoes on the inside for the panels. The beadboard used for the panels, however, is 3/8-inch thick and the bit cuts 1/4-inch dadoes. The back edges of the beadboard panels must be cut down 1/8-inch. This can be done using a table saw, with guard and splitter removed and cutting the pieces on edge. Or use a belt sander, with the panels clamped to a surface. A hand plane can also be used for this chore.

Place a panel in a stile, add another stile and apply glue to the dadoes in the ends. Then tap the rails in place over the panel ends and into the dadoes of the stiles. Clamp securely, making sure the assembly is square. Assemble the other door in the same manner. Install the doors using self-closing hinges.
Fill any holes, including nail holes, and paint any parts needed (or repaint any scratches created). Add knobs to the doors for a final detail to your new beadboard bookcase.
Materials List
• Leg posts, 1-1/2x 1-1/2 x 78”, 4 req’d.
• Side cross-pieces, 1-1/2 x 1-1/2 x 8-1/2”, 4 req’d.
• Side beadboard, 3/8 x 8-1/2 x 69-1/2”, 2 req’d.
• Front cross-pieces, 1-1/2 x 1-1/2 x 29-1/2”, 3 req’d.
• Rear cross-pieces, 1-1/2 x 1-1/8 x 29-1/2”, 3 req’d.
• Top, bottom and center shelf, 3/4 x 8 x 29-1/2”, 1 each req’d.
• Bottom and upper shelves, 3/4 x 9-1/4 x 30”, 3 req’d.
• Back, beadboard, 3/8 x 30 x 78”, 1 req’d.
• Door stiles, 3/4 x 1-1/2 x 25”, 4 req’d.
• Door rails, 3/4 x 1-1/2 x 13”, 4 req’d.
• Door panels, bead board, 3/8 x 13 x 22”, 2 req’d.
• Knobs, 2
• Hinges, 2 sets
• Support braces, 3”, angle-iron braces with screws, 2 req’d.
