A fence can add a lot to a landscape. A fence can divide property lines, boost home equity, add to the outdoor décor and safely contain animals.
When it comes to constructing a fence, you have a lot of options to consider for materials and design. Fence materials range from metal and wood to vinyl and wood-plastic composites. For an easy-to-build fence, you might consider using pre-assembled panels, which can dramatically reduce building time.
However, if your yard is sloped, then to keep the panel tops level you’ll have to stagger the panel heights where they fasten to the posts. If the yard has a significant grade, the staggered panels will create gaps at the bottom of the fence, through which a family dog can escape.
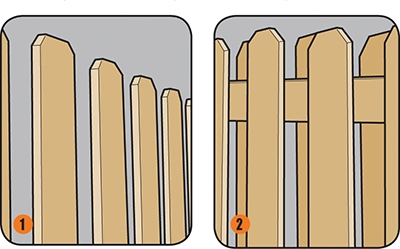
The alternative is a privacy fence built to closely follow the grade of the yard. The pickets can install along one side of the fence, or you can install a shadowbox style fence, which alternates the position of the pickets from one side of the stringer to the other.
For the framing, treated lumber is often used. Posts can be made from 8-ft. 4×4 posts, and the horizontal stringers (also called fence rails) can be made from 8-ft. 2×4 boards. The treated posts should be approved for ground contact.
For the fence boards or “pickets,” you can use treated wood or a species such as cedar or cypress that have natural preservative oils to resist insects, decay and chemical corrosion.
Use fast-setting concrete sold in ready-mix bags to set the posts. Simply pour in the mix dry, straight out of the bag into the post hole. Once the post base is buried, pour about a gallon of water per 50-lb. bag over the dry mix, which then cures in about 30 minutes. Use roughly 1-1/2 bags per post.
Fasten all connections with hot-dipped galvanized nails with ringed shanks for extra holding power. Make sure your fasteners are approved for exterior use in chemically treated lumber.
Planning the Layout
Check with local officials regarding building codes and any necessary permits. Some neighborhoods may also have certain architectural guidelines or “covenants” that restrict design. Also, double-check that the location of your proposed fence is not on a neighbor’s property. And before digging, always dial 811 nationally to get underground utility lines, cables and pipes marked for free.
Within local code limitations, the height, décor and trajectory of your fence are up to you, and may be dictated by other obstacles in your yard, such as trees and sheds.
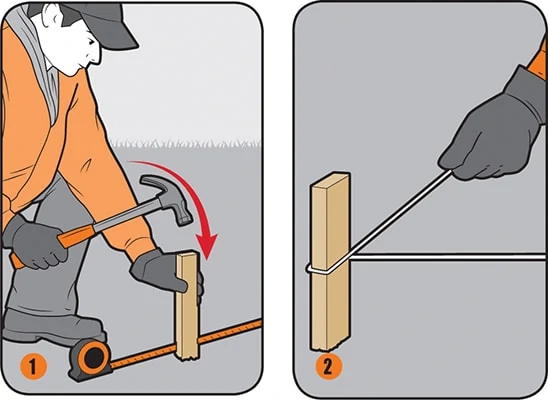
Mark the fence location with stakes and string, then walk the perimeter with a tape measure and spray paint a large “X” to pinpoint the precise placement of each fence post. Fence posts are usually spaced 6 to 8 feet on center. The closer the fence posts, the stronger the fence. (Note: This measurement is also crucial for the sake of your materials, because dimensional lumber is sold in standard sizes. So, if your posts are accidentally spaced 8 ft., 1 in. apart, then an 8-ft. board will be too short. In such a case, you would have to purchase a 10-ft. board and cut off 1-ft., 11 inches to create a stringer long enough, which is a waste of material.)
Setting the Posts
A good rule of thumb is to dig holes for fence posts deep enough to bury 1/3 the overall height of the posts (2 ft. deep at a minimum). Dig deep enough to set the post below the frost line, which will help prevent frost heaving. Additionally, dig an extra 4 to 6 inches deeper than the desired post depth to place a gravel bed beneath the post for drainage.
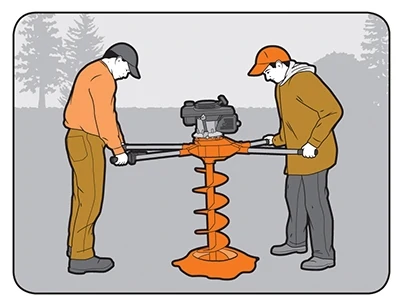
Be prepared for a lot of digging. A traditional way to dig a post hole is with a manual clamshell digger and a trench shovel. To speed up the process, enlist some help and rent a two-man powered auger to dig the holes.
Pro Tip: While digging, soak the base of the posts in water sealer. The best method to do this is to use a tall bucket and place about 4 posts upright in the bucket at once. Their mass displaces the water, which rises to the top of the bucket, soaking the bottoms of the posts. After soaking for about an hour, rotate four new posts into the bucket to soak.

Set all the corner posts first. Have a helper hold the post upright while you use a hand level to make sure it is plumb on top of the gravel bed. A post level is also helpful, because it frees your hands by strapping around the post while placing level vials on two adjacent sides.
Once you’ve established that the post is plumb left to right and back to front, brace the post in place. If you have a helper, they can hold it in position while you add the concrete. Otherwise, you’ll need to nail scrap lengths of wood that extend from the post to the ground to act as moveable braces, with the nails serving as their pivot point for adjustment. Plumb and square the post, adjust the braces to hold it plumb, and then add the concrete. Use a sledge hammer to pound the posts into the ground once they’re surrounded by concrete, then recheck for plumb and adjust if necessary. Leave the braces in place while the concrete sets.
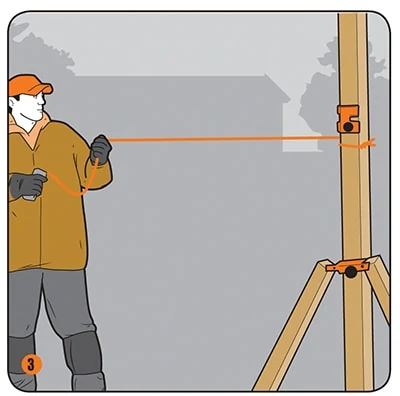
Once the corner posts are set, fasten a new string line between them to line-up the other posts. Keep the line on the outside face of the posts and secure it tightly. This string will guide placement for each post between the corners. Set the remaining posts in the same manner, making sure the outside faces of the posts are plumb and line up exactly with the string to keep the fence straight.
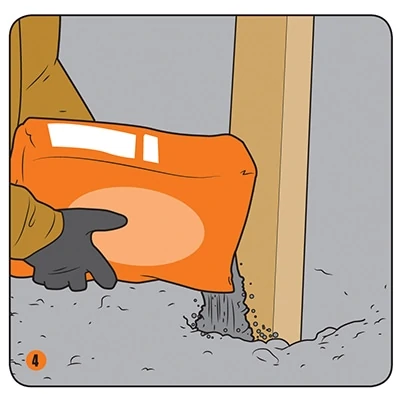
Pour the dry fast-setting concrete mix into the post holes. Then add water; no mixing is required. Note: If you’re using standard concrete that should be premixed, you can mix small batches with a wheelbarrow and shovel or hoe, following the manufacturer’s instructions for the required amount of water.
Allow the posts to set. Once the concrete is hardened, cover it with dirt and slope the earth away from the post to divert water.
Installing the Stringers
For a standard 6-ft. tall fence, position the bottom stringer 10 inches up from the ground. Space the other two stringers evenly apart. You may need to alter placement, depending on the height of your fence.
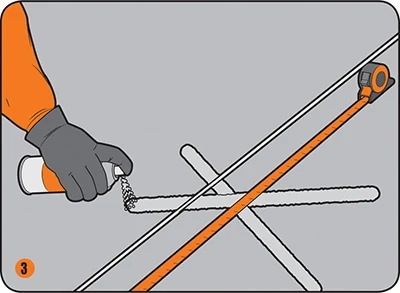
Pro Tip: To prevent repetitive measurements, make a story pole from a scrap piece of wood. Mark the position of each stinger height on the pole with masking tape. Place the pole alongside each post and use the tape to determine each stringer location, marking it with a pencil.
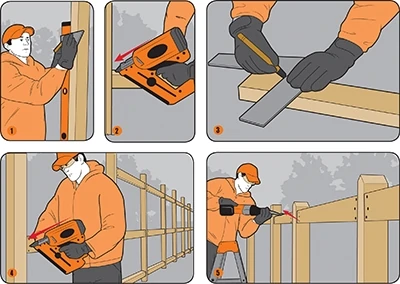
You have many options for attaching your stringers, such as face-nailing, mortise and tenon joints, or toe-nailing. For a shadowbox fence, the stringers are often toe-nailed between posts. To toe-nail, drive at least two nails into the side and one nail through the top of the stringer and solidly into the post.
If you’re toe-nailing stringers that follow a slope, they should be cut at a miter to fit flush between the plumb posts. First, butt the square end of one uncut stringer against the penciled location on your left-hand post. Hold that end firmly against the post while you position the other end of the stringer so it overlaps the right-hand post at the pencil marks. Mark the stringer using the post as a pencil guide. Remove the stringer and take to the cutting table.
Use an angle finder to transfer that angle to the left-hand end of the stringer. Before cutting the miters, recheck the post-to-post measurement to make sure you don’t cut it too short, and remember to account for the 1/8-in. wide blade kerf of a circular saw.
When it comes to nailing the fence together, expect a lot of it.
A framing nail gun will be a huge help, either air-powered or cordless. Use 3-in. hot-dipped ring-shank nails for all framing members.
With all stringers in place, use a reciprocating saw to cut the tops of the posts so they’re all the same height. Cut the posts in a manner that diverts water from standing atop the posts, which could contribute to rot. You can cut pyramid-like crowns, cover them with post caps, or just slice them off at an angle.
Installing the Pickets
Attach the pickets (also called fence boards) securely against the stringers. For a shadowbox installation, cut a spacing block slightly narrower than the width of the boards, so there is a slight degree of overlap among the alternating pickets.
Place the first board along the corner post and use a 4-ft. level to find plumb. Nail it home, using two nails per stringer location. Place the spacing block next to the first picket and position the second picket against it. Drive in one nail at the top stringer. Use that nail as a pivot while you find plumb, then nail that picket home as well. Follow suit down the stringer, spacing each picket with the block. In case your fence boards vary somewhat in height, keep an eye on the tops so they line up consistently and adjust their placement against the ground if necessary
For shadowbox installation, once you reach the next post, return to the first post on the opposite side of the stringer. Center a picket across from each space provided by your spacing block to achieve the alternating picket style. Install the boards in the same manner, spacing, plumbing and nailing.
If you prefer the picket tops to follow a straight line between posts, walk the fence and locate the high and low spots before installing. Tack a picket (preferably at posts) to each of those high or low points. Start a nail in the top of those pickets and string a line between them to guide picket alignment as you go.
Finishing Touches
The fence should be protected with a waterproof sealer. Although time constraints and inclement weather doesn’t always allow, it’s much easier to pre-apply the finish to the fence components before construction. Prefinishing the boards also grants access to all sides of the pickets and stringers that might otherwise be inaccessible once built. Use a stain/sealer product from a reputable manufacturer to protect against rotting, water damage and UV rays.
Side Note
Fence gate Design
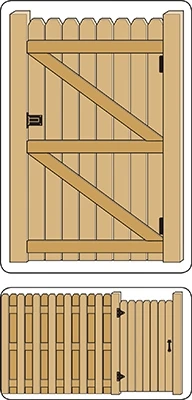
A fence can have multiple gates, such as a single-door gate and a two-door gate for a pickup truck.
It’s a good idea to purchase the beefiest hinge hardware available at the hardware store, because gate hinges are notorious for failure over time. Install according to the manufacturer’s instructions. To construct the doors, fasten all pickets on the same side of the stringers to provide a solid plane to mount the gate hinges.
When constructing the gate doors, use ample bracing. For large doors, skip the conventional
“Z” shaped bracing in favor of a “double Z.” Build each door with three 2×4 cross braces perpendicular to the fencing and two diagonal braces connecting them, with the fence boards nailed into each brace they cross.
Correctly constructing your gate’s support posts is also critical. You’ll get more stability from 6×6 posts rather than 4×4′s. Each post should be anchored with a concrete footing and be buried in the ground a third of its height. At the base of the two posts, you can add extra strength by installing a horizontal post flush between the two, or use a poured bridge of concrete, to prevent the posts from pulling towards each other at the bottom due to the weight of the gate doors.
If you enjoyed this story and the detailed illustrations, you’ll love The Quick & Easy Home DIY Manual, Extreme How-To’s book available on Amazon.