
If you are planning an addition to your home, or are going all the way and building a new home, Too often, floors have annoying squeaks or bounce, which can mar an otherwise quality job on the rest of the project. But a correctly built floor is a hallmark of good construction and can help support the long-term value and enjoyment of your home. Paying careful attention to the framing will help provide a solid and silent floor, plus reduce the risk of cracks in tiles, or gaps and bulges that show through carpet, linoleum or other floor coverings.
Quality builders will tell you that viewing the overall structural frame as a system, instead of individual components, helps deliver a stronger built home; this goes the same for your floors. Selecting and installing joists, rim board and floor panels that perform as a cohesive unit provides superior quality over installing with a piecemeal approach. Think of a finely tuned engine: All of the parts must fit together precisely and work as one for optimum performance. And, using modern materials, such as engineered wood products, can help speed construction and improve overall quality.

Plan Ahead
The first step in creating a superior floor is working out the details in advance. This is critical because it can be difficult and expensive to try to retrofit a poor floor installation.
Fortunately, you don’t need to be a contractor or architect to develop a well-thought and workable plan for the floors. Many lumber and building material dealers—especially those who support professional builders—have the tools and resources to help turn your basic ideas into a detailed plan. They can show you the size, spacing, and span for all materials, and then provide a detailed list to help you get the right supplies. As with any construction project, you should check with your local building department to ensure compliance with codes and to confirm if an engineer of record will need to review and stamp the plans.
The traditional approach to designing a floor is based on live load deflection criteria (i.e., how much the floor “bends” when the room is furnished and occupied), but deflection is only one part of how a floor performs. Relying on this method may provide a structurally sound floor that meets codes, but falls short of your expectations if it bounces, feels soft, or vibrates when you walk on it.
To address this shortcoming, an action many professional builders take—one that is also open to the serious do-it-yourselfer—is to have the dealer provide a prediction of the floor’s performance. For example, using TJ-Pro™ Ratings developed by Weyerhaeuser, the dealer can evaluate factors such as materials and installation methods, and determine a target performance rating for your floor based on your own expectations. Such ratings provide you with an idea of how the floor will feel, and allow you to test and compare the performance of various construction plans before installation. This can also help ensure that the finished floor is not over built or under built, and it balances desired performance with your project budget.
Obtaining performance ratings is quick and straightforward. You’ll need to provide the dealer with the dimensions of the floor, the type of floor covering (carpet, tile, hardwood, etc.), and the anticipated use of the room. Considering the use can help you decide how solid you want the floor to be. For example, a high TJ-Pro Rating may be especially important in a room with a lot of traffic like a living room or kitchen, but less important in a spare bedroom or office.
Joists
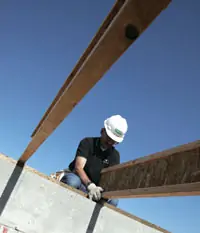
Once you’ve worked out a framing plan with the building material dealer, there are a number of things you can do during installation to help ensure the floor works as a system. From your work with the dealer, you will have selected either solid-sawn lumber joists (typically 2-by-10s or 2-by-12s) or engineered wood I-joists, such as TJI® joists.
I-joists are typically manufactured with an engineered wood product top and bottom flange (in the case of TJI joists, Microllam® laminated veneer lumber—LVL) and an oriented strand board (OSB) web between the flanges. The engineered materials provide exceptional dimensional stability, which helps I-joists resist warping, twisting and shrinking. The “I” shape is also structurally efficient and can do more work while using less material than would otherwise be possible with a typical rectangular joist. I-joists come in long lengths, allowing them to span greater distances and create open floor plans with fewer intervening walls or columns.

In addition to their strength and consistency, many builders like to use I-joists because they are easy to work with. They are relatively lightweight and simple to handle, plus they can be cut and installed using standard construction tools. Some brands also have pre-cut knockout holes to eliminate guesswork and extra effort when routing small pipes and wiring. If needed, extra holes can be drilled, but be sure to follow the manufacturer’s guidelines to not compromise the structural integrity of the joist. And unlike conventional joists for which the position of the crown must be noted, I-joists do not have an upside or a downside and can be installed with either flange up.
Because they are stable and consistent, I-joists work very well in a system approach to a stable floor. When installing them, remember the following points to further reduce the potential for squeaks and bounce:
First, avoid spanning the maximum distance allowed by the type and size of joist you are using. While this is not a structural integrity issue, a joist at or near its maximum span is often more susceptible to annoying vibrations. Span and spacing, as well as size of joist to achieve your desired TJ-Pro Rating, will have been determined in advance during the discussion with your dealer.

Second, follow the manufacturer’s specifications for fastening the I-joists at supports. This will help ensure the flanges are not damaged and will reduce the potential for nails squeaking when you walk on the floor. I-joists are typically attached to beams or headers using metal hangers. Place a dab of adhesive in the seat of the hanger to help eliminate squeaks from the joist rubbing on the hanger. Be sure to nail the hanger in all required holes as specified by the manufacturer and bend the tabs over (on select hangers) followed by nailing them down.
Third, if you need to use one of the pre-cut knockout holes or drill a hole, follow the manufacturer’s hole chart and size the hole larger than the pipe or conduit passing through it. This will help eliminate noise from the joist rubbing against the pipe when someone walks over the floor.
Finally, while not related to floor noise, do not cut or notch the flanges of I-joists. The flanges are designed to be a continuous unit and cuts can reduce their load bearing capacity, potentially resulting in breakage or loss of structural integrity.
If you are working with sawn lumber joists instead of engineered I-joists, many of the suggestions in the following sections on rim board and sheathing will help reduce the potential for squeaks. In addition, some manufacturers offer higher-grade joists that are selected for increased performance. For example, Weyerhaeuser Joists are mechanically tested and visually graded for consistency and stability, reducing the need to cull through stacks of lumber or trim and adjust for end defects. Such sawn lumber joists can provide a lower cost alternative to engineered I-joists in cases where the highest levels of performance are not required.
Rim Board
Rim board is a key component in the overall floor framing system. It provides a stable attachment point for the joists and assists with vertical and lateral load transfer, including transferring loads from the walls through to the foundation. Rim board also provides a secure attachment point for decks.
As with joists, there are both sawn lumber and engineered wood product options available for rim board. The key factor in selecting rim board is to match it to the material used for the joists. In other words, do not mix I-joists with sawn lumber rim board or sawn joists with engineered wood product rim board. To help avoid this, manufacturers typically make I-joists in different sizes from sawn lumber so they don’t appear to be compatible with one another. Matching materials is important and eliminates differences in shrinkage and inconsistencies between materials. I-joists typically do not shrink, while sawn lumber can shrink, potentially resulting in gaps that can lead to a noisy floor.
An engineered wood product frequently used for rim board is laminated strand lumber (LSL), such as TimberStrand® LSL. The material is made from wood strands that are dried and bound with resin. During manufacturing, the alignment of the strands is carefully controlled to take advantage of the wood’s natural strength. The result is rim board that is consistently straight, true and dimensionally stable—key properties for load transfer. LSL also has the added benefit of holding fasteners very well, which can help eliminate squeaks.
No special tools are required to work with LSL and regardless of whether you use it or sawn lumber rim board, be sure to follow code requirements for connections to the rest of the structure. A key consideration with either type of rim board is to plan ahead so that joints fall between joists. When a rim board joint occurs at a joist, the tendency is to nail both pieces of rim board to the joist, which could result in damage to the joist, as well as increase the potential for squeaks.

Floor Panels
Typical subfloor panels are either plywood or oriented strand board (OSB). OSB is an engineered wood product manufactured from layers (or mats) of thin, approximately rectangular, strands of wood compressed and bonded together with durable adhesives. A typical OSB panel is comprised of four mats, with the wood strands cross-oriented from layer to layer for strength. To achieve the flattest and most stable floors, OSB is the preferred choice since it is less susceptible to buckling and delamination and typically does not have the knots and voids often found in plywood.
A typical OSB panel thickness used in floors is 23/32 inch, but thicker 1-1/8-inch panels help dampen vibration and provide a more solid base with less deflection for hardwood floors and ceramic tiles, which can help reduce tile cracks caused by sheathing deformation between joists.
As with most classes of building products, different qualities of OSB floor sheathing are available, which can contribute to the performance of the finished floor. Products are available that are formulated to limit edge swell caused by rain or moisture, and also eliminate the need for extra sanding and adjustments to ensure a smooth and even surface. For example, Edge Gold® floor panels offer enhanced moisture resistance and a 90-day no-sand guarantee.
OSB panels install with the same ease as plywood, and in cases of panels with a tongue and groove, the process is even simpler since the panels are self-gapping. The following are tips for working with floor panels to help ensure they perform in conjunction with the other components of the floor framing.

In addition to nailing the panels to the joists and rim board, apply adhesive at all contact points between panels and other framing members. The adhesive helps ensure that all floor components work together as a system and fills gaps to reduce squeaks and nail pops. Use a construction adhesive that meets ASTM D 3498 (AFG-01) requirements. Check the label, or if you are unsure, ask your dealer for recommended products.

Apply a 1/4-inch diameter or larger bead of adhesive along the top of the joist. Where panel edges join, use two beads to ensure proper adhesion of both panels. If working with tongue and groove panels, add a 1/8-inch diameter bead of adhesive in the groove. While not required, this helps eliminate slip at the panel joints, which reduces vibration and noise in the finished floor. For panels without tongue and groove, leave a 1/8-inch gap between panel edges to allow room for expansion and contraction. Floor panels with a tongue and groove need the 1/8-inch gap at the panel ends. Otherwise, you run the risk of panels buckling and creating uneven surfaces or ridges in the finished floor.
For the strongest bond, once adhesive is applied to the tops of joists and rim board, do not slide the panel across them, smearing the adhesive. Instead, position the panel against the already installed panels at a slight angle, and then set it into place. Fasten the entire panel before moving on to the next one, rather than tacking the corners only.

Pay close attention to nail location when attaching the floor panels. Nails that narrowly miss the joist (called “shiners”) will rub against it when someone walks over the floor, causing a squeak. Snap chalk lines on the floor panels before fastening them to ensure that all nails go into the joist. Complete the fastening within 10-minutes of applying adhesive, or sooner if required by the adhesive manufacturer’s recommendations. Follow the panel manufacturer’s specifications for nailing pattern and size of nails. Where possible, inspect the framing from below once all panels are installed and remove and replace any shiners.
Building a high-quality floor goes beyond the skills of the casual do-it-yourselfer, but for those with some carpentry experience, planning ahead and using a few relatively simple techniques will help ensure the construction of a floor you will be proud to walk across for many years to come.
I-Joist Safety and Handling
Wood I-joists are strong and stable once fully installed. When building with them, there are several critical safety precautions to keep in mind to avoid serious injury to yourself or others working on your project, and to ensure high performance once installed:
When stood on their flanges in the installed position, I-joists are unstable until they are laterally braced. Walking on them beforehand can cause them to tip over, resulting in a falling hazard. Lateral bracing includes blocking, hangers, rim board, sheathing, rim joists and strut lines. Most manufacturers provide installation literature showing how to safely install and brace their products.
Do not walk on I-joists or use them as ramps when they are laying flat. They are designed to be strong when the flanges are oriented up and down in the classic “I” shape, but can potentially bend or break when loads are placed on them in the flat position.
Once installed, do not stack or store building materials on I-joists before the sheathing is attached. The sheathing and joists work together to provide the stability necessary for vertical loads.
Keep all wood products protected from the elements prior to and during construction to maintain their structural integrity.