

A Step-by-Step DIY Guide to Building with DuPont™ Corian®
By David Hugh
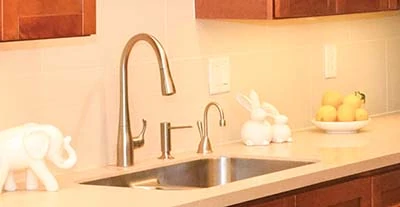
Building your own kitchen countertops can be a very gratifying project, as they are often the centerpiece of a home, and make for a heck of a DIY project you can be proud of. I know this because I recently finished my own kitchen countertops using Corian® solid surface material, and my family and I are thrilled with how it came out, not to mention the cost savings by doing it myself. Fortunately, I photo documented most of the construction stages of my new top, and now I have the opportunity to share my experience and process with you in this guide.
I did my best to follow the detailed how-to guides at SolidSurface.com and, as you will read, in some cases I didn’t always have the best tool for the job. But, hey, part of any DIY project is being resourceful and the joy of problem solving, and in the end it all worked out for me. Throughout this guide, I try to inform you if there is a more appropriate tool or technique than what I may have used to “wing-it”.
Solid Surface vs. Stone
I selected solid surface because of its characteristics as a countertop material and its fantastic workability and versatility. Regular woodworking tools can be used to cut and shape the material, unlike working with granite or engineered stone. One of the best and unique features of solid surface is that it can be glued together to appear seamless, depending on the material pattern and correct color-matched adhesive used. Other appealing features include it being non-porous, making it more hygienic, easily renewable and repairable, warmer to the touch, and no sealing is ever required.
How Much Will You Save?
You could expect to save from $20-$30/sq ft by doing it yourself. An average 12-ft. long kitchen (~25sq-ft.) on the high-end that might cost $3,750 would cost more like $1,169 as DIY, a savings of $2,581. Not bad. This of course completely depends on what material you select and which tools you need to buy, but overall the savings can be pretty significant.
The savings for my larger-than-normal job were calculated at around $3,875. The material cost of my five sheets was $2,000 (note: shipping was delivered for free to a local freight terminal, and I just rented an hourly Home Depot truck to pick it up) plus $366 for a sink, and another $425 for tooling and accessories (adhesives, adhesive dispensing gun, router bits and sanding discs all purchased from SolidSurface.com) for a grand total of $2,791. Had I hired professionals to do it, the cost would have been around $6,600. That is an estimated savings of $3,809! Again, this was a fairly large project but had it been smaller, the savings would have scaled with the size of the job.
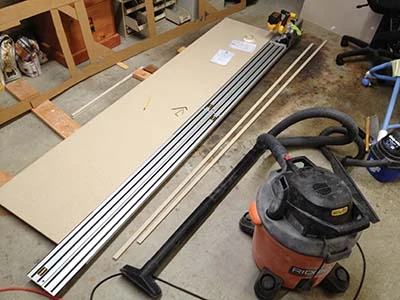
Sheet Material and Tooling Required
I had a decent size job made up of a main countertop, an island, and an add-on work desk, which measured to require five sheets of material at 30”x144”x0.5” per sheet. After much spousal deliberation we ultimately selected the color of Delta Sand, which was on overstock special at SolidSurface.com, but there are a handful of sources online that offer material.
I already had most of the tools for cutting and shaping and what I didn’t already have I was able to get online. If you do any seaming, which you most likely will, you will want to make sure to purchase an adhesive gun and matching adhesive, as noted by the asterisk below.
- 5 sheets Delta Sand “Overstock” Material (30”x144”x0.5”)
- Seamless Undermount Karran Edge E-350 StainlessSteel Double Sink
- Adhesive dispensing gun*
- 2 tubes color-matched adhesive*
- 20 extra adhesive mixing tips (strongly recommended)
- Circular saw (corded or cordless 18v with extra batteries or track saws are great)
- Long straight edge/fence(used for saw and router)
- Router and router bits (router bits I used are explained in appropriate section)
- Random orbit sander and sanding/finishing kit (multiple grits required for optimal finish)
- Counterbalance (for island overhang supports)
* required for seaming Planning the Layout I won’t go into details of designing a kitchen, but I do recommend putting the time into planning, you won’t regret the future time and effort savings. For our kitchen, which included all new cabinets, I used one of the many online tools to design the layout in 3D using standard cabinet sizes.
Whether you are working with existing cabinets or putting in new cabinets, it’s very important to measure and remeasure the cabinet layout to ensure you are ordering enough countertop material, including all edge buildups and backsplashes.
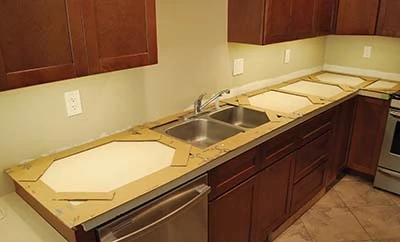
Build a Template
Before making any cuts to my new countertop, I took the important step of building a template. A template is helpful because most kitchens are not perfectly square, and with longer countertops being out of square can cause problems. Templates make the overall fabrication process much easier, and the result is you’ll have the exact size and shape of each counter-top section to build.
Creating a template as a guide is an easy way to transfer the intended shape of the top to the material that is being used for the new top. You can use the template as a guide to mark where to make all of your cuts.
Tape was used to fasten the cardboard strips together, and the corner gussets were added to increase their stability when moving the template about. Using hot melt glue and Luan strips is another method that is often used for creating templates.
Tip: Allow for expansion and contraction by leaving a 1/8-in. gap for every 10 feet of countertop anywhere there are walls or other permanent obstructions at both ends of the countertop. Also, leave 1/4-in. gap per 10 feet anywhere the countertop will be exposed to heat from sunlight or where it is within proximity to heat-emitting appliances.
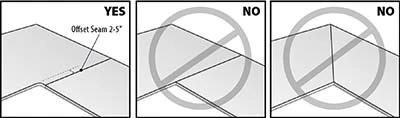
Seam Placement and Corners
Taking care in where to place seams and corners can be important to the overall layout and how much material will be needed. Here are some general guidelines to follow:
- Seams should be no closer than 3 inches from the edges of sinks and rangetops.
- An inside corner seam should not be on a diagonal, like a picture frame corner, but rather it should be placed perpendicular to one of the front edges at a distance of 2 to 5 inches from the start of the inside corner radius.
- Inside corners should have a radius of at least a 1/2 inch, or more
Making the Cuts
There are three primary types of cuts: a straight cut, a curved cut, and a mirror cut.
Straight Cuts
Straight cuts come in two types; straight and rough. The first is straight enough to go against a wall and can be done with a circular saw and a rip fence and a willingness to sand away any saw blade tooth marks. The second is a really rough cut that can be done freehand and then made straight with a router like would be expected on the front edge of a countertop. Both can be done with a circular saw with a carbide-tipped blade. The more teeth on the blade, the smoother the cut and the less sanding.
Curved Cuts
Curved cuts can be freehanded with a reciprocating, jig or saber saw so long as all blade marks are sanded away. Or, use a template and a router. Draw the pattern on the template material and then carefully remove all material up to the edge of the pattern line. This edge must be smooth, true and accurate, because any bumps will be transmitted to the material when routed. The easiest way to guide the router against the template is to use a router bit with either a top or bottom bearing that is the same size as the cutting diameter of the bit.
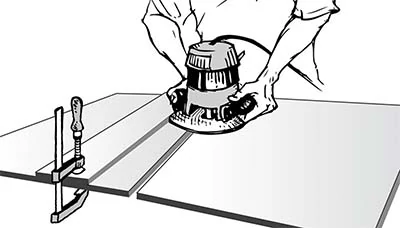
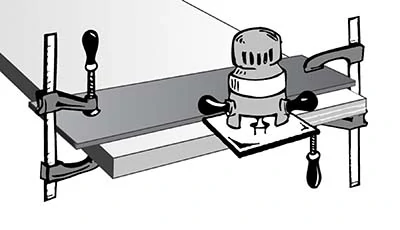
Mirror Cutting
Mirror cutting is a technique recommended for producing the most invisible seam when preparing two pieces of material to be glued together. The two surfaces to be joined are fastened securely to the workbench with 1/4-in. gap between them. A straight edge is clamped parallel to the 1/4-in. opening and a 1/2-in. router bit is passed through the gap so it removes a small amount from each of the two pieces. So long as all pieces remain fixed in place during the procedure, the two surfaces will come together with enough precision that the seam will be barely visible.
My island countertop, being more than 30 inches wide and longer than 72 inches, required three large sections of solid surface to be glued together. I made all my seams using mirror cuts with my router, a 1/2-in. straight router bit, and a fence.
Gluing the Surfaces Together
One of the hallmark features of solid surface is the ability of the material to hide seams and imperfections during the seaming process. Each solid surface color has a corresponding adhesive color that allows this disappearing act to take place.
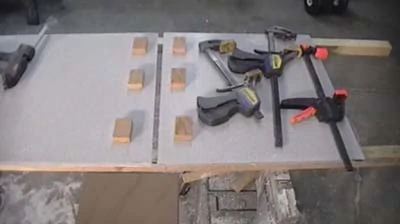
Once the material is prepared for seaming, the two pieces have clamping blocks affixed to their surface with hot melt glue. The seaming adhesive is applied and then they are squeezed together using bar clamps. Apply enough pressure so only a small amount of adhesive remains in the joint and the rest is squeezed out to be sanded away later. Too much pressure will create an adhesive-starved seam that will lack strength.
One additional step to the seaming process is required, and that is the addition of a seam plate. These plates, which are 4 inches wide and should run the length of the seam, are glued in place with seam adhesive. Their purpose is to resist the differential effects of heating and cooling that in rare instances can cause a seam to delaminate.
Building Up the Edge
The majority of solid surface material comes in 1/2-in. thick, so to achieve a thicker looking edge, like 1.5 in., you’ll need to build-up the edge with multiple layers of strips, typically three layers for kitchen countertops. Once the edge is built up, you can apply whatever decorative edge suits your taste using the appropriate carbide router bits.
Long Straight Edges
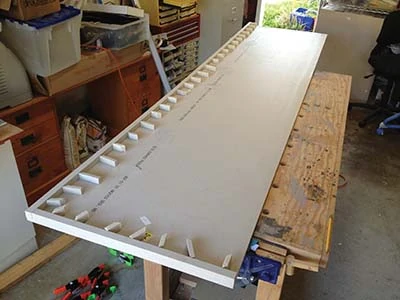
Two 1-in. wide strips are cut from the solid surface sheet in preparation to gluing them. The strips are stacked one on top the other and attached to the underside of the countertop to serve as the built-up edge. I am fortunate to have a cordless track-saw, making long rough cuts a little easier and faster to make, but setting up a fence to run your saw against works just as well.
When adhesive is applied to the edge strips, they become very slippery and hard to clamp and hold in place with the spring clamps. To solve this, the edge strips are dry fitted, and small backing blocks are hot melt glued into place to provide a backstop for the edge strips. Wood blocks will work as backing, but I happened to have some excess Corian I cut up into blocks.
Follow the manufacturer’s instructions for setting up and using the color-matched adhesive. To obtain the best adhesive joint, apply a 1/4-in. bead near the front of the edge strip so it will squeeze out and fill any gaps, and a 1/8-in. bead near the rear of the strip, for added strength.
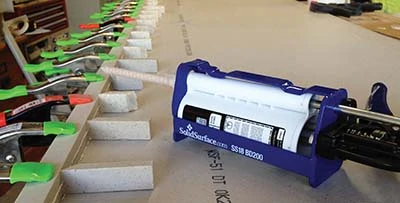
Tip: While clamping the edges down, position the spring clamps so that the lower jaw is a slight bit further under the top than the upper jaw which will cause the edge strips to slide against the backing blocks.
Once the adhesive is hard, in 20 to 40 minutes depending on temperature and humidity, remove the spring clamps. The backing blocks can be dislodged with a tap from a hammer. Scrape off any remaining hot melt glue.
The edge can then be routed to provide a smooth surface ready for the final sanding. With the top of the counter facing up, clamp the router guide strip into place and use a straight bit long enough to route the edge from top to bottom in one pass. Once the surface is smooth, the edge profile can be routed in place using the profile of choice. I like the boldness of a straight, slightly eased edge achieved with an 1/8-in. radius bit.
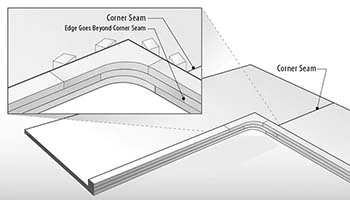
Inside Corner Edge
Inside corners can be a potential source for cracks, so it is important to do your best to build the corner so that seams are offset and edge build-ups are stacked in an overlapping fashion.
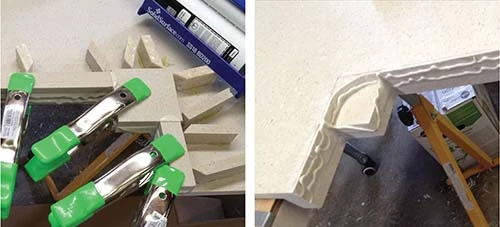
There are a number of ways to rout out the corner. I constructed a template so the outer edge of the router’s round base plate would run against the template.
As a testament to “winging-it”, the template I used is made from a piece of Masonite held in place by clamps holding down pieces of solid surface.
Alternatively, an exact size template could have been made for a straight flush trim router bit with a top bearing. Presumably, this template would have been easier to construct, but since
I did not have the right bit when it was time for this step, I improvised.
The result of my effort was a little disappointing since the inside radius is not very smoothly rounded. The unevenness is primarily the result of my template not being a perfectly smooth radius. Fortunately, the forgiving nature of solid surface allowed me to fix the uneven curve. This was accomplished with some elbow grease, wood rasps, files and sanding. The end result is a respectable inside corner.
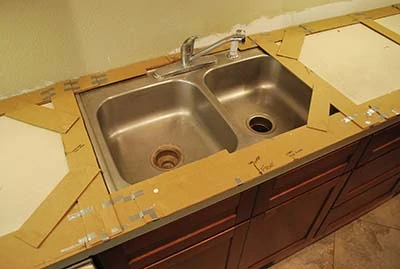
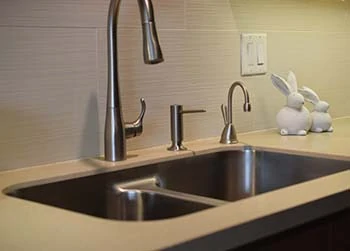
Installing the Sink
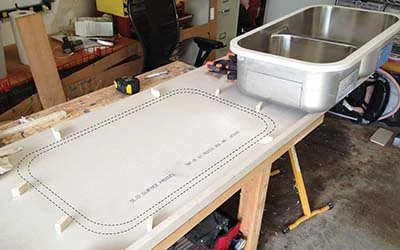
There are a number of different sink types often requiring different installation techniques. For this kitchen, a Karran Edge stainless sink was chosen. The “Edge” designation indicates the rim of the sink is created at the factory with a layer of solid surface attached at the top so that solid surface adhesive can be used to affix it to the underside of the solid surface counter in a seamless fashion.
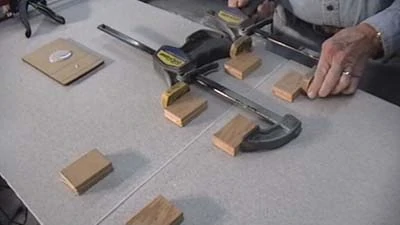
The location of where the sink is to be glued is surrounded by backing blocks that are hot melt glued to the underside of the countertop. This allows the sink to be placed exactly where intended while the seaming adhesive dries. This adhesive should be the same color as the adhesive used to glue the seam.
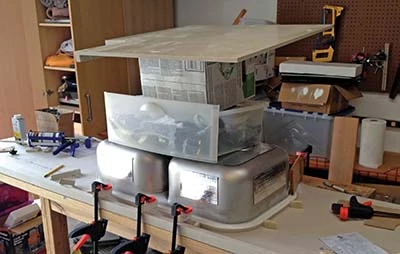
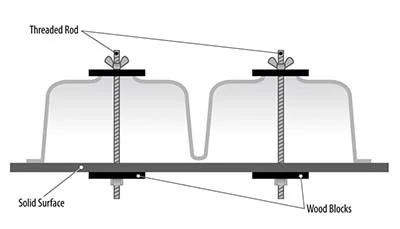
To put pressure on the sink while the adhesive dries, I used both clamps and whatever heavy garage items were sitting around to place on the sink, showing off my extreme inner DIY’ness. A more professional technique would be to use threaded rods, wood blocks, and wingnuts.
Preparing the Sink Opening
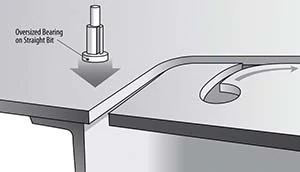
Flip the countertop so the top is facing up. Routing the sink is a two-step process, and two different router bits will be used to remove the material from within the bowl opening and provide the edge to the sink. The first pass, using a 1/2-in. 2 Straight-Flute bit with an oversized nylon bearing at the bottom, is intended to remove the bulk of the material and will leave a slight lip to be removed in the next step.
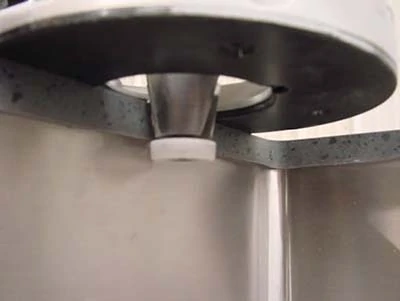
Next, use a bevel bit with an 1/8-in. over-size nylon bottom bearing (Amana Bit #57169). Carefully set this bit so it will cut a small amount from the overhanging edge of the countertop and almost come in contact with the sink. Carefully rout around the sink, then lower the bit slightly but still not coming in contact with the metal of the sink, and make another pass around the sink. Do the same thing again if there is still material to be removed.
Finish the bevel edge with a random orbit sander held at the same angle as the bevel. If you do blemish the metal sink edge, you can reestablish the grain in the metal with a 180 grit non-woven flap wheel chucked into a drill.
Move the wheel horizontally and not up and down.
I recommend reviewing the more detailed fabrication instructions found on the Karran website under “Edge Sinks in Solid Surface” in the “Fabricator Resources” section, www.karran.com.
Finish Sanding the Countertop
One of the final steps before installing your top is to sand the surface and edges to the desired finish, or sheen. The most common finishes are matte, satin, semi-gloss and gloss.
I use a 5-in. random orbit sander in conjunction with a semi-gloss small finishing kit from SolidSurface.com, which contained all the required grits.
To give an idea of the two extremes, a matte finish provides a good finish for high-use areas such as a countertop because it will be the least likely to show wear. A high-gloss finish can lend itself to scratching more easily and is best used in an area with less expected wear. Keep in mind that darker colors will generally show scratches more apparently than lighter colors, particularly in a high gloss. I chose a satin finish for my countertop, because it is a lighter color and I like a little sheen.

First, use 180-grit to sand away any remaining hardened adhesive and any areas with heavier scratches. Try to keep the sanded area to a minimum with this coarser 180 grit. Wipe the area clean of any remaining dust and grit particles and sand again with 280 grit. With this grit, increase the area sanded so as to feather out the sanded portion. Finish the area with 400 grit and cover an even larger area.
Next, sand the entire counter-top by working in sections of about 2 feet by 2 feet. Move the random orbit sander from side to side and front to back in the 4-sq-ft. area, and when done move to the next area with some overlap with the area just completed. If you don’t sand the entire top with 400 grit, there will be a difference in the finish from area to area. Stopping at 400 will give you a satin finish.
For a slight enhancement to the satin sheen, follow the 400 grit with a gray colored non-woven pad. Once the entire top has the same sheen, you’re done and it is time to prepare the cabinets and install the new top.
Cabinet Preparation
Before installing the finished countertops, the cabinet tops need to be elevated by 3/4 to 1 inch. This is so that the countertops’ built-up edge, which hangs down 1 inch, does not get in the way of opening any cabinet doors or drawers. This can be accomplished by using strips of wood or plywood that are 2-1/2 to 3 inches wide and 3/4 to 1 inch thick. Using strips, rather than solid sheets of plywood, allows the solid surface to dissipate heat and cold away from the top, which minimizes stress that can be caused from expansion and contraction.
These strips are placed on the cabinet tops front to back every 18 inches or less, except where there are obstructions such as sinks, and can be affixed to the top of the cabinets with screws, glue or daubs of silicone sealant. As an alternative, the wood strips can be pre-adhered to the underside of the countertop with daubs of silicone. Just make sure the wood ends up resting on the cabinet’s top edge.

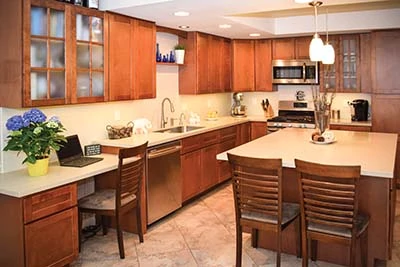
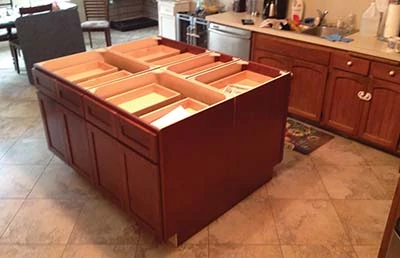
Next, I applied the underlayment for my kitchen island which also contained an overhang, requiring additional supports. The island is made up of five cabinets fastened together to form the island base.
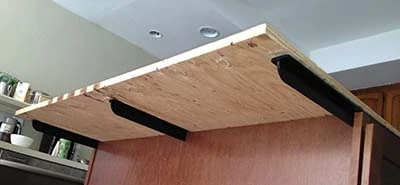
Three-quarter-inch plywood was used to elevate the top, with much of the area cut away, rather than using the wood strips discussed in the previous section. I used strips on the remainder of the main cabinets (not shown). Best practices might argue that the large overhanging area of the plywood should have had more cut away to allow for heat and cold dissipation. The overhang area has supports underneath that allow for it to extend out away from the cabinet wall support.
Installation
Assuming all the other steps have been followed, your countertop is complete and ready for placement on the cabinets. All you need to hold the countertop in place are thumb-sized daubs of silicone sealant at about 12” to 18” intervals (or between the strips and the cabinet tops if the strips are glued to the bottom of the top). Do not use more than that, and do not use hard adhesives or screws, because you want the top to be able to expand and contract without a lot of restriction.
Get Cookin’!
That’s it, you’re done! Now you begin to enjoy your new countertop for many years to come. You can also rest knowing that no matter what happens, such as when 3-year-olds manage to color on it with permanent marker, that it is easy to wipe clean with a little Soft Scrub® and a wet paper towel.
Friday nights is pizza night for our family, and we like to roll out our own pizza dough right on our island top knowing that it will not absorb moisture or support the growth of mold and bacteria, and cleanup is a cinch. We treat cookie dough the same way.
I hope this article gives you the confidence and know-how you need to take on building your own top. Until then, it’s Friday, and I have some pizza dough to roll out!
Side Note 1
The Forgiving Nature of Solid Surface
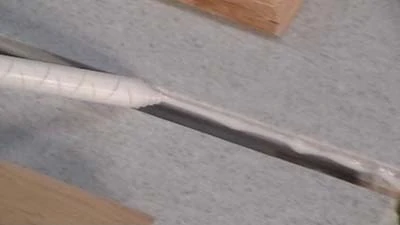
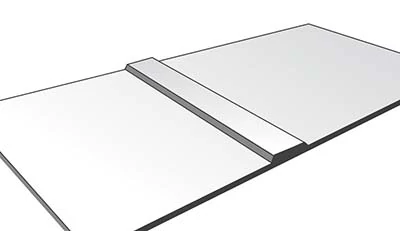
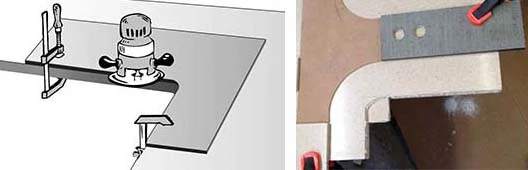
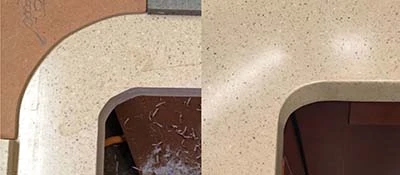
Sometimes accidents happen during the countertop installation, such as when the rip fence moves while routing the edge. The next two images show the aftermath, and the fix, of a mirror cut gone awry. In some cases, the fence can be repositioned so the divot can be routed away. However, there was not enough extra material to allow this, so the divot was filled with color-matching adhesive during the seaming procedure. The damage all but disappeared after the repair.
Left: The white strip of solid surface being used as a router guide slipped during the mirror cutting procedure resulting in the divot being cut away from one of the two edges to be joined. Note that even before the seam is glued, the seam is not very visible.
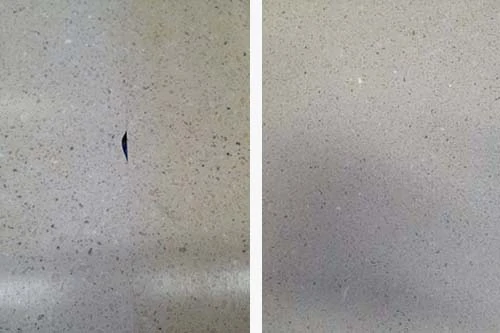
Right: Can you find the repaired divot? This image is taken from a different position so the divot is not where it was in relation to the edges in the previous image. Also the seam, which was visible in the previous image is now invisible. The repaired divot is the elongated white spot that is appearing as part of the normal fleck pattern in the lower left part of the image.
