

I love building retaining walls. It’s fun to be out in warm weather cutting big timbers and doing a project that sees quick, upward progress. However, the standard stack of horizontal 6-by-6′s wasn’t a design that worked for me, so when it came time to design a wall for my own yard, I went looking for something with a little more texture and style but with the same mass and power as a standard style wall. I found it, and all it took was standing those 6-by-6′s on their head.
This post-and-plank system is based on the way seawalls (or bulkheads) work. You set posts into the ground, vertically, then plank behind them. This creates a wall with texture and shadow lines with nice hollows between the posts for plantings or grass. And, because there’s so much post buried in the earth, a wall like this is solid state and resists moving, even if the soil on the hill you’re holding back is mobile.

Save yourself some headaches and have the material delivered. Lumber yards with forklifts, can help you stage the material right where you want it.
Prep Work
Preparation is key to getting a project off on the right foot. For this one, there were two critical steps to a good kick-off; obtaining a building permit and sourcing materials and equipment. Because my build time is limited (weekends), it’s important to me to source all materials and equipment in one place. This saves phone calls and leg work. For me, this was my local Home Depot. I could purchase all the landscaping supplies including lumber and fasteners, and even rent the excavation equipment, all under one roof.
Permit. The easiest way to know if you need a permit (and what’s required if you do) is to call your building inspector’s office and have them walk you through the process. Mine was very helpful and easy to work with. Although building inspectors are busy and shouldn’t be used as a design source, mine offered me some good advice.
Materials. The lumber for this wall will be ACQ pressure-treated 6-by-6 and 2-by-8′s with double hot-dipped galvanized fasteners. There’s no beating pressure-treated lumber in ground-contact situations. The reason for double hot-dipped galvanized fasteners, as opposed to electro-galvanized or coated, is that the new formula for pressure treating lumber has one serious drawback: It corrodes unprotected steel.
The last tip on materials is this: Get it delivered, even if the yard charges for delivery. Lots of DIY-ers like to go to the lumber yard and max out their trucks. With a load as heavy and long as this one, that’s a waste of your time and your truck’s shocks.
Equipment. My Home Depot store is also a full-dress rental center, and I was able to rent an AC Prowler, a mini skid-steer. The beauty of this package is that it comes with a bucket and several augers, so I can use it to drill post holes (auger attachment) and move earth (bucket attachment) both for construction prep and final backfill.

Hack away a couple of feet of hill with a mattock to loosen it so the loader can cart it away. I took out about 2 feet of hill for this project, but wish I had taken away another 6 inches.
Excavation and Layout
So I can have access to the back of the posts later to install the plank, I notch out the hill with the Prowler’s bucket.
Next, because I’m building against a sidewalk, I sweep up and layout my post locations, which is 3-feet on center. I mark them in chalk on the sidewalk. If I were doing this elsewhere (like on grass) I’d set up a string between 2-foot rebar rods set 1-foot into the ground to mark where I want the front of the posts to land. Next, I’d set 40-penny spikes in the center of each hole location, and then remove the string so I could work (Don’t remove the rebar; you’ll need it later).

We dug 30 4-foot deep holes in one long day with this machine, including all the bucket work.
Drill the holes. It’s smart to go down at least 3 feet. This provides the posts the muscle they need to hold back that hill.

Cut the posts to length, drop them in the hole, set them to the string height, plumb in both directions, then brace with 2-by at the base.
Post Placement and Concrete
Level the Wall Top. Set your layout string up again. It’s important to set the post faces straight along your layout line. In my case, I lucked out with a sidewalk to follow, though I had to use a chipping hammer to carefully remove some concrete below grade to get the posts flush to the edge. To get the wall top level (as opposed to following the grade of the earth) set up a second layout string at the exact height you want your wall to finish out. Securely braced 2-by-4′s or rebar will work well to hold the string. A line-level will help you get a level string-line. You can also use a laser level. Keep your 2-by-4 string holders at least 4 feet from the wall location on each end so you have room to work.

We held the posts in position with temporary 2-by bracing to make sure they stayed level and plumb.

There’s always that one hole you have to dig by hand. In our case, there was a pile of subterranean concrete impeding a post. A 14-pound chipping hammer does the trick.
Setting Posts Using Temporary Bridging. With your level string-line in place, you can now measure down to the edge of the hole. Let’s say its 4-feet from the level string line to the hole. Add 3-feet for the hole depth and you know you need a 7-foot tall post. Cut the post to length. Plan for the end you cut to go in the ground, leaving the factory cut end up.
Tool Tip: When cutting a 6-by-6, the idea here is to measure once, cut 5-times. Say you need to cut a 7-foot length of 6 x 6; measure and use a layout square to mark all four faces of the stock. Cut the line, then roll the piece and cut the next line until you’ve cut all the way around. Since a 7-1/4-inch circ saw won’t cut all the way through, finish the cut with a handsaw or recip saw. To make really quick work of it, use an 8-1/4-inch circ saw. This cut is likely to be ugly, which is why you want it in ground.

Once the posts were plumb and braced, we set each post in 80 pounds of concrete.
Next, measure down from the top of the post 4 feet on each side and draw a line across using a layout square. On the above-grade side of the line on each side, nail or screw a 2-by-4 scrap to bridge the hole. The scrap should be twice as long as the hole is wide. Drop the post in the hole and use diagonal braces to hold it plumb in all directions. Measure for each post down the line. You may have to shim one side of the bridging to get the post plumb. This can be tricky so take it slowly. Once all the posts are in, nail 2-by-4 bracing across the top. Tip: Screws or pneumatically driven nails often work best in these applications because there’s no pounding on the material you’re trying to keep stationary (as will happen when using a hammer and nails). And, screws are easiest to remove.

The best way to get the concrete to flow around the post bottoms is to mix it in a wheelbarrow and pour it in. make sure to hose down all posts, sidewalks, grass, etc. after finishing to dilute spillage.
Concrete. Next, mix an 80-pound bag of concrete in a wheelbarrow for each post hole and pour it in. Keep your garden hose handy to wash away any concrete that gets on the posts. Double-check all posts for plumb and straight in all directions. Adjust as necessary while the concrete is still wet.

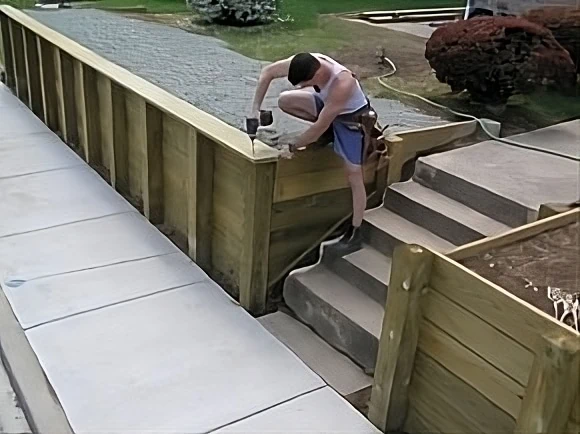
Start the decking at the top and work your way down. This ensures that all but the last boards, wich finish in the ground, will be even. Drive a nail or screw 1/3 of the way in as a cleat to help hold up long boards. make sure decking material is dry before installing.
Planking
Ideally, you can wait for the concrete to cure, but since this system is set up with temporary bracing, you don’t have to and you can begin planking, which will actually hold everything in place even better once it’s installed. Be sure the bracing is very stable though, so the posts stay put. Leaving your strings in place help you gauge if the posts are moving or stationary.
Start at the top and work down. If your wall is longer than the lumber you order, you’ll have to splice the planks. Always splice them on a post and stagger your joints as far away from each other as your materials will allow.
To make life easy, I set a screw as a cleat to hold each plank where I want it, then use a cordless impact driver to set four 3-inch deck screws per joint. I also use weather-proof construction adhesive to get a really solid bond and resist cupping.

For the sides, I ran a kicker between posts rather than excavating the entire hill. The kicker, wihich rests underground on the exterior side of the decking acts as a nailing surface for the return walls.
Tool Tip: Cordless impact drivers are half the size and twice the power of standard cordless drills and are quickly taking over how screws and bolts are driven on site. They make fast work of deck screws, lags and carriage bolts. And, with a hex shank system instead of a chuck, bit changes are almost effortless.
Install the remaining planks, butting each one as tightly as possible to the one before it. To prevent soil seeping out from under the wall, install at least part of the last plank below grade. If this disturbs footings or bracing, wait until the concrete has cured before installing this piece.
Corner Detail. If your wall makes a right angle return like mine does, install a 2-by-4 cleat to the back of the front planking. This cleat will give the planking from the return something to fasten to, and keep you from having to use another 6-by-6 post.
Drainage. Ground water is a serious stress on retaining walls and the best way to deal with it is to let it out. Every 4 feet or so, drill a 1-1/2-inch hole in the center of the lowest full-plank.

Sheet the decking with geotextile fabric. A hammer tacker is perfect to put it on fast and securely.
Fabric. To prevent mud and silt from seeping through the planks, install geotextile fabric on the back of the wall.
Tool Tip: To install the geotextile fabric, staple guns work but they’re slow. Hammer tackers—because a hammer strike drives the staple in a split second—let you fly through the job.
Backfill
Once the concrete in the footing holes has fully cured, strip the bracing and install the last plank. Next, fill in each post hole. Every foot or so, use the head of a sledge hammer to tamp the earth down. The more compact it is, the harder the posts will hold.
Now, lay a sheet of geotextile fabric on the ground and cover with a course of 2-inch crushed stone or rubble, then shroud that with one more layer of fabric. This leaves a porous layer at the base of the wall to dissipate water from heavy rains and snow melt.
If you’re lucky, you still have your Prowler and can use the bucket to move earth and backfill the hole the wall has created. Overfill the hole 4 inches or so, because the soil will settle eventually.

Route the edges of your top plate for a nice finished look. For light edging tasks, I leave the routers in the shop and use a trim router on site.
Capping off and Final Details
Cap. The last wall piece is the 2-by-10 cap, which I install flush to the back of the planking and let overhang the front 2-1/2 inches. Rather than miter the corners—a miter will open no matter what—I use a butt joint. I then use a round-over bit on my router to ease the edges.
The last wall piece is the 2-by-10 cap installed flush to the back of the planking and overhanging the front by 2-1/2 inches.
Final Details. Because the front of the post-and-plank wall has contour, there are nice pockets between each post. This makes a perfect spot for plantings and is a way to dress the wall year round. Kale and cabbage for fall and winter, annuals in summer or bulbs for spring color. Shrubs work, and a bark mulch bed works, too. The top of the wall provides a similar space. You can edge it with plantings and a bark mulch bed, or you can increase the size of your lawn and plant grass right up to it.
To add another color to the palette, tinted wood sealer (like you’d put on your deck) is another way to give the wall life and maintain the lumber that will get baked by the sun or soaked in the snow.

Editor’s Note: Mark Clement is a home improvement contractor and author of The Carpenter’s Notebook
