


Decks are some of the most popular homeowner projects. They can be a small extension off a family room, bedroom or dining area; or they can be a spacious “outdoor” room large enough for a party. Decks can be single level or multi-level; they can be some of the simplest “first” projects for a beginner, or elaborate examples of sophisticated craftsmanship.
Decks are quite often the first project many beginning do-it-yourselfers tackle, but it’s important to understand the basics of deck construction. Decks are built in specific steps. By taking those steps one-at-a-time, building a deck can be fun and easy.
Planning
The first step is to design and plan your deck. Location is important. Determine its primary use, such as a place for large parties, family relaxing, outdoor cooking or private sunbathing areas. Do you desire sunlight or shade? Do you want privacy? Is there a view you wish to enjoy? How would the deck fit with your general landscaping? How would the deck fit with your existing structures? Consider the safety factors. Will the deck be used by children or older persons? Remember that decks are basically support bases for people to walk on, as well as to support items like flower planters and furniture. They must be constructed strong enough for this support.
Measure the area of the proposed deck and temporarily stake it out with small stakes. Make sure there are no utility or drainage lines running beneath the deck. Contact the local building authorities for any permits, and any code rules or limitations. Some cities, municipalities, communities or subdivisions may restrict the size and height of the deck, as well as the materials. Determine the basic design of the deck, such as posts, beams and other spacing, and prepare a materials list. With this information you can apply for any permits needed.
Materials
Decks must be constructed of long-lasting, moisture-, rot-, decay- and insect-resistant materials. Three basic types of materials can be used.
First, there are naturally insect- and moisture-resistant woods such as redwood or Western Red Cedar. For example, Western Red Cedar fibers contain natural compounds called “thujaplicins” that act as preservatives. As a result the wood will have a long life without the need for chemical treatments. Plus, the even, consistent grain and low density make cedar less likely to swell, warp, cup and twist than other soft and hard woods. As a result, it lies flat and straight. Cedar is also free of the pitch and resin found in other softwoods – a quality that makes it ideal for a wide range of finishes, whether you choose a lightly tinted semi-transparent stain or a two-coat solid color finish.
Pressure treated lumber is the second option and has an advantage of lower initial cost.
There’s also the option of composite decking materials, which are made from a combination of plastic and wood fibers to provide a low-maintenance alternative to real wood.
Availability, cost, the final design of the deck, as well as personal preferences will determine the materials to be used. Check with your local building supply dealers as to the materials available in your area.
Design
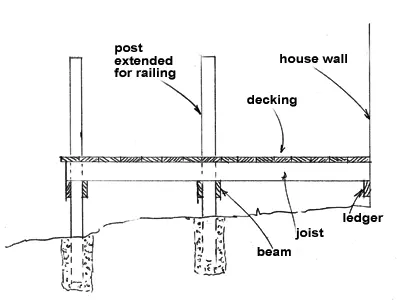
Regardless of how low or high it is built, a deck consists of several basic parts: the footings; posts or vertical support members; the beams or horizontal supports; the joists; the decking and finishing details such as railings and steps. The size and spacing of the different members depends on the design of the deck and the woods being used. The charts at the bottom of this article show the spacing for Wolmanized Natural Select Pressure Treated lumber and for non-stress-graded redwood (Construction Heart) lumber.
Laying Out the Deck
It is important the deck be laid out square, and also square with any building it is to be attached to. Even if some of the deck is free-form or rounded, the basic support structure must be squared.
First step is to determine the height of the deck. If the deck is to be attached to a house or building, measure the height of the house floor above your grade line, or at the doorway. Allow a 2- to 4-inch step down from the house floor to the deck level so water won’t be allowed to enter the building. Then measure one side to the length needed and drive a stake. Fasten a string to the house at the height determined. Using a string level to create a level line, fasten the string to the stake. Measure for the second corner stake, making sure the measurements are the same. Then measure the distance between the two lines attached to the house and adjust the outrigger stakes so they are the same distance apart. This provides the basic shape. Drive stakes and construct batter boards about 2-feet on either side of the outer stakes. Before fastening the batter boards in place to the stakes, extend string lines across to the batter board tops and, using a string level, make sure the tops of the batter boards are level with the string positions on the house and level with each other.
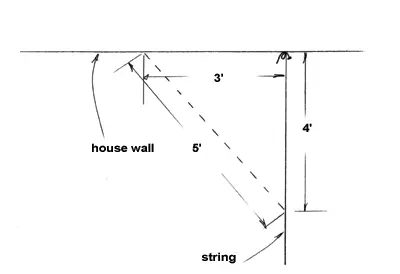
Above: Use the triangle method and string lines with batter boards for laying out the deck., locating the support posts and ensuring the deck support structure is square.
One method of ensuring square is to create a right angle with the string lines. Measure 3 feet from the building along the string and mark this distance with a felt tip pen. Measure 4 feet along the building wall and mark that measurement as well. Measure diagonally between the two marks. The measurement must be 5 feet to create a square corner. Move the string line in or out to achieve the correct measurement. Then fasten the string in the correct location to the batter board. This creates a square corner at the building. Repeat for the opposite edge or side of the deck, from the building out to the second outer stake batter board.
Repeat to locate the outer deck edge. Measure 4 feet from where the string lines cross over the tops of the outside corner stakes along one of the string lines. Mark this location with a felt-tip marker. Measure 3 feet from where the string lines cross on the opposite line and mark this location as well. Measure the distance diagonally between the two marks. It must be 5 feet. Move the strings in or out until you achieve this measurement. This ensures a square, 90-degree corner at this corner. Repeat for the opposite and last corner. Remove the stakes and relocate them directly underneath where each string crosses. This establishes the outside corners. To check for squareness, measure diagonally between each corner stake and the deck corner at the house. These measurements should be equal.
To prevent weeds from growing up through the deck, you may wish to cover the area below the deck with black polyethylene film, and then add gravel, pebbles or bark mulch over the polyethylene.
Deck Construction
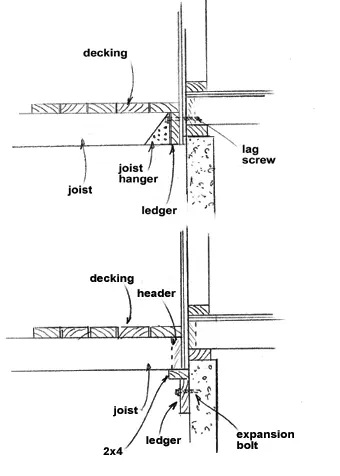
The first construction step is installing a ledger board to support the deck as it is fastened to the building. Position the ledger board in place against the house, making sure it is set low enough for the top decking boards to come to the final deck height. Brace the ledger board in place, make sure it is level, and then nail it in place at both ends, again making sure it is still level. Anchor the ledger firmly to the house using washers and 3⁄8-inch lag bolts that are 2 inches longer than the thickness of the ledger. For masonry walls, use the appropriate masonry anchors.
Footings are required to support the posts. These may be concrete blocks, pre-cast pier blocks or poured concrete supports. Footings are usually constructed twice the size of the post they support. Building codes usually dictate the types and sizes of footings allowed. As a general rule, the footings must extend below the frost line. In most soils and locations this will be 2 feet deep. The tops of the footings should be above the ground to keep water away from the posts. In the case of using pressure-treated wood posts, the posts can be set down in the holes, on a layer of concrete, then a layer of gravel. Quikrete suggests pouring dry concrete mix into the hole and around the post until it is approximately 3 to 4 inches from the top. Two 50-pound bags of Quikrete Fast-Setting Concrete Mix will set a 4-by-4 (or 4-inch diameter) post in a 10-inch diameter hole that’s 2 feet deep.
Pour water into the dry mix and allow it to soak in. Use at least one gallon of water per each 50-pound bag of concrete. Fill the remainder of the hole with soil dug from the hole. The concrete sets up in about 20 to 40 minutes. Wait four hours before placing heavy objects on the post or moving the posts in any way.
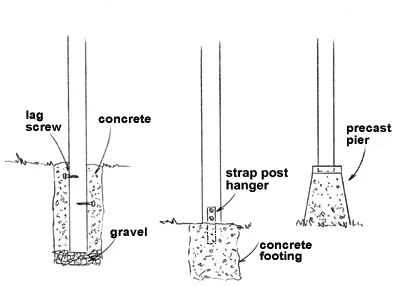
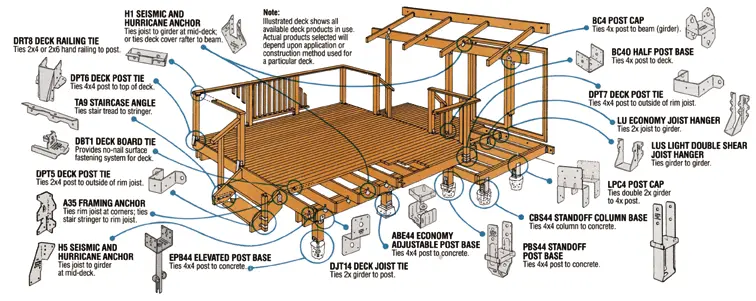
Purchased pier footings are the easiest, but pouring your own concrete footings for posts to rest on is also fairly easy. These can be poured in the dug holes, or cardboard tube forms may be used. Use pre-mixed concrete, such as Quikrete, mixing it in a wheelbarrow and shoveling it into the hole or tube form. If the posts do not sit down in the holes, but are resting on the above-ground footing tops, then the posts must be anchored to the footing. Metal base anchors, such as those from Simpson Strong-Tie Connectors, can be set in the concrete before it sets up. The posts are then fastened to the anchors. Regardless of whether the posts are setting in the holes or on the footings, it’s extremely important to make sure the posts are correctly located, and the squareness of the structure is maintained. Make sure the posts are set plumb in both directions. Use 2-by-4 braces temporarily tacked to the posts to keep them plumb until you can install the beams or girders.
To locate the beams, run a string line, with a string level, from the top of the house ledger plate to the posts. Make sure the line is level. Three methods can be used to fasten the beams in place. If there won’t be a railing, cut off the posts to attach the beams, cutting off to match one of the three methods chosen. If a railing is involved, leave the posts full height as railing supports.
Fasten the joists to the beams. One of two methods can be used to anchor the joists in place. Using metal joist hangers is the simplest, cutting the joists to fit between the beams. You can also sit the joists down on top of the ledger plate and outer beam, but this requires more joists and is not quite as neat in appearance. You will also have to have a fascia board to cover the outer ends of the exposed joists. The joists must be spaced according to the deck covering and according to building codes, and this will run from 16 to 24 inches. If the posts are to act as railing supports, add spacer railing-posts, bolting them to the outside beam or girder.
Beam fastening options:
Installing the Decking
Decking can be 2-by-4, 2-by-6, or 5/4 decking boards. The decking boards are the most visible aspect of your deck. Install them with care. Begin with the deck board perpendicular to the house. This board will serve as the guide board for all the other deck boards. Install the boards “bark-side” up to reduce cupping of the board edges. The decking can be installed with galvanized nails, screws or Strong-Tie Deck Board Ties. The latter provides a fastener-free deck surface. Nails, although the most economical fastener option, will eventually pop up, causing problems unless they are designed for deck installation. Nails and/or screws should also be predrilled on some woods to prevent splitting out the ends.
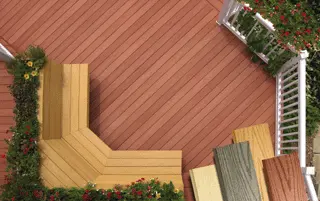
Deck boards can be installed straight, diagonal, herringbone or parquet style for more variety. Regardless, the deck boards should be staggered to allow for any slight movement during the natural seasoning process. Once installed, snap a chalk line on the sides or ends where the boards protrude outside the deck, and then use a circular saw to cut all the boards off evenly. Decking boards will have to be notched to fit around any posts that protrude through the deck. Incidentally, the Vaughan Bowjak makes it easy to straighten and hold warped or crooked deck boards until they can be securely fastened in place.
Deck Finishing Details
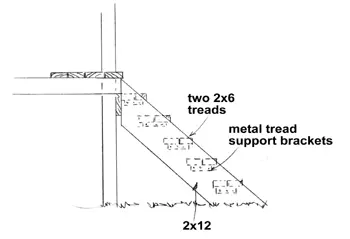
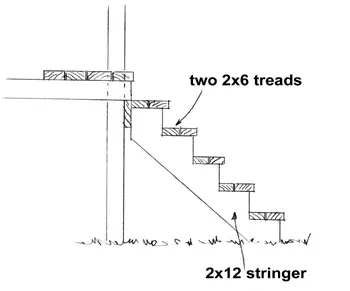
Steps are often needed from the deck to ground level or from one deck level to the next. Steps can be created using a traditional notched stringer system, or you can use Strong-Tie Connector Stair Case Angles. These make it extremely easy to adjust the angle of the stringers to span the distance from the deck to the ground. Measure the rise (vertical height) from grade top to the top of the deck. Divide the rise by 7 inches or whatever stair rise you prefer. This indicates how many stair risers are required. To determine the total run of the stairs, multiply the number of steps required by 11 1⁄4 inches.
If you want to simplify these calculations, you can use a stair calculator to quickly determine rise, run, and stringer layout before cutting your stringers.
Cut the 2-by-10 stair stringers and fasten to the deck framing with a Strong-Tie Framing Anchor. Mark the staircase angle support position on both stringers. Install the Staircase Angles with 1⁄4-by-1 1⁄2 inch lag screws and then fasten the stair treads in place. If more than three steps are involved, a hand railing should be added to each side.
Railings not only provide safety to higher decks, but also add to the décor. Most building codes call for a railing if the deck is more than 24-inches off the ground. In the past, railings tended to be straight wood pieces. These days, any number of railing designs is available, including turned spindles and supports.

Composite Decking
Composite deck materials, including deck flooring, rails and balusters do require somewhat different steps in installation. The different products, from the many different manufacturers do require specific installation and construction steps. Most posts and rails come as a “system.” Make sure you carefully follow manufacturer’s instructions with the products purchased. This includes design, such as spacing of the railings and so forth.
Composite materials are not designed for load support. Regardless of the composite decking and railing system chosen, it must first be supported on a wooden framework, in the same construction manner as for a full-wood deck. As an example, the following are a few tips on installation of the ChoiceDek system from Weyerhaeuser.
First step is to assemble the post bracket and fasten to the rim joists. Insert posts into the brackets and connect with the appropriate fasteners. Then install the decking materials, cutting to fit around the posts and leaving a 1/8-inch gap. For a more decorative look, add a post collar over the post. Then attach edge trim to the ends of the decking boards.
Measure and cut the universal support rails and the decorative handrail. Attach with the brackets supplied. Support blocks to match the balusters are suggested for extra strength. Insert the end balusters/spindles tight against the posts, then insert the balusters and fillets to space them properly. Fasten in place with stainless steel fasteners. Fillet spacer blocks may also be glued in place. Install the decorative handrail. Then cut the post tops to the correct size if you haven’t already done so. Install the post caps.
Stair railings are installed in the same manner, except with one difference, it’s on an angle. Installation requires additional care in measuring, cutting and fitting. The posts are first anchored to the stair stringers. Then the decking material for the steps installed. Again, the universal stair rails are then installed, followed by the balusters, fillets, decorative handrail and post tops.
Don’t be limited in the design of the deck to a floor only. Planter boxes, built-in bench seating, privacy screens, deck covers, even pool and spa surrounds can all add to the beauty, usefulness and enjoyment of a deck for your backyard.
Spec Your Deck
Determining Joist Size
(Based on 12” joist spacing)
Max. Joist Span: Max. Joist Span:
Southern Pine Red Pine Joist Size:
Hem-Fir Ponderosa Pine
9′ 7’6″ 2 x 6
12′ 10′ 2 x 8
15′ 13′ 2 x 10
(Based on 16″ joist spacing)
Max. Joist Span: Max. Joist Span:
Southern Pine Red Pine Joist Size:
Hem-Fir Ponderosa Pine
8′ 6’6″ 2 x 6
10’6″ 9′ 2 x 8
13′ 11’6″ 2 x 10
(Based on 24″ joist spacing)
Max. Joist Span: Max. Joist Span:
Southern Pine Red Pine Joist Size:
Hem-Fir Ponderosa Pine
6’6″ NA 2 x 6
8’6″ 7′ 2 x 8
11′ 9′ 2 x 10
Determining Beam Size/Post Spacing
(Species: Southern Pine and Hem-Fir)
If joist size is Use beam size Max. post spacing
2 x 6 (2) 2 x 6 6′
(2, ) 2 x 8 8′
2 x 8
