By Matt Weber
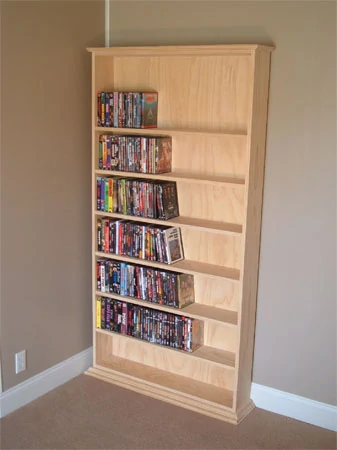
Here’s a look at a basic case of shelves built with pocket-hole joinery.
I ‘m a big movie fan. I like action movies, monster movies, thrillers, comedies, dramas, westerns, you name it, and I’ve been collecting them since I was a kid. Over the years I managed to accrue a considerable pile of VHS tapes, and wouldn’t you know it—now DVDs are the hot new thing, and VHS tapes are going the way of the dodo. So after all those years spent collecting movies, I’m now replacing the clunky old tapes with the new digital disc format. All of this movie fandom means that I’ve got a lot of movies but not a lot of places to put them. So I decided to build a case of shelves to house my movie collection.
While the shelf case in this article is designed specifically for DVDs, you can alter the dimensions and basic design to suit whatever stuff you want it to hold. The whole thing is constructed from No.1 select pine and a plywood back. The shelves are joined with pocket holes and self-tapping screws—a fast and strong way to join finish carpentry (more on that later). Here’s how I took it from a stack of boards to the final product.
Materials List
3/8” Pine-veneered plywood “One Good Side,” 4′ X 8′, 1 pc.
4-foot, 1” X 8” No. 1 Select Pine, 8 pcs.
8-foot, 1” X 8” No. 1 Select Pine, 2 pcs.
4-foot, 1” X 10” No. 1 Select Pine, 3 pcs.
Building the Carcass
The shelf case is designed to be taller than I am—more than 6 feet—so I built it outdoors to have plenty of room to handle its size. I set up a couple of sturdy sawhorses saddled with a couple of sheets of plywood to serve as an outdoor work table.
The first cuts I made were with a circular saw, rough-cutting the 1-by-8 sides and shelves. When rough-cutting the stock, take the opportunity to trim away any damage the wood may have suffered at the supplier. Carefully inspect the boards; even low-defect pine will have some dents and nicks, and you can often keep the best section of wood and treat the damaged areas as waste stock.
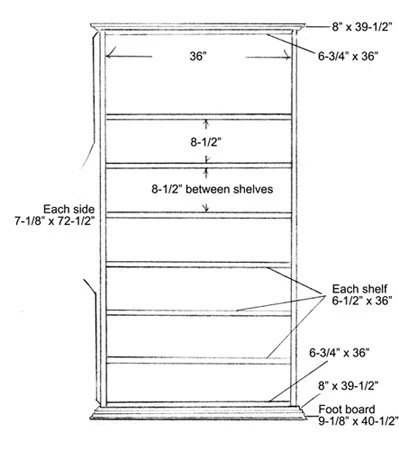
I then finish-cut each board on my table saw to ensure a more accurate cut. I ripped the edges of the sides just to remove a little edge damage, cutting the 1-by-8 stock to 7-1/8 inches wide, and I cross-cut both 8-foot boards down to 72-1/2 inches. I then used a router to cut a 3/8-inch-deep rabbet in the backs of the side boards—the rabbets are to provide a snug place to hold the plywood backing.

These shelves were sized to hold a standard DVD case … I sanded the boards throughout the project … Rout a rabbet in the rear of the side boards for the plywood back.I cut the top and bottom boards to 36 inches long, from 4-foot 1-by-8’s. I fastened the top and bottom to the sides with pocket-hole joinery and wood glue to create the rectangular frame of the carcass. The top and bottom of the carcass were fastened flush to the interior of the sides and flush to the front of the side boards. However, the top and bottom were shallower than the sides, so they were not flush with the rear of the sides. I had cut the top and bottom boards to 6-3/4 inches, which was 3/8 inch shallower than the side boards. This allowed the rear of the carcass’ top and bottom to be flush with the bottom of the rabbets, creating a recessed frame for the plywood back. I turned the carcass face down, revealing the rabbets in the sides.
I then cut the 4-by-8 plywood sheet down to size—36-7/8 by 72-1/2 inches to fit the rear of the carcass. To cut the plywood I used a Festool plunge cut saw and a guide fence, both available from Woodcraft. When clamped to the plywood, this cutting system creates a nice, straight, accurate cut. However, if you don’t own one, you can whip up a homemade guide fence to use with your circ saw. Once cut, the 3/8-inch plywood fit right into those 3/8-inch rabbets and flush onto the back of the top and bottom boards. I then used wood screws at the top and bottom, and hammered finish nails through the plywood and into the rabbets of the sides. The plywood held everything tightly square for the rest of the construction.


A Little Décor
I had just gotten a new Skil combo-base router and was eager to try it out, so I went ahead and made the true top and bottom of my shelf case. The top and bottom were cut larger than the top and bottom of the carcass. My idea was to allow a little overhang on the front and sides so I could rout a decorative edge in them, giving the overall appearance of the case a little “snap.” I used a 4-foot 1-by-10 that I finish cut on my table saw to 8-by-39-1/2 inches. When fastened flush with the back of the carcass, this would allow the top to overhang the carcass more than 1 inch at the front and sides.
Next, I set up the combo-base router in “fixed-base” configuration for a little edge routing. I used a roman ogee router bit to cut a nice profile in the front and sides of the board. One thing about routing—you’ve got to have good, sharp bits. I used one of Vermont American’s new Silver 1/4-inch-collet router bits, and it worked great. When cutting a deep profile, I’d suggest making it in a few successive passes, lowering the cutting depth after each pass to prevent “burning” or discoloring the wood.
With the top completed, I cut and routed an identical board to attach to the bottom. I then used wood glue and countersunk wood screws to attach the new top and bottom to the carcass. As I did so, I inverted one of the boards so the top and bottom edge profile were upside-down to each other—a personal preference.
Then, at the bottom of the case I went a step further. The carcass was more than 3 feet wide and more than 6 feet tall—nice looking, but I was concerned about stability; it was only 8 inches deep at the bottom. I didn’t want it toppling forward onto someone’s head. So I added an extra layer of 1-by to the bottom to act as a foot. This was a deeper board cut from a 4-foot 1-by-10 to 9-1/8-by-40-1/2 inches. That made it 1 inch wider than the original routed bottom board and 1-1/8 inch deeper, which was key. I routed another ogee profile in the foot board, and attached it with countersunk screws and glue to the bottom, flush with the back. This meant an extra 2 inches of depth was protruding at the bottom beyond the face of the case, like a person’s toes. So once the case is standing it would resist the tendency to tilt forward—thus, extra stability.


Pocket-Hole Joinery
The next step was to add the shelves, which were fastened with the aforementioned pocket-hole joinery. Pocket-hole joinery relies on a two-step process. First, use a special “stepped” drill bit to drill the pocket hole. The drill bit has a 1/2-inch diameter shank but it also features a shoulder with a narrower tip that drills a pilot for the shaft of the screw. The bit’s 1/2-inch diameter is actually to provide a pilot hole to house the wider head of the screw.
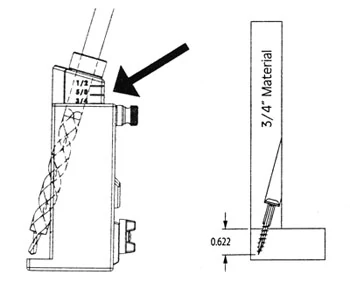
This initial pocket hole is drilled at an offset angle with the help of a special jig (see diagram). I simply clamped the jig onto the edge of the boards and drilled through the jig’s drill-guide holes, which held the bit at a precise angle.
The depth of the pocket hole and the length of the screw depend on the thickness of the wood you’re joining. But don’t worry—you don’t have to commit a bunch of depth measurements to memory. The jig I used from Kreg Tool Company features marked graduations that you simply align with the top of the jig’s portable base. In other words, since I’m joining 1-by (3/4-inch-thick wood), I just line up the “3/4-inch” mark that’s written on the jig’s guide block with the top of the jig’s portable base. I tighten a nut to lock it in place, and the jig is ready to rock.

One more note: To prevent the drill from plunging through the wood, you have to tighten a stopping collar on the shank of the drill bit. So, where on the shank do you lock the collar? For 3/4-inch material, place the depth collar 3-9/16-inch from the shoulder of the drill bit. This is simplified by another feature of Kreg’s K3 Master Jig System: It comes with a benchtop base for the jig. This benchtop base, like the portable base, features marked graduations for standard wood thicknesses. Just line up the drill bit with the markings on the benchtop base, and the base shows where to position the collar. Once you set up the drill bit and jig, which only takes a second, you’re ready for repeat drilling. It’s really pretty easy.

So, on to Step Two of pocket-hole joinery: Apply the screw. Using a square-headed driver bit, I drove Kreg’s 1-1/4-inch self-tapping screws into the pocket holes. That completes the operation. I used three screws on each side of each shelf (on the underside). The self-tapping screws driven at the offset angle provides a very strong clamping action for a solid, durable and fast wood joint. Once you get the hang of it you’ll be flying through your screws. And the screw heads are concealed beneath the surface of the wood, inside the pocket hole, which you can conceal with putty or Kreg’s pocket-hole wood plugs.
Adding Shelves
Each shelf was made of 4-foot 1-by-8 stock, which I finish cut to 36 inches wide and ripped to 6-1/2 inches deep, just slightly deeper than a standard DVD case. This also allowed the shelves to sit recessed in the case about 1/4-inch—a design feature I thought would make the case appear a little less “boxy.”
Note: After the shelves and sides were cut to size, I went ahead and sanded them smooth with an orbital sander. As a matter of fact, I sanded the wood many times throughout construction, trying to save myself from facing one giant sanding job at the end of the project. It’s also easier to sand the entire board before it’s been installed. Ultimately, you want to go from 120-grit sandpaper to 180-grit on a power sander, graduating to the finer grits as you go. In the end you’ll want to hand-sand everything smooth with 220-grit paper on a sanding block, which will remove the tiny swirl marks that will inevitably be left by the orbital sander.
To install the shelves, I pre-drilled the pocket holes in each shelf board, then screwed them in place one at a time. When doing so, I rested the backs of the shelves on the plywood, spacing them 8-1/2 inches apart. I used a layout square to make sure the shelves were square and marked their locations. I then used a couple of right-angle clamps to hold them steady while I screwed them in place. I added six shelves, giving me seven surfaces of shelf space. And I left extra space above the top shelf as a decorative preference, and so the case wouldn’t be quite so top-heavy.

Wrapping Up
The pocket joints held the sides of my shelves sturdily in place, but I wanted to reinforce them to prevent sagging in the centers. So, from the rear of the case I used a Zircon stud finder to locate the shelves. I marked the shelf locations and drove five wood screws evenly spaced through the plywood and into the backs of each shelf.
Due to the light weight of the DVD cases that these shelves were destined to carry, I was confident the wood screws would prevent sagging. Plus, I liked the slightly recessed look of the shelves.
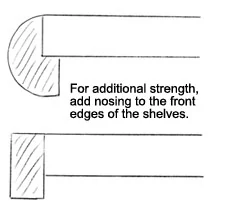
However, if your shelves will be holding anything heavier, then I’d recommend adding a strip of nosing to the fronts of the shelves. Nosing will further increase their strength and stability. Plus, you can rout a profile in the nosing for a little extra decorative flair.
Next comes finish sanding, and I used Skil’s new Octo sander, because you can fit this little gadget with eight different sanding profiles, allowing you to access tight corners, flat faces and numerous shapes and profiles. This came in really handy at the edges of the shelves and when trying to smooth out the routed ogee profiles.
Once you’ve sanded the wood to a glassy finish, the last step is to add your favorite stain and sealer to the pine. But that’s another story, which you’ll read in a future issue of Extreme How-To.


