

A Step-by-step Approach to a Beautiful and Budget-conscious Bathroom Overhaul
Pound-for-pound and blow-for-blow, a full-on bathroom renovation is easily one of the most challenging home-improvement projects you can tackle. While there is usually no single element that is too complicated, the challenge sometimes comes from having to do everything—organize materials, demolition, framing, plumbing, electrical, flooring, trim, windows, paint—in a small area, on a fast schedule and, considering the current economic conditions, on a budget.

By the way, when I say “full-on bathroom renovation” I’m not talking about a remove-and-replace situation where the main scope of work is to replace the existing vanity with a new one, the existing tub with a new one and so on. No, I mean a total gutting and relocation of fixtures—the sink goes across the room, the tub moves from here to there, and so on.
Sometimes “full-on” is the only way to make a bathroom work, which was the case with the bathroom here. The good news is that the payoff is much greater than the headaches if you do it right, and that means there are a few decisions to make before you start. For example, decide whether you’re the contractor orchestrating the symphony, a homeowner acting as your own general contractor, or a DIY’er tackling all or some of the work yourself. If a bathroom overhaul is on your schedule, this article is for you.
From design to framing and finishes to smart layout tricks, we cover the issues you’ll face that’ll help you get the bathroom you imagine and—get this—do it by maximizing every dollar!
Design
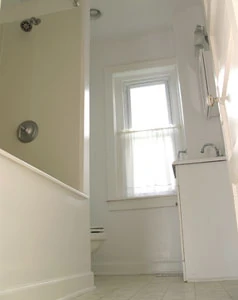
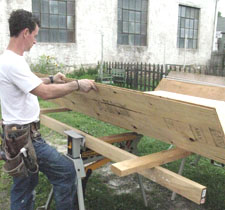
Like every home improvement or step forward in life, it starts with a need, dream, vision, or some combination of the three, which was the case here. Not only was the existing bathroom a train wreck, but the homeowners had a baby on the way. Also, the space was just 8 feet deep by 6 feet wide. And, if you can imagine it, there was a ton of wasted space here begging to be utilized. We started with a redesign of the layout (see sidebar).
Get Organized Early
Once your design parameters are in the bag, it’s time to focus your mind like a laser beam on getting organized.
A full-bore bath remodel can—and probably will—turn to chaos at some point, especially if you’re remodeling the only bath in the home. Success hinges heavily on a well-organized project. The first order of business is to decide on one of three possible options: farm out the whole thing, act as the general contractor, or execute the work myself.
Whatever your course of action, planning, design and product selection is the next step.
Planning & Product Selection
It’s hard to plan a bathroom remodel because there’s always some unforeseen challenge. Nevertheless, there’s a certain group of categories where I focus my energy. This not only saves time and enables me to deliver better work, but it protects budget like a bulldog.
Scheduling. One of the best ways to protect my budget is to do what I’m good at and pay for what other people are better at. Getting this ball rolling starts with two phone calls—the first to my plumber and the second to my electrician.
During the design stage, I’ve figured out where plumbing fixtures and electrical devices go, so now all I need to know is the sub-contractors’ schedules. When their services are required, their schedules dictate when work can proceed. Scheduling Tip: If I’m scheduling this for a client, I usually inform the client I need no less than 4 weeks lead time to get on their schedules. And, call the plumber first; he’s usually tougher to schedule. Also, it’s easier to pull wire around pipe than the other way around.
Materials—Inside. Although it’s tempting, new bathroom fixtures should not be stored in the yard under a tarp. They take up a lot of real estate, and big-ticket items and wet weather are not the best of friends. They’re also heavy, so I typically like to stage the toilet, sink and tub as close to the bathroom as possible to minimize lugging stuff around. This usually means commandeering an adjacent room like a bedroom. I also use this same space to store the “on-location” tools I need, including everything from impact drivers and nailers to drywall tools and wrecking bars.
Materials—Outside. Storing building materials like 2-by-4s and drywall in a garage, under a porch or outdoors under tarps makes more sense. They can handle the weather to a degree and they simply take up too much room to store indoors.
Dust Management and Floor Guards. For demolishing an existing bath—especially if there’s plaster and lath like there was here—dust is unavoidable. I tell my customers, verbally and in writing, that I can only manage and minimize the dust; I can’t (on a budget anyway) avoid it, but you can bet it’s coming.
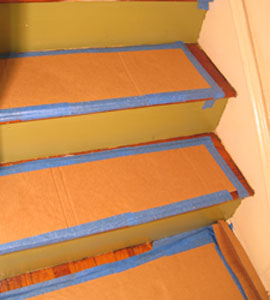
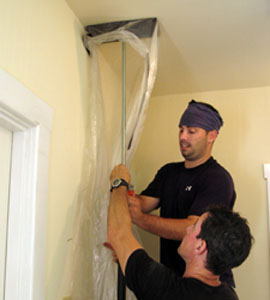
My first step in dust management is to cut and tape cardboard over the floor surfaces adjacent to the bath (Tip: Saving large boxes from TVs, appliances, etc., is my cardboard source. If you’ve got DIY projects on your mind, save cardboard. You’ll use it, trust me). Drop cloths work, but they bunch up. Cardboard works better. If there are stairs, I cut pieces for each tread to protect the finish. I also make a trail from bathroom to doorway to keep from tracking mud, dust, debris in and out of the house. Draping plastic from the ceiling is another trick. I either press it in place with a couple of T-Jaks or I screw it to a 1-by-2 then screw the 1-by-2 to the ceiling.
When possible, I put a powerful fan in the window pointed out and turn it on high. It can really get a lot of dust moving outdoors. I also own an air cleaner to gobble airborne dust. Both do a good job of controlling—not eliminating—dust. The fan also does a good job of evacuating the house of conditioned air, so time of year matters when using this technique.
Demolition Prep
The word “demolition” often raises people’s blood pressure; the adrenaline starts to flow and they think it’s all about smashing and banging. I hate to rain on everyone’s parade, but I’ve always found being careful during demo is a smart way to avert various crises.
The Right Tools. Plunging a sledge hammer into a wall is neither productive, nor smart, though I’ve seen it done a zillion times. I pull a room apart slowly—especially one that adjoins another room. Sledge hammers are for breaking rocks and stuff. To yank the room down, I used the hook-shaped Stanley FUBAR III.
Other Stuff. If at all possible I throw debris out a window rather than drag it through the house. This means I end up bagging up the debris in contractor trash bags, then gunning the package out the window. I create a drop zone from large drop cloths to catch overflow that occurs when bags break or spill.
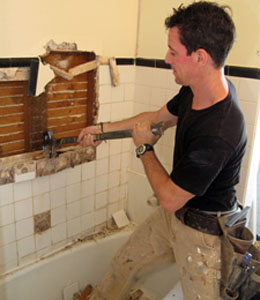
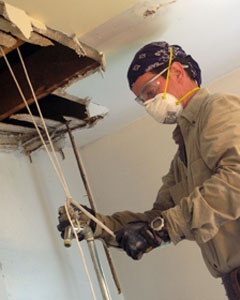
With a plaster blow-out, safety gear (or PPE, personal protective equipment) is necessary because the dust is lung-clogging, and the stuff that flies around—everything from sharp pieces of lath to tiny nails—is pretty gnarly as well. Safety goggles and a dust mask are an absolute must. A hat or bandanna and work gloves definitely help, too.
Demolition Best Practices
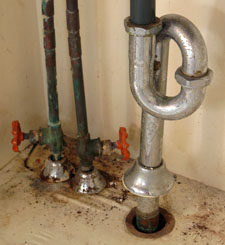
Water Source. Before I swing a crowbar, I figure out where my water shut-offs are, especially the main water shut-off to the house—and I make sure it works. This is my fallback position if I bust a pipe. After that, I try and locate local (or in-line) shut-offs to the bathroom some place upstream of the actual room. If I can shut them down without shutting down another room, I do. A single misplaced blast and you’ve got a room filling up with a flood. If I can’t locate an up-stream shut-off, I shut the supplies off at the fixture. Finally, if those knobs are frozen or corroded (as they were here), then there really is no other option other than to remember Step One.
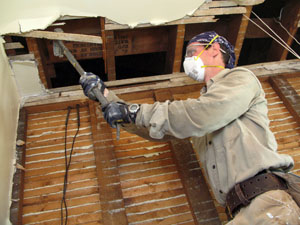
Dropping Ceilings and Walls. For ceilings and walls I use the bar to do a plunge-and-pull: I dig the bar’s hook into and behind the wall cladding, then yank. And for second-floor baths, if there’s any access above the ceiling (like an attic crawl-space) I bash the ceiling down from above.
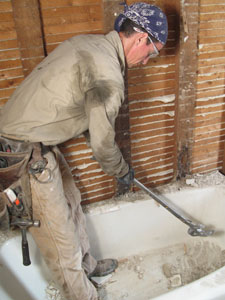
Old House, Big Iron. An old house like this one will almost surely have a cast iron tub, and cast iron is extremely heavy. If you can’t carry it out of the house, cast iron is hard but brittle. And, sorry to go back on my word, but you might use your sledgehammer here, though I used the FUBAR’s hammer head. Time to crush the tub.
To do this, wrap the tub in a heavy drop cloth. This prevents shards of porcelain and iron—shrapnel, basically—from escaping the strike zone. But be aware that in a house, the hip bone is connected to the leg bone. In other words, you have to wale on a tub to break it, and striking this hard could easily dislodge drywall or plaster or a light fixture in contiguous areas of the house.

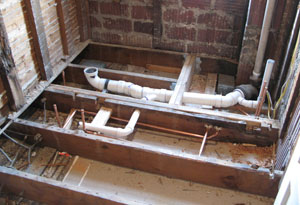
Floors and Subfloors. I’ve found the best way to eliminate a floor and subfloor system is to sacrifice a few circular saw blades. Instead of pulling and prying to access the joists below, I cut out the floor instead. I run the saw between the joists, then tear out the individual strips of plywood (or whatever). It’s much easier.

Trashing It Out
Dumpsters make perfect sense on a project of this scope. They’re convenient and easy to access, however they don’t always work. Either there’s no place for them (like on a city site) or the customer doesn’t want one in the driveway. To hopscotch that (and to save money, actually) I use my utility trailer. In this case I carted 2,000 pounds of plaster, tub and detritus to the dump. Of course, I have to own the trailer and my time has value, but the tipping fee was under a hundred bucks, and I made money that otherwise I would have paid to the dumpster company.
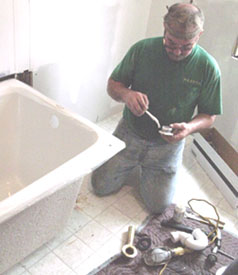
The Trades, Water and Wire
Water First. If fixtures are to be moved as happened here, the plumber becomes a nearly godlike figure on the job. He is the most important guy because everything is hinging on him doing his work on time, on budget and properly. Many contractors will tell you that accomplishing all three is sometimes a holy-grail-ish undertaking; plumbers take note.
Framing and Re-Framing. If any framing needs to be altered—and this is usually the case in a full-on redesign, new drains need to be let through a joist or a joist must be deleted—it’s vital to reinforce the framing to carry the load. Do not skimp on this.

Often, simply installing double 2-by headers with joist hangers works to make room for new pipe. In other cases, like when a joist has a lot of holes in it or when I open the floor and find notched joists (usually the case in older homes), I gusset it.
To gusset a joist means gluing and screwing 3/4-inch plywood to each side of it before drilling any more holes in it. Some contractors use MetWood connectors. I haven’t, but they make a ton of sense. Whatever your course of action, be ready with this information because plumbers are famous for perforating load-bearing floor systems and then walking away. Management Tip: If your plumber doesn’t know that eliminating joists or hacking huge notches and holes through them is a problem, you can bet there’s a lot of other things he doesn’t know, and he might not be the best plumber—budget or not—you should be using.
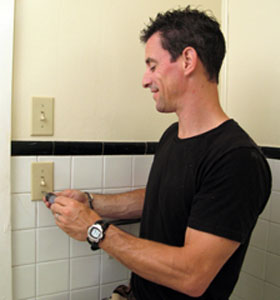
Electrician. By now, you know where you want to locate your light fixtures and devices, so now, with the walls down and the floor out, is the time for the electrician to come and do his “rough-in.” This means he’ll install the wires that will supply the power to the fixtures.
Bathroom Design
When I design a bathroom, I’m very aware that this is the most personal room in the house, even more than the kitchen (remember, you can eat out). There are the obvious biological reasons, of course, but it runs deeper than that. A bathroom needs to attend to our higher needs, too.
Don’t confuse higher needs with higher cost however. I’m not talking solid gold fixtures, I mean a smart, thoughtful layout that lets you gracefully move through a confined space. And because you may share this space with several members of your family, it must not only be gracious in its egress and access, but it must also store all the things—out of sight—required in a bathroom.
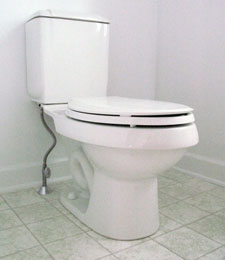
And finally, it must look and sound accommodating, which means using tricks like 3/4-height walls, shorter tubs (we used a cast iron Kohler), a gentle paint vocabulary, and flooring that makes sense. It must also be a soothing space. If water usage—or living economically and/or “green”—is an issue where you live, then flushing the toilet (the most water-consumptive device in the home) is literally flushing money down the drain, which is hardly a soothing experience. To ease that burden and do our part for the environment, we used a Sterling DualForce commode. At 0.8 gallons for liquid flushes and 1.6 for solid matter, it’s a real water saver.
Just because this is a budget bath doesn’t mean any of that higher minded stuff was glossed over. –M.C.
Building It Back Up
Once you have gutted the old bathroom, it’s time to inspect and upgrade insulation. One place that is often overlooked, insulation-wise, is in the floor framing. I always install batt insulation in a joist bay or two along the exterior wall to help seal the room. And, I insulate around water and drain pipes at the same time. It helps conserve hot water, no doubt, but it also helps quell the noises from waste draining through PVC pipe.
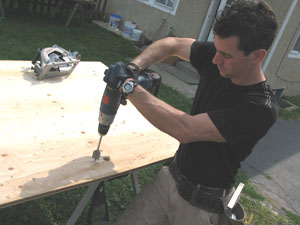
New Subfloor. The plumber leaves his supply and drain pipes “stubbed out” for the shower, sink and toilet. Transferring these measurements from real space onto a sheet of plywood is tricky work—some measurement is always a little off for me. To increase accuracy and speed I use a piece of 3/4-inch thick, 2-foot wide rigid foam insulation as a “blank.” I lay it in place as if it were the subfloor, but since it only weighs about a pound, I can rest it right on top of the pipes. Now all I have to do is firmly press on top of it at the stubbed pipes (which I’ve asked the plumber to leave at the same heights above the floor), and this leaves an indentation in the foam, creating a full-size template. I then cut out the holes in the foam, transfer it to my plywood, then cut it out right the first time. I love this.
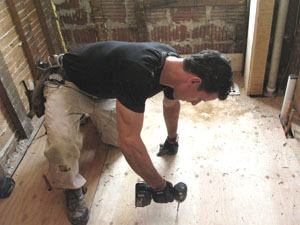
To get a solid connection to the framing and to prevent squeaks later on, I screw down the subfloor using an impact driver.
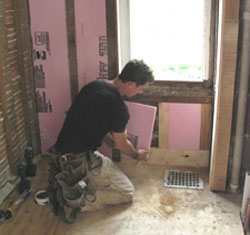
Walls. It’s now time to frame and insulate the walls. In a typical old-house remodel, I’ll re-frame the walls with full 2-by-4s, but here we needed every inch, so I used what was already there—1-by strapping fastened to the block. I then insulated between the straps with rigid foam.
And for framing the shower wall I used a neat design trick, a 3/4-height shower wall. This wall not only houses the shower’s plumbing and shields the room from water but—because it doesn’t go all the way to the ceiling—light can pass over the top, giving the feeling of a much larger and accommodating space. You can even put a plant up there for color later on.
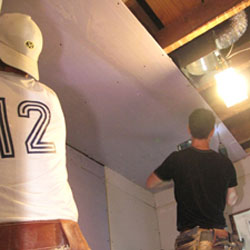
Drywall
There’s not a ton to say about hanging drywall, but it is a watershed (pun intended) moment because once you’re rockin’, the room starts coming together. Moisture-resistant drywall is a must in the shower area—and a minimum in regard to water protection. While moisture-resistant drywall is a budget saver (and when properly detailed, works like a charm), cement backer boards have better longevity. Once the boards are hung, finish them with compound.
Floor
Underlayment. As we build up the bathroom, the opportunities to save cash pop up often. But saving money doesn’t mean low-quality work. On this bathroom we saved not only money, but days by eliminating tile. Instead, we used a vinyl sheet which worked like a charm in a small, chopped-up room like this. And, the best time to install a sheet is right after installing the subfloor.
A few things about sheet goods: A sheet telegraphs imperfections from the subfloor below. To minimize this, install 1/4 BC (sanded on one side) plywood to get the substrate nice and smooth. Then, use flooring mastic to fill seams and screw heads. Use the same template from the subfloor to measure and cut the underlayment.
Installation Trick: To get the subfloor and underlayment to weave in with the door jamb—no notching here—undercut the door jamb. Use a block the same thickness as your finished floor height (plus 1/8 inch for fudge factor) as a saw guide, then use a pull saw to slice through the bottom of the jamb. Once that little block from the doorjamb bottom is removed, you can tuck a strip right underneath for a seamless, notch-less look.
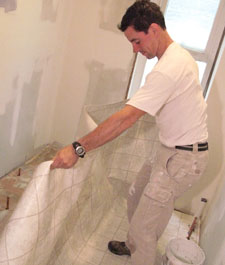
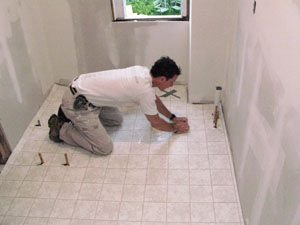
Laying Out and Installing The Sheet. I measure the room north-south/east-west in at least three locations. Next, I layout and cut the sheet to fit within 1/2 inch all the way around. And for the third time, I use my rigid foam template to lay out the stubbed penetrations on the vinyl sheet.
It’s best to unroll the vinyl on a wide, flat surface like a garage floor. However, I didn’t have that, so I made a mondo work table using my two Jawhorses, some 2-by-4s and a few sheets of plywood. This is a great trick.
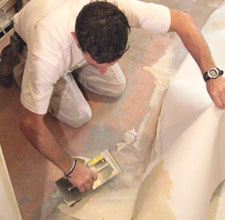
I think it’s a best practice to test fit the sheet in the space, carefully laying it over all penetrations before there’s any glue involved. Once you know it fits, fold it in half. Next, apply glue to the subfloor. Lay the sheet back down in the glue, then, using a damp rag and some serious elbow grease, wipe/rub every square inch of the floor from the center out to the edges. This is akin to pressing a tile into thinset; it bonds the sheet to the glue and usually eliminates any air bubbles. Plus, you don’t have to rent a 100-pound roller.
Repeat the process for the other half, making sure to wipe out all bubbles, then give the glue 24 hours to dry.
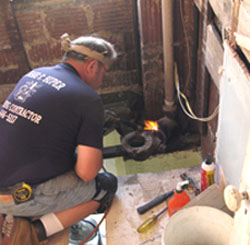
Plumber Returns—Setting Fixtures and “Trim”
The bath is now ready for the plumber to return and “trim out” the bath, which means setting the fixtures and making the final plumbing connections. The plumber will also “wet bed” whatever is required. For example, the tub used here, a cast iron Kohler, is set in a mortar. This makes a bulletproof connection and delivers a solid feel to the tub. Allow 24 hours to dry.
Note: Some companies allow you to set lighter (usually fiberglass) tubs in joint compound instead of mixing up mortar. And sure, this is faster because joint compound is already mixed and in a bucket, but mortar has more meat, and makes a more solid connection. And in the case of this Kohler, it is required.
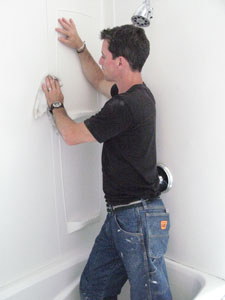
Shower Walls
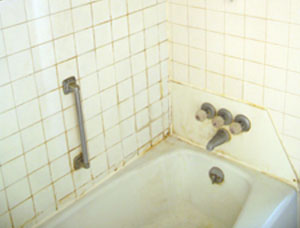
A big bridge to saving budget dollars in this bath was using fiberglass shower surround panels instead of tile. The trade-off, however, is that they require a ton of physical labor to install correctly. They need loads of caulk, which both sticks them to the wall and seals them. Sealing them tight with caulk prevents liquid and vapor from penetrating the wall system. This is a process not to be undertaken lightly or done halfway. Water vapor in the walls will cause mold and other rot issues. I like the price tag for sure, and the look is fine, but I worked hard saving these bucks.
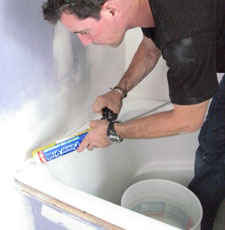
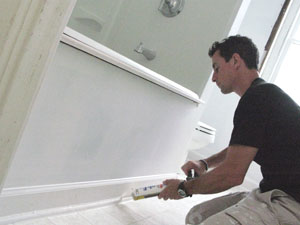
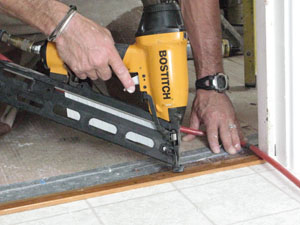
Trim Package
I love trimming out bathrooms with a beadboard wainscot, primo casing, and crown where it makes sense, but for coming in under budget, spend your trim dollars in a dining room or something a little more grand. Keep it basic in the bathroom, which is what we did, using a nice but simple package. I applied base and shoe molding, which I caulked along the wall and the floor. I used a high quality caulk (Phenoseal) along the floor. It costs more than regular caulk to be sure, but it is a vinyl-based product that works well as a sealant—again, our goal is to prevent water from getting behind the walls and into the floors.
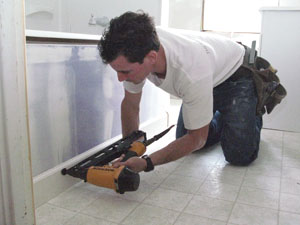
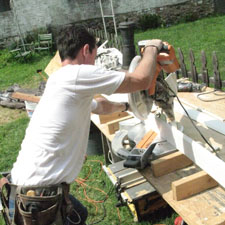
The final trim element is a custom threshold I made on the table saw. I find this faster and easier than buying a “saddle” and trying to make it fit. With the table saw I can cut my piece to the actual jobsite conditions thereby ending up with a nice transition between the existing hallway floor and the new bathroom floor.
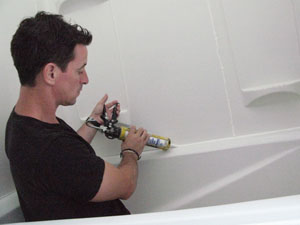
Above and Below: Use a high-quality caulk (Phenoseal) to seal the shower surround and floor trim from water infiltration.
Trim Note: For cutting elements like this I use a nice blade (Freud Fusion) to really minimize blade swirls which will show up in the wood—especially if you stain or urethane it. And, I hit them with the sander before installing just to be sure they’re baby-bottom smooth.
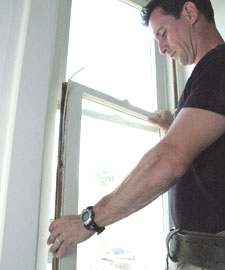
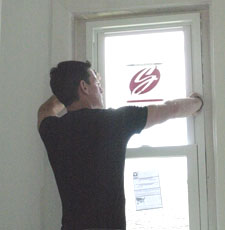
Window
I don’t see how it makes a lick of sense, even on a budget, to go to all this effort and leave a drafty old window. Plus, leaving it will cost money every day it leaks conditioned air, so as an investment, I installed a new double-hung Simonton vinyl replacement unit, which was a snap to set according to manufacturer instructions. I was also able to install the unit from the inside by removing the interior blind stops and sash stops so I didn’t have to alter any of the exterior trim (or wrap it with metal). This meant I could seal the window tight with a bead of caulk inside and outside.
Coatings
Whenever possible I use low-VOC paints these days and I’m getting great performance out of Sherwin Williams products. They have low odor too, which my brain cells appreciate the day after, for sure.
It’s best practice to use semi-gloss paint in a bathroom and as a budget saver, the entire room was painted semi-gloss white. This mountain of white is offset by fixtures, a colorful shower curtain and other interior design details. And while it’s a lot of white, it saved hundreds on the up-front paint costs because separate colors didn’t need to be cut in.
Drying Time
Materials in a bathroom go in rapid fire. The joint compound is barely dry before you’re setting fiberglass and caulking right over it. And there’s a lot of caulk you really want to dry and cure, whether that’s to make a tight grab on the fiberglass panels or the beads over the top edges and along the floor trim to keep water at bay. What’s more, there’s paint over the top of that and floor adhesive under the floor. And then there’s mortar under the tub—which I want to dry no less than 24 hours before people stand in the tub.
If at all possible (like if there’s a second bath in the home) I encourage my customers to wait a week before using the bath. If there’s no other option, I encourage them not to take baths the first week and to limit their showers to quick ones.
After all, we’ve worked hard to use limited funds to bring a beautiful bathroom to life, enabling it to do what fine bathrooms do best—serve as an area of gracious, soothing utility that is easy to navigate and inexpensive to live in.
Editor’s Note: Mark Clement is author of The Carpenter’s Notebook, A Novel www.FormalFarmHouse.com.
