

By David Schrock
My company has been finishing basements almost exclusively for several years now. I have been a general contractor since 1992 and I’ve completed projects in virtually all genres of construction – from new homes, room additions and decks to commercial remodeling – including a 5,000-square-foot gym at my children’s school. But basements have been a wonderful niche market for us. Probably the biggest reason I got into remodeling basements was my enjoyment of the challenge involved in solving the issues that arise in the design phase. How do I get all my customers’ ideas and desires incorporated into a clean basement design that flows well? Careful planning.
Basement dimensions vary from house to house; so planning is key. Carefully thinking through the project will result in a newly created space, which will be enjoyed for years to come. I recommend planning for now as well as the future, particularly if your children are small and your intention is to remain in the home for an extended period of time.
The Layout
You need some concept of where you will be going with this project, so lay out your ideas for how the finished product should look. There are a couple of approaches that work well. The least expensive is to use graph paper. Your first step will be to outline the basement’s perimeter walls. A scale that generally works is 1/4 inch of paper representing 1 square foot of floor space. This way each graph square will be 1 foot. If you have an unusually large basement, tape several pieces of paper together.
Precise measurements are not necessary, but try to keep the outside dimensions within 2 to 3 inches of the true measurement, keeping the scale accurate. Additionally, realize that your total finished room dimension will be anywhere from 10 inches to a foot narrower, because each of the walls will be built out 5 to 6 inches from the concrete. Once the exterior walls are laid out, your next step is to start on the interior spaces. Locate the stairs first and use them as a reference point. When you have the layout of the basement perimeter accurately drawn, you can begin to plan.
Next, for better accuracy, lay out interior walls with distance measurements from the perimeter concrete walls. This way the interior wall will be located by a fixed position instead of guesswork. Be sure to include the windows, doors, posts and any ductwork or beam boxes you might be creating. Then, with your scaled floorplan you can create 1/4-inch scale furniture cutouts from other graph paper and put them on your drawing. This should give you a pretty good idea of what will work and what will not with the space you have. Additionally, with the scale drawing you can create a fairly accurate materials list.
If you’re computer savvy, another method to layout your plan is using an architectural program designed for homeowners. Many of these programs will print 1/4-inch scalable drawings, and you can locate furniture by pointing and clicking from the furniture library. Use the programs’ soffit tool located in the cabinet menu to draw beam boxes and duct boxes. Undeniably, the best features of these programs are the 3D renditions they will create. If you have trouble visualizing what your finished space will look like, these computer programs are your ticket.
Of course, without doing it on computer does not leave one destitute for an idea of how the basement will look. It’s just a matter of being able to picture it in your head.
Space Exploration
When designing the basement’s interior space, try to keep the wall lines straight. You want to be able to tie in the various “mechanicals” – sump-pump pits, ejector pits, furnace rooms, sewer pipes, water-meter pipes – so that it looks logical and flows smoothly. If you have a main sewer pipe that runs along a perimeter wall, you should design your basement so the wall goes in front of the pipe. Don’t try to design a wall tight against the concrete and then build a box around the pipe to give yourself slightly more space. You will not be happy with the way it looks, and at some point you’ll likely bump your head into it. If you still feel the space is too small, the 2-by-4’s can be rotated 90 degrees so that the 3 1/2-inch side is flat against the pipe. Try to make things have a general purpose instead of a wall just sticking out for no apparent reason.

To the left side of the picture, you’ll see a rectangular box going all the way to the ceiling. That box is hiding a post. Since it was so close to the wall, we wanted to tie it in with the wall. So we made a flower box to put flowers in.
Box around I-beams and ductwork; sometimes you can use these for natural soffits that will make really cool spaces for cabinets or shelving. Again, the idea is to tie it all together. Odd pieces sticking out into a room can be made into normal-looking boxes that both function and look right. When using natural soffits created from beams, low-hanging pipes, etc., imagine a good use for the space. An entertainment center, some shelving, cabinets with a counter top and so on can be used to make the area appear more logical.
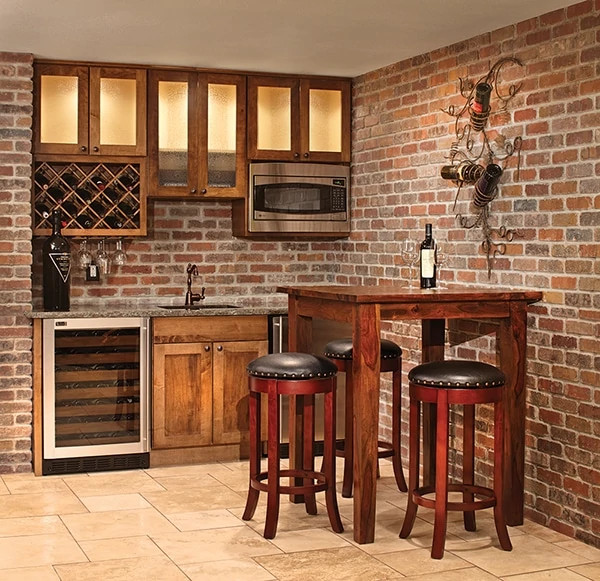
We made this custom mega-bar, from the hardwood-floor top to the doors, as well as the oak soffit above. The area beneath the television is actually where the sump pump is located. On the front side of the bar the panel is removable for access.
In an area where a portion of the basement is being left unfinished I try to make a closet, or recess the countertop and cabinets into that space so the finished area is not consumed. Many times you can create a closet by encroaching into the furnace or storage room. Clever use of space can pay off handsomely. If you plan carefully with a good idea in mind of what will be where, you can come up with things built into spaces that others might not think of. This article is intended to give ideas you can use, so be creative. Don’t just look to your basement and inventory what you think you can do with it. Instead, envision your ideal basement. Figure out what you’d like in it. Have fun dreaming it. Then endeavor to make that work in your home.
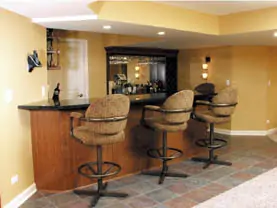
The tall cabinets behind the stools are actually wall cabinets sitting on a platform we created. We needed a solution that would allow our client space to walk behind the island counter he wanted. The wall cabinets worked great.
This basement had ductwork galore, which meant it had soffits galore. Light colors were used to enhance the ceiling height. The cabinets beneath the mirror at the back bar are all wall cabinets to allow space in the main bar area.
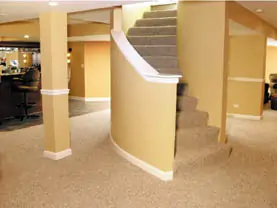
This is the only curved stairway we’ve actually worked on. Note the customized curved handrail. We treated the post by boxing it with drywall and adding a base. We added a chair rail approximately 36 inches high.
Remodeling Tips
Here are a few tricks of the trade to help move along your basement or other remodeling project.
- Prior to installing the drywall, you can mark important locations by stretching a tape measure across your studs and taking a digital photo. The photo can later be blown up to determine exact measurements whenever you need to know them.
- Before you “mud” the newly hung drywall, put rosin paper on the floor to catch the mud that spills as you apply it. Tape the sections together with duct tape. Then simply remove the paper after you’ve finished your drywall work. The paper is a lot easier to clean up than scraping dried mud off the floor.
- Use a treated 2-by-4 for your bottom plate. The treated 2-by-4 will not absorb moisture into the walls from the floor as a regular 2-by-4 might. Do this even if you are using metal studs. You can screw the bottom track into the 2-by-4. This will make it easier to attach a base molding because you’ll have something to nail into. Use a powder-activated tool to attach the 2-by-4 to the concrete floor.
- If your house is relatively new, and you have removable basement windows, ensure your framing is set up so the window is still removable when the project is complete. And if you have a metal frame, you can use paint specially designed for metal. Be sure to clean up the frame before you paint it.
- Use a string between the two opposite walls when building the lower frame of a duct box. Ensure the string is level. Then use it to measure and you’ll have a very straight duct box.
- Always hold your exterior wall frames about 1 inch off the concrete walls, whether poured or block. If the concrete walls aren’t perfectly straight, you will have some fudge room to ensure your wall is straight. Use a chalk line to mark the floor and measure from the line.
- After you’ve finished sanding your newly drywalled walls, prepare a bucket of water and a sponge. Wet the sponge and wring out the water so the sponge is only damp, then wipe down the walls. As you go over the wall areas where you have the drywall compound, take the sponge and trace the outline of the drywall compound. This process will do two tasks for you: (1) It does a great job of getting rid of the dust on the walls, and (2) tracing the outline of the mud compound on the wallboard also helps to feather the materials better.
Reader Question
John from Edmonton, Montana, asked “Is there any special consideration when putting carpet on basement/wooden stairs?”
Author David Schrock responded, “Make sure the carpet is attached securely. Generally this is done with staples by the installers. I’d make sure there was a pad underneath too. I’ve been recommending mildew-resistant pads to my customers. At the sides of the stairs – if a wall is planned at one or both sides – make sure the drywall is cut close to the stairs so that there are no gaps visible after the carpet is laid. Another alternative is to set up a “runner” on both sides of the stairs. A runner is generally a 1″ x 10″ or a 1″ x 12″ that fits alongside the edge of the stairs and runs at an angle from the top to the bottom. The runner is essentially a decorative tool that hides any bad cuts in the drywall around the stairs, and affords some protection at the sides too.”
