

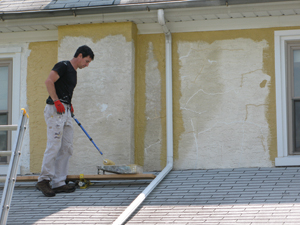
Here at the MyFixitUp Life headquarters, we do a lot of painting, both inside and outside the house. And doing a good job painting is as important to a project as tight miter joints or hanging cabinets dead level. While there’s no doubt painting is work, knowing some tricks can save you time and thousands of dollars.
Painting’s Perception Problem
The first challenge of painting is overcoming your perception of it. Painting is often viewed as either seductively easy or monumentally difficult. The truth is, both can be poignantly true.
On the one hand, some people who haven’t painted much perceive it as a no-brainer. They spread a few cheap drop cloths, get some throw-away brushes that cost ten cents and expect a million dollar paint job in an hour. Unless you’re blind and can’t tell time, that result is … unlikely.
Other people (usually those who’ve painted a little and struggled) perceive painting to be a nettled nest of drips, runs, spatters and ruined clothes. It costs a fortune, you’re never done, and it looks terrible anyway.
The MyFixitUpLife reality is somewhere in the middle. Painting is a skill to be acquired to be sure—one that takes effort and attention to detail—but it’s not rocket science, either. The key is to tool-up and think like a painter.
Organize
Painting is no different than good carpentry or other successful home improvements in this sense. Being organized is the first key to the castle. Before starting work, get everything you need ahead of time. Whatever the job, make a list. Items on ours include:
1. Extra roller covers
2. Enough drop cloths to cover the area (see below on unconventional drop-cloths)
3. If you’re climbing to the second story, make sure your ladder is both tall enough and that it functions properly
4. If you’re working on long walls, does it make sense to have two stepladders with a 2×10 plank between instead of moving one ladder every 2 minutes?
5. Access to water for cleaning brushes and roller pans
6. Access to the proper paint thinner/cleaner (read the paint can to see what is required before you need to clean a brush or spill!)
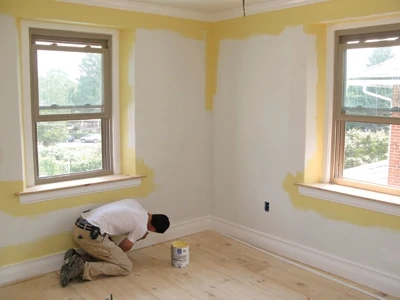
Prep
Clear the Decks. Assuming the walls only need basic prep—filling nail holes from picture frames, maybe skimming a gouge left over from an errant Big Wheel—the first thing to do is to move the furniture. At the very least, move it to the center of the room and cover it. Best case is to empty the room entirely.
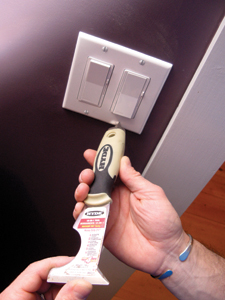
Switch Plates. Once the room is empty, remove and store all switch plate covers. Since all those little screws are easy to lose, we employ a simple trick: As we remove covers, we wrap the screws in blue tape and tape them to the cover. We do this with each cover then store them all in the same place outside the room where they won’t be disturbed until we need them again.

Drop and Cover. The best drop clothes we’ve used are the heavy-duty cloth type. They’re big enough and they repel paint. However, they really only work in the middle of the room when they’re laid flat, and even then it takes almost nothing to get them folded and crumpled. But, they’re leagues better than those cheap throw-away plastic deals. Another alternative is to roll out rosin paper (that red paper in 3-foot rolls in the flooring department) over the entire floor and blue-tape it. This takes time and it’s not foolproof, but it is effective.Big pieces of cardboard cut to shape and taped to the floor provide a great way to mask stair treads for painting.
For stuff we don’t hand-cut, like stripes or shapes, we create them with Frog Tape; the stuff works by chemically sealing its edges when it comes in contact with latex paint. It also works just as well for cutting in moulding.
One key to cutting in—and to a paint job that looks luscious—is the brush. People get 75 cheap brushes of all kinds of sizes thinking they’ll help. We only have one type of brush. It’s a professional grade, angled, 3-1/2inch brush. We’ve used both Purdy and Corona and they work great. But, you have to take care of them (we’ve had ours for years.)
Indeed, the reason the throw-away brush market exists is because people don’t know that cleaning the brush out every two to four hours will make life so much easier. Paint dries on and inside the bristles keeping the paintbrush from working as efficiently. All we do is clean the brush in the sink using a brush cleaner like Hyde’s 45960 to work paint out of the bristles. Then, spin it dry, and we’re back in action. Clean it and you’re good as new with nary a brush in the trash, we hasten to add.

Paint Can Management
For our money, the paint can itself is the biggest source of goop that gets past the drop cloth, on your hands, clothes, tools or the bottom of your shoe. While these are all wildly frustrating problems that slow production to a halt, there’s a pretty easy way to turn this mountain into a molehill. It starts with a tool that rides shotgun in our pouches for all kinds of projects but is designed for painting—Hyde’s 10-in-1 tool. This tool carries us through from how we use the brush, to how we empty the can into the roller tray.
1. Open the paint can and preserve the lid so it’ll shut again using the 10-in-1’s lever. Screwdrivers are for screws, not opening paint cans.
2. Pierce the gutter of the can all around the perimeter with the 10-in-1’s gouge. The paint that used to gush over the side will now simply and effortlessly drain back into the can.
3. Dip your brush about 1 inch into the paint, then screed one side of the bristles on the edge of the can. The brush holds the paint until you get it to the wall.
4. When pouring the last of the paint into the roller tray, rest the can upside down on the roller tray for a few minutes and allow it to drain. Then, carefully remove and discard.
Note: you can actually clean empty paint cans out and use them for other stuff. They’re often lined with a Teflon-type product, which enables you to get them squeaky clean.
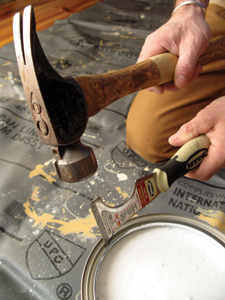
5. When re-sealing the lid on the can, do just that. If you just tap it down lightly, the paint remaining in the gutter will dry and pretty much glue the lid on. Seal it all the way, and the paint won’t dry for a long, long time. Deform the lid with a screwdriver and it’ll never re-seal, and the paint will quickly dry into globs inside the can. Also, cover the can/lid with a cloth and tap down with a hammer to prevent squirt-outs
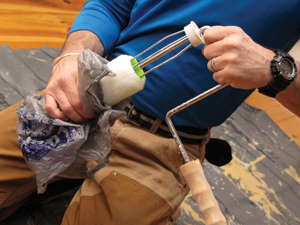
Gloves
We love the skin-tight fabric gloves for painting. They keep most of the paint off your skin but allow you to feel the brush in your hand and make minute movements accurately.
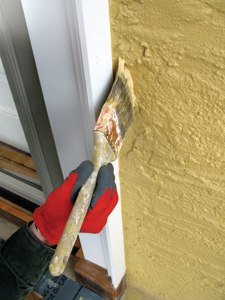
Cutting In
Cutting-in takes a lot of practice. Once you’ve removed your brush from the can (see above) hold the wide edge of the brush along the work. Keep the paint-covered side away from the work; the “clean” bristles do the work. Press and move the brush slowly until you get the hang of how the brush dispenses the paint. Little things matter here—how hard you push, how much paint is on the brush, if you’re painting crown or base, and more, so pay attention to the details. And, the slower you go the faster you’ll finish … to a point anyway. The idea here is not to rush.
Rolling
This is the seductively easy part of painting. Move the roller too fast, however, and you’ll spatter paint. You will also end up painting the same wall about five more times than you would otherwise need. Move slowly and methodically. The roller only dispenses paint for three to six passes. We’ve seen people move the same paint around for minutes; once you’re only “spreading” paint the roller needs to be recharged. Two coats are always required.
At the end of the day, throw the roller cover away. Don’t bother with those home remedies of wrapping it in tin foil or putting it in the fridge. The tin foil trick is OK for lunch, but overnight some little part always dries or fuses to the roller frame and messes you up the next day.
We use two methods to strip the roller cover from the frame. First, hook the round part of the 10-in-1—that’s what it’s for—over the edge of the roller cover and push. Or, slide the entire roller cover into a plastic shopping bag, grab hold and pull. Once the cover is in your hands, seal it up in the bag. No fuss, no muss, no mess.
Finally, clean out the roller pan. We use the brush to clean it out, essentially washing it like a dish. Clean tools work better.
Oddball Stuff
Pre-Paint? It’s hard to say how many people have asked us during the moulding installation clinics we’ve done around the country if we ever pre-paint moulding before installing it.
My opinion: It doesn’t work. Never mind the millions of fingerprints you get all over it during installation. You still have to caulk it and fill the nail holes, so it’s just not worth it. There is, however, one element we do pre-paint: shoe moulding.
We know how to paint shoe in place; it’s agony. And since we usually don’t need to caulk our shoe, we spray-paint it outside, install, and touch up later. It saves cutting in against the floor (especially hideous work when it’s on carpet) and saves all kinds of time.
Remove, Paint, Re-Install. For other things like shutters and shelf blanks where it doesn’t make sense to paint them in place—but doesn’t make sense to lay them flat on a table or horses, either—propping them up on little Painting Pyramids like Hyde’s 43510 on a work table gives access to edges, enables flipping a piece over (even wet) and otherwise getting to all sides. Paint them, let them dry and re-install.
As complicated as all this may sound for a “simple” paint project, we’ve learned bringing all this to bear makes life simpler. Tools, materials and techniques all blend to help us deliver a paint job we can be proud of as quickly and affordably as possible.
Editor’s Note: Mark and Theresa Clement host MyFixitUpLife. They’re licensed contractors and are busy remodeling their hundred-year old home. Find out more at www.MyFixitUpLife.com.
