

By Larry Walton
Rolling out a new look in an old standard.
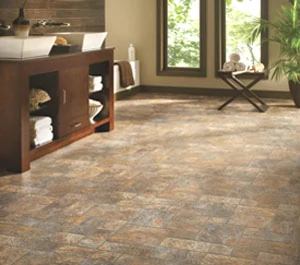
This is not your grandma’s linoleum. Today’s sheet vinyl flooring is available in a large variety of colors, textures and patterns. Often categorized as resilient flooring, sheet vinyl can be a relatively inexpensive alternative to other hard surfaces for kitchens, bathrooms and utility rooms.
Vinyl flooring is available in a variety of grades, which means the choices go beyond cosmetic considerations of color and texture. In general, higher grades of vinyl are thicker, which means stiffer, especially when temperatures are low during the installation process. In fact, if you select a heavy grade of vinyl, we recommend you make a pattern of heavy paper to get the layout as close as possible.


The shinier the floor surface, the more demanding the install. If you select a vinyl with a matte finish, however, it will camouflage more little imperfections such as uneven glue and bumps in the subfloor.


Keep in mind that a strong cross-light source, such as a patio door, will also accentuate ridges and bumps in the floor and may call for more attention during the preparation phase.
Surface Options
Sheet vinyl is usually installed on underlayment, the most common of which is particle board. The advantages of particle board underlayment are its low cost, core consistency and smoothness. On the downside, particle board swells and disintegrates when exposed to water and it lacks structural strength.
Plywood makes a good underlayment, but care must be given that the surface is sanded and smooth. Marine-grade plywood eliminates voids in the interior layers of veneer, which allows it to withstand the occasional high-heeled shoe. Plywood can also withstand getting wet so it can handle plumbing problems or entry door environments. However, vinyl flooring was designed to have water on the surface only.


Concrete also makes a good sub-surface for a vinyl floor if it has been prepped smooth.
Regardless of the surface, it needs to be clean, grease-free and cleared of any above-surface nail and screw heads. The surface must be flat and all holes, cracks and joint lines must be filled. Remove base shoe and baseboards before installing vinyl. Take time to clean the area where the floor meets the wall and watch for debris that likes to hide under the drywall where it can jump under your flooring as you roll it out.


OVERSIZE
Measure and cut the vinyl to approximate size—about one inch oversize all the way around. Roll the vinyl with the top surface on the inside and bring it into the room. Unroll the vinyl to correctly position it in the room, keeping the pattern lines parallel to the longest open wall area. Fold back at least half of the vinyl for gluing.

Using a 3/32-inch notched trowel, spread a thin, even layer of glue on the exposed floor. Unfold the sheet of vinyl over the glued area, being careful to avoid creases and large bubbles (smaller bubbles will be worked out later). The extra material should curve up the wall or toe kick.

Fold the unglued vinyl over the glued half. Be careful not to step on the fold, which could damage the flooring. Apply glue to the second half of the floor. Be sure to extend the glue to the already-glued area. Unfold the vinyl over the second half of the glued surface.


Work the bubbles from the center out to the edges using a flooring roller, rolling pin, wet rags or your hands.

Trim the edges where the vinyl is ramped up the wall or toe kick until the flooring lies flat. The back of a curved vinyl knife can be used to crease the vinyl where the floor meets the wall. This technique will identify a line where the sheet should be cut.


Cabinets usually don’t sit directly on the floor but are shimmed for leveling. In this case it’s preferable to tuck extra vinyl under the cabinet rather than trim it even with the toe kick.
Clean all residual glue from the floor. After allowing time for the glue to dry, install baseboards and/or base shoe molding.
SIDE NOTES:
Quick Cleanup
Many pros prefer to mix filler compounds right on the floor. Cleanup is quicker and easier because there is no bucket to deal with. Start with a pile of latex-fortified compound. Dig a hole in the center with a trowel. Pour a small amount of acrylic latex mixture in the hole and gradually work the dry mix into the liquid. Add more liquid as needed. Keep stirring with the trowel until the mixture is smooth and ready for use.
Vinyl Overlay
When installing vinyl over vinyl, cut away any of the old flooring that is loose or curled and fill voids with a quality filler compound. The entire surface of the old vinyl should be floated with an embossing leveler, because most modern vinyl has a textured surface that will show through the new vinyl without the use of a leveler in the prep process. After the leveler has dried, sand and vacuum the entire surface.
Flooring contractor Kent Miller recommends using a finer tooth trowel for spreading glue on existing vinyl. He also says to allow for some “open time” to let the glue breathe, because glue liquids are not being soaked into the underlayment in this application.
Casing Cutoff
It’s much easier to tuck vinyl under existing casing than to trim the flooring to the shape of the casing. If the casing is tight on the floor, use an undercut saw or dovetail saw to trim the casing so there is enough room to tuck the flooring underneath.
Cut with Caution
The most common mistake I see in vinyl installations (even by pros) is cutting the material shy of the wall or toe kick during the trim process. Often the installer assumes that if they cut in the bottom of the curved vinyl it will lay in just right, but when it rolls out they find it is 1/2 inch or more away from the wall. It’s true that trim will often cover this short-fall but not always. It’s better to trim the material more than once to get it to lay flat.
