

Working with stone is an age-old craft that is very satisfying. A stone project has a sense of immortality. Many stone buildings, walls, walks and fences are centuries old. Stone can be used around your own home to build long-lasting and beautiful projects such as patios, a garden walk, steps, a retaining wall, flowerbeds, or even a building. Stone blends in with almost any decor, from traditional to formal to rustic. Although the basic stonework used for these types of projects is fairly simple, the chore of working with stone is not easy. In fact, it can be backbreaking work. It’s important not to lift too much and to use your entire body, not your back, when lifting. It’s also important not to do too much in a day’s time, especially if your body isn’t used to heavy, physical labor.
Many old-time stone projects were made from stones picked up from fields, hillsides or creek beds, and the availability of stone on the property was usually the reason for the stone projects. Most homeowners these days will have to purchase stone for their projects. Several different types of stone are available including granite, limestone, marble, slate, flagstone, sandstone, gneiss and tap rock. Stone is also available as fieldstone, rubble stone or quarried stone. Fieldstone consists of rocks in their natural shape, and the wide variety of shapes and colors can add to informal stone projects.
Quarried stone is cut and shaped, and is used in more formal projects. Cut stone is slabbed at the quarry, but the face is left natural. A good example is slate or flagstone for patios or walks. Rubble stone is the pieces left over from blasting and cutting the cut stone. Ashlar stone pieces are cut on all sides to create a formal pattern. The face of ashlar is also cut or faceted in a decorative manner. This type of stone is seen on many churches and commercial buildings. Naturally the most expensive stone is ashlar, quarried stone; fieldstone and rubble (respectively) are the most economical.
Because of the cost of shipping, the choices of stone may be limited in some areas. It’s wise to visit local stone yards before you plan a project and determine the choices available. Stone is sold by the cubic yard. To figure the amount of stone you will need, figure the cubic volume in feet by multiplying the length times the width times the height. Then divide the cubic feet in the project by 27 to determine the cubic yards needed. If purchasing cut stone, add 10 percent for breakage and waste. With rubble stone, which is not graded but purchased by the bulk, you will need 25 percent more. In most instances you will have the stones delivered, but if transporting them yourself, do not overload your vehicle.
Regardless of building a wall, patio or walk, try to pick stones that have flat, fairly square sides. Round or cannon ball stones are hard to deal with. They don’t stay in place when dry laid, and are also hard to secure with mortar. Once the stones are delivered, sort them into piles of different sizes, shapes and colors. This will make designing your project easier.
Stonework requires only a few tools. You’ll need heavy leather gloves, goggles, a tape measure, a sharp bladed trowel, a stonemason’s hammer and chisel. For mortared projects, you’ll also need a wheelbarrow, mortar shovel and hoe, or powered mixer. For flat projects such as walks and patios, you need stakes and string. For walls you’ll need stakes, string, a level and a plumb bob.
Stone is laid either dry or mortared. Following are a few sample projects.
Dry-Laid Garden Walk
A dry-laid walk is one of the easiest projects. The walk can be created with cut stones for a formal pattern or with fieldstones for an informal pattern. Two construction methods can be used. The first method is to cut the turf to the shape of the individual stones, digging the soil down to level each stone and positioning them level with each other. The second method is to outline the walk with stakes and string, cut away the sod, place pressure-treated 2 x 4’s or landscaping timbers on either side, and place the stones down flat with the side timbers. Then fill in around the stones with sand.
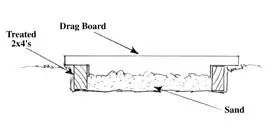
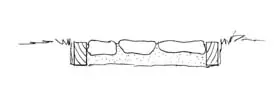
Stones in position for dry-laid walk.
Dry-Laid Patio
A dry-laid patio is created with the same method detailed above. The patio is outlined with stakes and string, the turf removed and the area excavated to the depth of the stones, plus 2-inches. Again, wooden sides are used to outline the patio. Place a 2-inch layer of sand in the bottom, then rake the sand flat and smooth. A raking board, or drag board, can be used to even out the sand, and make sure it doesn’t have any high or low spots. The sand should be somewhat higher in the middle, or next to a building, to create water drainage. After the sand has been leveled, sprinkle it with water to pack it down and provide a more solid surface.
Position the stones in place, with about a 1-inch spacing around the stones. Make sure they are set level, don’t wobble and are an even height. Once all the stones have been positioned, sprinkle sand between the joints, making sure all joints are well filled. Then spray the patio lightly to dampen the sand. Wait a bit and add more sand to any areas that are low. Spray again to settle the sand, then lightly sweep away excess sand.
Mortared Patio
A formal, mortared patio must have a concrete pad to support the stone. The flagstone or slate pieces are then placed in a bed of mortar, mortar placed in the cracks and the excess mortar cleaned away before the mortar has a chance to set. This is a more complicated project requiring concrete and stonework skills.
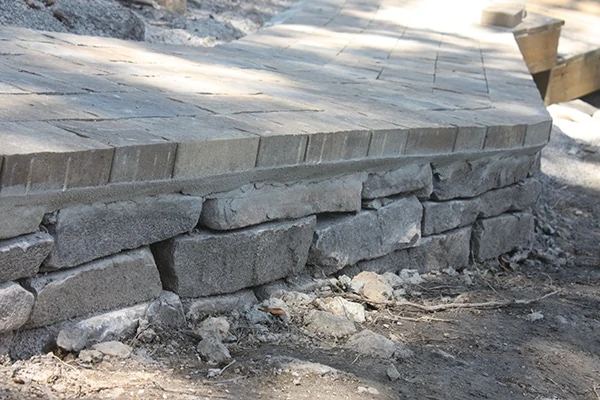
Dry-Laid Stone Wall or Fence
Another fairly simple project is a dry-laid stone wall or fence. A dry-laid stone wall makes a fairly good, low-height retaining wall because the open areas allow water to run through without building up pressure behind the wall. A dry-laid wall can be laid out to follow the contours of the garden, in a straight line, a square shape or curved. The number one rule is not to build a wall that is top-heavy and dangerous. A good mason’s rule of thumb is a wall up to 3-feet in height should be at least 2-feet in thickness. For each additional 6-inches of height, the wall width must be increased 4-inches. Low-height walls are usually created with plumb faces. Higher walls must be constructed with a taper to the top. Generally, this is about one-fifth narrower than the width of the wall base. Walls above 3-feet must have a footing that extends below the frost line. Even with low walls, you should remove the turf, and good stonemasons usually lay the bottom course below ground level. Because dry-laid walls are simply held in place by the weight of the stones, it’s important to choose fairly flat, thin stones. Avoid round stones.
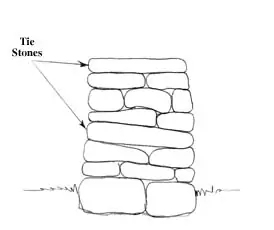
Cross-section of dry-laid stone wall.
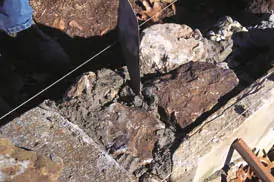
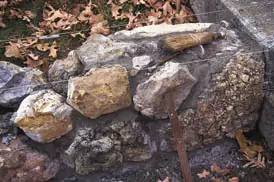
The first step is to outline the wall using stakes and a string line. A bottom string line should be placed on the stakes as well as a top string line. This provides a means of keeping the wall faces plumb. Lay the bottom layer of stones against the inside and outside string line. Normally a stone wall or fence consists of two outer stones with filler stones in between. Continue laying the next course, making sure to overlap the face sides of the wall. About every 4- to 6-horizontal feet, install a 3bond2 stone. This should overlap from front to back of both faces and tie the faces together. Close off the open end of the wall with three large stones to create a U shape. The most important factor is to make sure the stones overlap and all are stable, with no rocking or loose-fitting stones.
Mortared Stone Wall
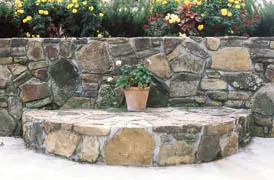
A mortared stone wall has more of a formal look, even when fieldstones are used. A mortared wall is also a lot more work, and the work goes slowly because you can only mortar one course or layer at a time. A mortared wall can also be built with more varied stones with different shapes, types and colors. It can also be built with colored mortar. With a mortared wall, however, you do have a permanent structure. If you don’t like the wall, you’ll need a sledgehammer to take it apart.
Construction is quite similar to a dry-laid wall. The main difference is the mortared wall must have a footing 4- to 6-inches wider than the wall and extending below the frost line. The footing should be placed a couple of inches below the turf, and then the soil graded back up over the footing after the wall is completed.
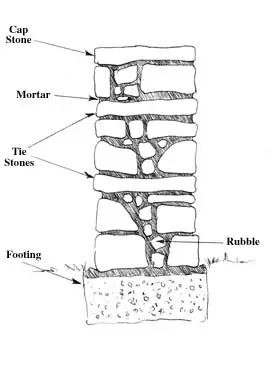
Cross-section of mortared wall.
Again, stakes and string lines are used. One method is to place a bottom string line just about an inch below the approximate height of the first course. Simply move the string line up as you lay additional courses.
The next step is to mix the mortar. Use a mortar mix of one part Portland cement to about four parts sand, plus a little water. Add a little bit of lime to make the mortar stickier. Don’t get the mortar too wet or it will not support the weight of the stones. Add water a little bit at a time. Stick your trowel down into the mixed mortar. The trowel should stand upright. If it slumps, add more cement. Mortar that is too dry, on the other hand, sets too quickly to allow for easy masonry. Do not mix too much mortar at a time. Laying stones is slow work, and a large batch of mortar may dry before you can use all of it.
Place a layer of mortar under the string line extending it into the wall the approximate thickness of your largest stones. Place the first course in the mortar, scraping away the excess mortar squeezed out with your trowel. Place a first course on the backside of the wall in the same manner. Place rubble rocks between the two courses, flinging mortar in and around the rubble rocks to hold them in place. Allow this course to set about an hour, then remove excess mortar from the joints between the rocks. The mortar should be set, but not solid. Use the end of a round-headed bolt to scrape the mortar out of the joints to create a “sculpted” look to the wall. Use a hand broom to whisk away loose mortar, then use a steel brush to remove mortar from the rock faces. Allow the first course to set overnight.
Now you’re ready to lay the second course. Place a layer of mortar, add the inner and outer face stones. Fill with rubble and add mortar in the center of the wall. Like a dry-laid wall, bonding stones reaching from front to back should also be placed about every 4- to 6-feet. It’s a good idea to build up each corner or end first, then build between them. Use the old mason’s rule of overlapping stones for strength: two stones go over one, one stone goes over two. There should never be a vertical joint of masonry between the stones. In some cases you may need to prop some stones with wooden sticks, until the mortar sets.
A partially mortared wall has the appearance of a dry-laid wall, but is actually held more securely with mortar on the inside. The mortar is kept back at least 4- to 6-inches away from the face of the stones.
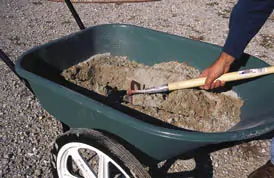
Mix mortar in a wheelbarrow using a mortar hoe.
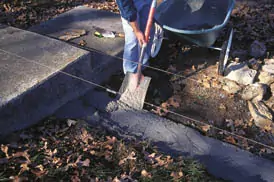
Outline the wall with string lines, then trowel a layer of mortar in place.
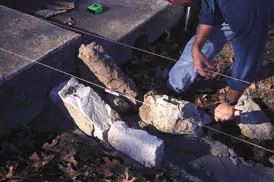
When building a mortared wall, lay the stones with both an outside and inside layer, or course.
Thin stones can be used as face stones. Prop them in place until the mortar sets.
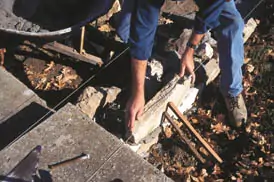
Rubble stones should be used to fill out the center of the wall.
Apply mortar over the rubble stones. Normally only one course of stones should be laid at a time.
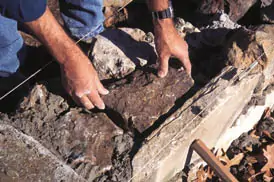
Before the mortar sets completely, remove any excess mortar. For this project a round bolt head and a whisk broom was used for the mortar removal.
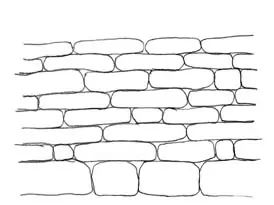
Follow the old stone mason’s rule: “One stone over two, and two stones over one.”
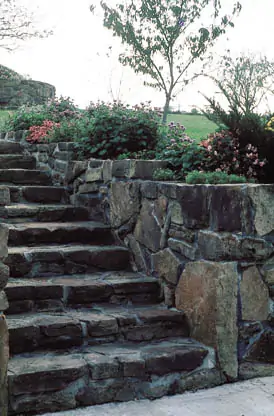
Terrace or retaining walls are constructed in much the same manner as dry-laid or mortared walls. However, many municipalities strictly govern these types of walls because of problems with water and ground pressure. You will probably need a building permit, and have an inspector approve the wall you intend to build. Unless experienced, this type wall is best left to the experts. In both instances the wall should be sloped backward, and allowances should be made to drain water away from behind the wall.
Stone Veneering
Stones can also be veneered onto other surfaces such as brick, cement block or poured concrete. These rocks must be thin, veneer-type stones that can be adhered into place with a bed of mortar and metal wall anchors fastened to the wall. The courses are laid in the same manner as laying a wall. Additional footing support is also required.
Artificial Stone
Artificial stone, like those manufactured by Cultured Stone Corporation is a blend of Portland cement, lightweight aggregates and iron oxide pigments cast in molds to resemble natural stone. These products require no additional footings, foundations or wall ties and can be installed on a variety of surfaces, including wood framing, rigid foam and masonry or concrete. A wide variety of shapes, sizes and colors is available including stones for walls, patios, driveways and walks, and even shaped stone lintels and window moldings. The stones are very consistent in coloring and shapes.
Each piece of cultured stone is applied individually with Type N mortar and attaches permanently to the wall. Then a mortar joint is grouted between the stones. Certain products also are designed to be installed without grouting to create a dry-laid look. Cultured stone veneers are durable, maintenance free, non-combustible and are covered by a 30-year limited warranty.
Cultured Stone Corporation
www.culturedstone.com
