

By Matt Weber
Replacing your shutters? Consider installing decorative urethane shutters for years of low-maintenance curb appeal.
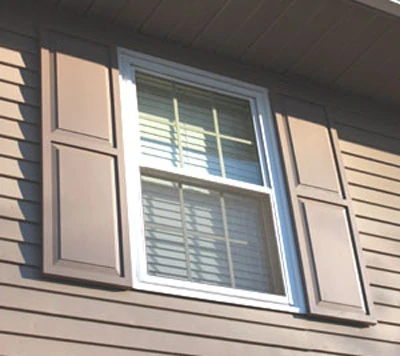
A home makes its first impression through its curb appeal. When repainting the exterior siding and trim of EHT’s current project house, we decided to boost its curb appeal by replacing the old, hollow aluminum shutters with solid urethane shutters that had a more contemporary style.
Although aluminum holds up to weather fine, over the years the painted shutters had severely faded and become dull with chalky residue. We would have to remove them from the house, even if it was just to repaint them. Since this was the case, we took the opportunity to replace them completely, opting for a raised double-panel design rather than the louvered look of the old shutters.


Aside from the stylistic update, urethane shutters offer several other material advantages. Solid urethane shutters are insect-resistant, will not bow or fade over time, and they’re more resilient to weather exposure than wood or polypropylene shutters. Urethane is a very lightweight material, making the new shutters easier to lift and install than the old ones, and the material is easy to drill and screw.
We selected three pairs of shutters from Fypon, a company which offers 123 different sizes and styles of shutter and shutter accessories, such as quarter-round, elliptical or transom accent pieces to extend the height and decorative appeal of the shutters. The over-the-window clearance of our project house didn’t leave room for trim pieces, but the replacement shutters alone went a long way toward providing a fresh, modern look to the house façade.

Painting and Design Options
The shutters we chose had a smooth white finish, although Fypon also offers wood-grain as a finish option. All Fypon shutters can be painted any color or stained, and will not chip or peel, since the material cannot absorb water. Whereas we chose a double-pane design, you can also choose from raised triple-panel shutters, traditional louvered shutters, and louvered shutters with center rails.


If you’re interested in wood-grain styles, you now have the option of two-, three- or four-panel arch top board shutters, along with new three- and five-board shutters. The realistic cedar wood-grain texture is designed to complement the southwest style popular in homes from Texas to California.

To add color to the shutters, I applied a high-quality acrylic latex paint to tone the shutters just a shade darker than the gray-beige tone used for the house siding. A 2-inch brush works well to work paint into the recessed channels of the raised panels. For the face of the shutters, I applied the paint with a foam roller. The foam roller does a great job of eliminating bristle marks for a very uniform paint finish. Apply two coats and allow drying time between each.
How to Replace
While the shutters were drying, I pulled the old shutters off the house, which were held with a few 2-1/2-inch aluminum screws fastened through the siding into the house sheathing. If removing old shutters, make sure you have a plan to support the weight of the shutters once you remove the fasteners. Once removed, I sealed the old screw holes in the siding with silicone sealant to keep out any insects.


To mount the new shutters, I first used a countersink bit to pre-drill holes for the fasteners. These shutters were 48 inches high, so I predrilled six screw holes per shutter, two at the top, middle and bottom.
In addition to fastening with screws, I glued the shutters to the siding using polyurethane construction adhesive. Due to the beveled profile of the aluminum siding, I ran a bead of adhesive only along the ridges of the siding that would contact the rear of the shutter.

Before installing, I measured the windows and then the shutters. I then marked the shutters at the top and bottom with some faint pencil marks that indicated where the shutter should be installed along the window casing to be perfectly centered against the window.

Due to the light weight of the shutters, I was able to install them alone, even while working on top of a ladder. Holding the shutter in place with one hand, I drove a couple of 2-1/2-inch self-starting aluminum screws into two of the predrilled holes. Fasten from the top downward. Two screws is enough to hold the shutter in place while you drive the remaining fasteners, moving the ladder if necessary. It’s important to use self-starting screws so the tips feed easily into the siding on the opposite side of the shutter and bite solidly into the house sheathing.
Repeat this procedure for each remaining shutter—it’s a fairly easy job. The heads of the screws were recessed in the countersunk holes I had drilled. So, once all the shutters were installed, I filled all the fastener holes with plastic wood filler that had a similar tint to the paint color. Once the filler cured, I carefully sanded the patched spots and touched up the paint with a foam roller.


Painting time aside, it only took an afternoon to replace the shutters, and the result was a snappy enhancement to the exterior décor that would last for years with minimal maintenance from the homeowner.

