EHT explores some basic roof framing techniques, from layout to installation.
Roof framing is one of those carpenter skills that appears quite complicated, and indeed, some roof designs are difficult. Roofs are basically five types: shed, gable, hip, gambrel and mansard. Another common design in the Northeast is the “saltbox,” which is a gable roof with one longer side. These days “cut-ups,” or roofs with a lot of valleys, dormers and other features, are increasingly popular. In many cases with purchased house plans, the details of the roof construction, including rafter design, are included. Pre-constructed trusses have also become increasingly popular. They are constructed at a factory to match your building and delivered on site. They do, however, require extra manpower and lifting equipment to install in place. You can also build your own trusses if you have the equipment, or can rent the equipment to install them. Piece-by-piece rafter/roof construction, however, is still the more common construction method for many buildings. Simple roofs, such as a shed or the common gable, are fairly easy to construct, even without plans, if you understand the basics and a little geometry.

In order to build any but a shed-type roof, including trusses, you’ll need to first determine a few factors; the span, rise, run and line length. For a shed roof you only need to know the rise, span and line length. Span is the measurement across the building from outside supporting wall to outside supporting wall. Run is half the distance of the span. Rise is the measurement from the centerline of the span to the top of the roof line. Line length is the measurement from the outside of the supporting wall line to the centerline of the roof at the top of the rise. Basically you’re working with a triangle with two legs and the line length for a hypotenuse.

How To Determine Roof Pitch
You will also need to know the desired pitch of the roof. Pitch is the slope or angle from the wall plate to the roof ridge line. Pitch can vary a great deal, from a shallow slope up to a very steep pitch. Pitch for a gable roof, the most common, is generally 1/4 or 1/3; which is equal to 1/4 or 1/3 the total span of the building, not counting any overhang. Pitch also has its own denotation, determined by the rise in inches in 12 inches. For instance a 4/12 pitch denotes a roof rising 4 inches for each 12 inches. Having the correct pitch is important. In many instances, a certain pitch may be necessary or even required by local codes. Pitch is determined by snow loads, other weather factors and the covering to be applied to the roof. For those in the northern parts of the country, an 8 in 12 pitch, or more, is commonly used to keep excessive snow loads off the roof. Those in the southern climates may utilize lower pitches. The minimum pitch, however, that can be used with many roofing materials such as asphalt shingles or corrugated metal is 3 in 12 (3/12 pitch). For lower pitches, a built-up or continuous roll roofing must be applied to keep the roof waterproof.

Rafter Layout
This article will discuss a gable roof, without valleys or dormers, because it’s the most common and the easiest for a first-time builder to tackle. After you determine the rise, span, run, line length and pitch, the next step is to lay out the rafters, or mark the cuts on a pattern rafter to create the roof.
There are three basic cuts used in creating the rafter; the plumb cut at the top of the rafter where it fits against the ridge plate; the tail cut that creates the outside edge of the building eaves; and the bird’s mouth, which positions the rafter on the top of the wall plate. We will show two methods of laying out rafters; one using a traditional framing (2-foot) square, and the second using the new C.H. Hanson Pivot Square.
Hold the framing square with the manufacturer’s name up; this is called the “face” of the square, and the opposite side is the “back.” The long arm of the square is the “blade,” and the short arm is the “tongue.” In the example we’ll use a 1/3 pitch as shown in the drawing below, this means a rise of 8 inches for each 12 inches of run (an 8/12 pitch roof). The first step is to lay the square on the end of the rafter board and locate 8 inches on the tongue (the rise), and 12 inches on the blade (the unit of run). Measure from the point on the blade to the point on the tongue—it should be 14-7/16 inches. Multiply this by the run of the building. We’re using 10 feet in this example, excluding the overhang. The resulting figure is 144-1/2 inches. We add 12 inches for the overhang to get a final figure of 156-1/2 inches.

Examine the rafter board to determine if there is any curve or “crown” in the board. You should make this first pattern rafter on the straightest board you can find. If there is any curve in the board, lay out the rafter so the crown is up or facing away from you. Experience has shown that the weight of the roof will gradually flatten this crown. (If the crown were to be positioned down, the roof could eventually sag.) Then lay out the rafter as shown on the next page.
Rafter Layout with a Framing Square
This example is for a roof with an 8/12 pitch
- Position the square at the end of the rafter board, with the tongue on your left and facing away from you. Position the square with both the 8 inch on the outside edge of the tongue and the 12 inch on the blade on the upper edge of the board. Mark along the backside of the tongue. This is the plumb cut for the roof ridge.
- Measure form the top of this line down the board to determine the line length, or length of the rafter, less ½ the ridge board. This commonly is a 2-by or 1-1/2-inch board, so the measurement is less ¾ inches. Also exclude the overhang at this point. Holding the square in the same position as before, mark down to the side of the tongue. This marks the plumb cut at the inside of the house wall for the notch (called a bird’s mouth) to seat the rafter one the wall plate.
- Add the length of the overhang beyond this mark and mark it. Note the square is turned over. In the example shown this is 12 inches. Cut the rafter at the ridge line and at the overhang line.
- Then hold the square on the plumb line that marks the bird’s mouth. Determine the wall thickness or depth of the bird’s mouth cut and make a mark. Cut the notch, first with a handsaw or portable circular saw, and then finish the cut with a handsaw.
Another method of laying out the rafter with the square is called “stepping off.” Once the plumb cut is marked, simply move the square 12 inches and mark another plumb cut. Continue moving down the rafter and marking plumb cuts, including any odd figures.

Cut the Pattern
Make a duplicate rafter from the pattern. Then lay the rafters out on a smooth, flat surface, with a 2-by between them at the ridge line. Measure to make sure the rise, run and span are correct. You may wish to test these on the building before cutting the rest of the rafters. Once you’re sure these two pattern rafters are correctly cut, mark them as patterns and mark and cut the necessary number of rafters. If the building has hanging or “fly” rafters for the gable ends, cut them as well. They do not, however, have the bird’s mouth cut.
Make sure you carefully follow the pattern rafter. A number of years ago I was constructing a two-story building. One carpenter laid out and began to cut the rafters. He became ill from the extreme heat of the day and another carpenter took over for the last third of the rafters. When the roof framing was completed and decking installed, there was a built-in sag. I don’t know if the second carpenter didn’t use the pattern rafter, or simply wasn’t as precise, but it was a costly mistake.
Pivoting Square Method
The new C.H. Hanson Pivot Square makes the chore of laying out a roof quite simple. I wish I had this tool a number of years and buildings ago. This quality tool is basically a small “adjustable” square. It comes with its own heavy-duty belt holder that is also designed to hold a carpenter’s pencil and the instruction booklet.

The Pivot Square has three edges corresponding to the three sides of a triangle. Degrees and rise are marked on a blade attached to the pivoting arm. With the common rise figures facing you, and the raised fence on the right, the bottom represents the base of the triangle (the run) and the right side the altitude (the rise). The long adjustable edge represents the hypotenuse of the triangle, or the line length.
The Pivot Square can be set to any whole number pitch from 1/12 to 12/12. Simply adjust the square to the desired pitch and lock in place with the knurled knob. You can then use the square to transfer the angle for the cut to the lumber. Or you can hold the square in place and use it as a sturdy guide for running a portable circular saw. One great feature is that the pitch is also marked on the tool in degrees of angle. Determine the pitch, then you can set a miter saw or compound miter saw to make cuts in degrees that conform to the desired pitch. The Pivot Square can also be used to lay out pitches steeper than 12/12, as well as to lay out hip-valley rafters. These figures are determined on the back side of the square. This tool takes a lot of the figuring and guessing out of creating hips and valleys. And, the tool is even more versatile and can be used for other cuts as well. A series of numbers run along the center of the graduated arc of the adjustable blade on both sides of the tool. Each of these numbers represents the complement of the corresponding angle along the edge. The sum of these two figures always equal 90 degrees. For instance, when you set the square for 20 degrees, the complementary angle of 70 is directly aligned. You can make the 20-degree cut following the set angle, flip the tool over and make the complementary 70-degree cut to create a perfect 90 degrees. The square also comes with three leveling vials which make it easy to measure the pitch of existing structures. To measure pitch, first position the hypotenuse of the square on the roof, running straight up the pitch. Make sure it’s not off angle because of the shingle edges. You may use a 4-foot level to set it on for more accurate measurements. The outer end, or number 9 on the hypotenuse or adjustable blade, should be at the top or upper side of the pitch. Loosen the lock and adjust the square until the level vial on the base reads level, then lock the setting. You can now read the pitch and degrees on the “Deg. Common Rise” scale of the square.
To lay out a rafter with the Pivot Square, first determine the pitch and set the square to the correct pitch on the Deg. Common Rise scale. Position the square with the base or raised edge on top of the rafter board. Mark the plumb line for the ridge line cut near the end of the rafter board. Measure the length of line on the rafter (less 1/2 the ridge board), and make another plumb line mark parallel to the first. Determine the rafter overhang, move the square to that position and make another plumb cut mark. To create the bird’s mouth cut, position the square at the bottom of the middle plumb line with the altitude side against the plumb cut and mark across the board using the square base, and beginning at the bottom of the plumb cut. Once this level line is established, measure and mark the wall thickness, plus about 1/4-inch for any slight imperfections along the level line. Then use the square to draw a short plumb line parallel to the others, down from this mark to the bottom edge of the board. This completes the bird’s mouth layout.


Framing Issues
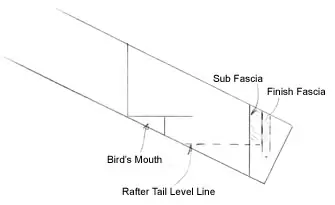
These days’ wider rafters are often used than are suitable for the fascia, so the tail of the rafter is also cut to create a narrower, more suitable fascia board. This requires laying out a level line on the tail of the rafter. To do this, do not make the tail cut until this has been established. Draw the sub fascia and finish fascia board on the end of the rafter and against the plumb tail cut. Use the bottom edges of these boards to mark the level line cut. Again, once all cuts have been marked, cut the pattern rafters, test and you’re ready to erect the roof framing.
Before beginning the framing, determine rafter location on both top plates and mark them using a framing square. The small or tongue side of the square is 1-1/2 inches wide so you can mark the locations of both sides of the rafters to guide the installation.
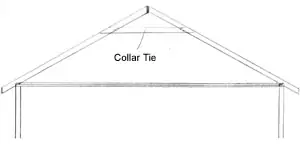
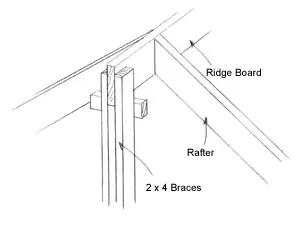
The easiest method of erecting the rafters is to make temporary braces of 2-by materials. These should be the height of the building walls, plus the rise. Use only enough supports for the first length of ridge board. Rip the ridge board to the correct width to meet the rafter widths at the ridge. Create a saddle at the top with the braces the height of the building walls, plus rise, less the width of the ridge board. Brace these supports in the centerline of the building. Position a ridge board down in the saddles of the supports. Align the top plumb cut with the ridge board, and align the heal cut of the bird’s mouth with the inside of the wall. Nail the rafter in place. As the rafters are installed, add any supports needed or required by code, such as collar ties or center supports. Continue erecting rafters until you reach the end of the firs piece of ridge board. Then move the temporary braces for the next ridge board and continue installing rafters.
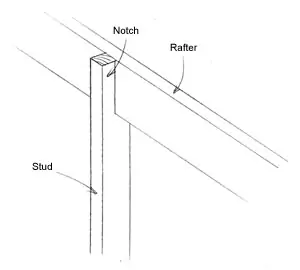
With the rafters in place, the gable end framing uses vertical studs, or “blocking,” positioned directly over the wall studs and supported by the end top plates. They are notched to fit around the gable-end rafters. After the sheathing is installed, hanging or “fly” rafters are then installed.
Roof framing doesn’t have to be daunting, but if it’s your first try, a simple gable roof, say on a garden shed, is the best bet.