

By Matt Weber
When the old paint wears away, it’s time to wash away the chalk and apply a new acrylic latex.
The house I’ve been remodeling was built in 1978, and the exterior paint colors did nothing to hide its age. The aluminum siding was a shade of beige that had aged into a dull mustard tone, and the trim was a rust-colored reddish brown. The homeowners hated the look, but the metal was still in decent shape, and they didn’t want the expense of re-siding the entire house. A new paint job was the solution. However, over time the original paint coat of the siding had developed a chalky film, caused by the old paint film wearing away. The chalk had to be removed before slapping on a new coat. We had a lot of prepping and painting ahead of us. Here’s how it went.
Prep School
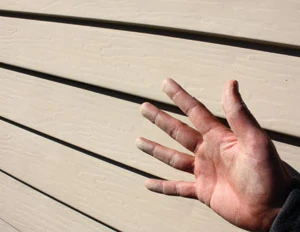
On any sort of painting project, surface preparation is absolutely critical for any hope of success. Obviously, you need to remove any loose dirt or debris. There was also a lot of shrubbery to cut and remove for unhindered access to the house walls. The chalk that coated the old aluminum siding posed the biggest obstacle for this project. If you wiped your hand across it, you’d draw back a dirty, yellow palm. This stuff seemed to cover every square inch of siding and made for a lousy painting surface.

To remove it, I turned to my trusty pressure washer, a heavy-duty Maxus unit that was equipped with a detergent tank. First, I washed down each wall with a garden hose to remove the loose dust, and then filled the detergent tank with Krud Kutter Pressure Washer Concentrate specified for house siding. When applying a detergent with a pressure washer you have to lower the pressure and use the right nozzle—a low-pressure tip. This means you won’t have the power to throw the detergent as far and as high as with a high-pressure setting, so if there’s more than one level to your house then you’ll need a ladder. I sprayed on the detergent over the entire wall of the house, working from the top downward, and allowed the chemicals to agitate the surface for a few minutes, per the Krud Kutter instructions. Before spraying it off, I could already see the murky chalk substance dripping down the walls with the detergent.


To clean it off, I switched nozzles and returned the washer back to a high-pressure setting. When washing metal siding, it’s best to get the nozzle as close to the siding as possible, which makes the most use of the powerful water stream. I worked my way down the ladder, blasting away the detergent and chalk, cleaning one wall at a time. Sheets of chalky water streamed off the house like dirty milk.

During this phase of prep work I had the opportunity to test a new pressure-washer nozzle from Hyde Tools (www.hydetools.com). It featured a pivoting nozzle specifically designed to save time and effort. You can complete jobs faster, work more safely and more easily by aiming the stream directly at the work surface without overreaching—very nice when you’re on a ladder. Just twist the grip, and the head of the wand pivots 90 degrees up and down, so there is no need to stoop, bend or kneel to get to hard-to-reach places. The nozzle also twists to enable side-to-side work. The Pivot Nozzle is ideal for overhead work. In my case, pointing the nozzle straight up to spray the house soffits would have resulted in all the water cascading back down on top of me. By pivoting the nozzle, I could stand to the side, spray upward and avoid the ensuing waterfall.

Picking Paint
Even after all the pressure-washing, there were still traces of chalk that I hit with some detergent and a soft-bristled carwash brush on an extension handle. The chalk was stubborn. To ensure longevity of the new coat we made sure to choose a high-quality acrylic latex paint that would withstand the weather and cling to the metal surface despite any leftover traces of chalk. We went with the new Valspar Duramax paint, available at Lowe’s, which features long-lasting cross-linking technology and comes with a lifetime warranty. The Duramax brand also has primer mixed right in with the paint. And, because of the chalk problem, we took a belt-and-suspenders approach to paint adhesion by blending the paint with a product called EmulsaBond from Flood Paint Solutions. EmulsaBond is specifically formulated to help exterior latex paint stick to hard-to-coat surfaces.

When choosing paint color, it always helps to see a sample applied to the project. We slapped a couple of colors onto the siding, and quickly decided that green was not the way to go. We chose a grayish beige called “stone manor,” specifying a satin finish for the metal siding, and white with a gloss finish for the trim.


To determine the amount of paint you’ll need, measure the perimeter of your house and multiply that number by the height of the house. Then, deduct the area of the windows and doors. An average window is 15 square feet and an average door is around 21 square feet. Divide the number by 400 to determine the number of gallons needed (one gallon of paint covers about 400 square feet). Always make sure you’ll have enough paint to complete the job.
Another color concern is caulk. Make sure the caulk you select either matches your paint color or is a paintable product (most silicone caulk won’t hold paint). There were no gaps or cracks to fill in the siding, but I did seal around the windows with a water-based product called Big Stretch (www.sashco.com). Big Stretch is white, so it matched our trim color (and it’s paintable, even if it didn’t). First, cut out any old, loose sealant with a putty knife—Hyde makes a nice 10-in-1 tool for this job—and then apply a continuous bead of caulk to all gaps and seams with a quality caulk gun.
Most silicone won’t hold paint

Apply the Paint
I started with the windows, because the upper stories could only be reached with a ladder. I wanted to avoid leaning a ladder against the siding after it had been freshly painted, so it’s nice to have the windows painted first. To paint windows I’d suggest investing in a ladder standoff, which is a wide bracket that mounts to the ladder top, bracing the ladder on each side of the window so you have up-close access to the panes. Mask off the glass with a quality painter’s tape. I use Frog Tape, which is designed to create a seal along its edges when it comes into contact with latex paint (www.frogtape.com).

When painting with a brush, brush towards the unpainted area and then back into the freshly painted wet surface to prevent lap marks. Also, keep a damp rag handy to clean up any wayward drips or splatter. A wire brush is another good tool for removing paint that accidentally contacts stone or masonry. Note: When painting windows, leave the sashes slightly open while they dry so the cured paint doesn’t seal them shut. You’ll still probably need to run a razor along the moveable seams to break the paint and restore functionality.

Next, I recruited a professional house painter (and the drummer of the band I’m in), Richie Hamilton, to help with the job. Richie has a lot more experience painting houses than I do, so he manned an airless sprayer to paint the siding while I stuck with the trim work of the gutters, downspouts, fascia, etc. Richie used a power drill with a mixing paddle to blend the paint and EmulsaBond with a little water to thin it for the sprayer, which also helps ensure uniform color. (Note: Refer to the manufacturer’s recommendations for thinning your paint).

Richie started spraying the soffits first, and worked his way down the house walls following the direction of the siding. When spraying around areas that you don’t want to paint, such as your freshly painted windows, use paint shields to help mask off the overspray. Hyde Tools makes some nice wood-handled shields, one style with a plastic spine that allows a little flexibility, and another version with a rigid aluminum spine that keeps the shield perfectly flat and straight.

When painting this house, Richie sprayed with a strategy to hit the tricky spots first—the areas around windows and trim that needed to be masked—and saved the “field” work in between for using a new extension spray gun from Hyde Tools. The new RVT (Rapid Valve Transfer) system comes fully assembled and ready to use with an airless sprayer. The cool thing about this new spray system is the quick-connect feature that detaches the nozzle from the spray gun and connects to an extension pole in a matter of seconds. You can also make the switch without powering down the sprayer. This means there is no heavy gun at the top of the extension pole, for easy maneuverability. The pole telescopes for a 12-foot reach with the simple twist of a wing nut to lock its position, and a remote trigger on the pole activates the spray. This extra reach eliminates the need to set up scaffolding or move a ladder from spot to spot, which is a huge time-saver for hard-to-reach jobs. And, because no paint actually travels through the extension pole, the cleanup is a cinch. The light weight of the extension pole means it’s not only useful for high elevations, but also for any lateral area that’s difficult to access, such as above awnings. When you’re ready to paint easy-to-reach areas, just pop the RVT nozzle off the extension and back onto the gun, and you’re immediately ready to spray as usual.

To finish the job, I painted the front entry door, garage door and window shutters with a color one shade darker than the siding, and using a foam roller, which eliminates bristle marks on the paint surface. In fact, we replaced the old aluminum shutters altogether, opting instead for some weather-resistant urethane shutters made by Fypon (www.fypon.com). I painted the new shutters in my workshop to avoid as much ladder work as possible. Once installed, the shutters were the final touch and the house had a nice, neat style more appropriate for the new millennium.
SIDE NOTE
Selecting Brushes
Latex paints require synthetic bristle brushes (polyester or nylon). The water in latex paint will ruin natural bristle brushes. For oil-based paints, use natural bristle brushes or good quality synthetic brushes.
Use a 3-, 3-1/2- or 4-inch brush for large flat surfaces; walls and ceilings, floors and stairs, siding, shakes and shingles, masonry and brick.
Use a 1-, 1-1/2- or 2-inch brush for smaller surfaces; woodwork, door frames, shutters, furniture and accessories.
Use 1-, 1-1/2- or 2-inch long handled brushes, straight or angled, for hard-to-reach areas of woodwork, molding and furniture, for window sashes and when cutting straight lines of wall paint to molding or ceiling lines. (Courtesy Hyde Tools, www.hydetools.com)
