

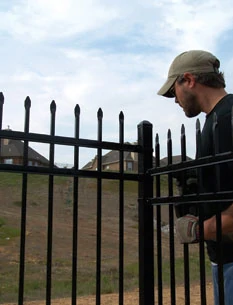
Robert Frost wrote, “Good fences make good neighbors,” and the Minor family of Birmingham, Alabama, decided to be good neighbors. They selected an ornamental metal fence to follow the property line of their new home. The fence was chosen for its good looks and to provide safe stomping grounds for the family dog. This meant the dog could roam around the yard, while sparing the adjoining yards from any unwanted lawn fertilizer. Good neighbors, indeed. We installed the fence over a long weekend, and here’s how we did it.
Planning and Prepping
Anytime you’re planning to erect an outdoor structure you should check your local building regulations. Contact the appropriate state or local jurisdictions regarding mandatory setbacks, permissible fence heights, style limitations or required permits.
And always locate all underground utilities before you dig, including lines for water, gas, phone, electrical or cable TV. All locations throughout the United States have an underground utility locating service, and the service is usually free. Service personnel will come out prior to digging your holes and locate any underground cables on your property.
Also, clearly mark all legal boundaries taking into account any concrete fence footings, which should not extend beyond your property. It’s a good idea to keep your fence four inches inside your property line.
Lay out your fence plan with stakes and string. If you plan to use standard gate hardware, then square up the corners using the 3-4-5 rule. For out-of-square corners, you can use special swiveling brackets to install the panels against the fence posts.
When laying out the fence, sketch your site plan on paper, including measurements, fence lines and notes for all post, corner and gate locations. The fence system featured in this article is the Montage Fence from Ameristar, which comes with pre-assembled panels. The 8-foot panels were designed to connect to the metal posts with special brackets, so no welding was required. On our site plan, we marked post locations following the property line every 96-3/4 inches (according to Ameristar’s instructions). When the property limit didn’t leave room for an entire 8-foot panel, we shortened the span between posts with the intent of cutting the panels to size when it came time to install.
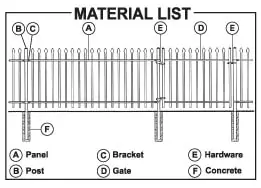
(diagrams courtesy Ameristar)
With our plan completed, we then used stakes and string line to mark the fence location. For a 90-degree corner, make sure the corner is square using the the 3-4-5 method: Mark one string at three feet from the corner. Mark the second string at four feet from the same corner. Adjust the two strings so the distance between the two marks is exactly five feet, which ensures a right angle. (If you prefer a fence with corners at out-of-square angles, you can use special swiveling brackets to connect the fence panels to the corner post.)

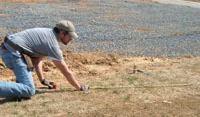
We marked the post locations with spikes and spray paint.
Breaking Ground
We marked all post locations on the ground with spray paint and spikes, and drilled the post holes. This was tougher than it sounds. Each post needed to be at least 2 feet deep and 8 inches wide. And we had to dig through the tough clay and rock of a new subdivision that was built into a mountainside. We rented a gas-powered auger, and although it did speed things up, it also kept jamming against big baseball-sized rocks.
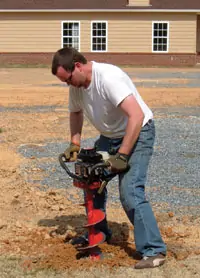
A gas-powered auger speeds up the chore of digging the post holes.
To break out the rocks we resorted to a 5-foot iron wrecking bar—basically a heavy-metal spear that we used like a manual jackhammer. A handheld post-hole digger helped to clear the hole of dirt. All of this digging was really tough work—17 holes—and it was easily the longest and hardest phase of construction.

When the auger stopped against an obstruction, we resorted to using a large wrecking bar to break out the hard rock.
The holes provided our rough measurements for the post locations, but I wanted a firm figure to measure the distances. I assembled two posts and a panel on the ground, and lined the connecting brackets in the center of their screw slots to afford myself a little “fudge” room. The distance from inside post face to the other inside post face was 94-1/2 inches. This would be our magic number. (We measured the 4-foot gate separately.)
Use a grease pencil or crayon to mark the ground height on the fence posts.
The distance from inside post face to the other inside post face was 94-1/2 inches.
Posting Up
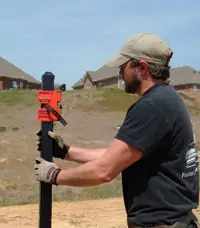
Next, we anchored the fence posts in concrete. Following the supplied fence instructions, we began by making a ground mark on each post 61 inches from the bottom of the post cap. The mark indicates where the post should line up with the surface of the ground when setting it in concrete.
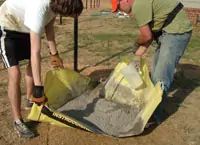
We used a CreteSheet to mix and pour the concrete.
To mix the concrete, we used a plastic CreteSheet, which is basically a wide, thick plastic sheet with four handles. To use, just pour in the concrete mix and add water according to the mix instructions. Our mix required one gallon of water for every 80 pounds of concrete. After adding the water, grab the sheet by two of the handles and have a helper do the same on the opposite side. As the two of you lift the sheet and roll the mix and water back and forth, the concrete blends to a cookie-dough consistency. Then tilt the sheet to pour the mud. We used an 80-pound bag per post. This being our first time using the CreteSheet, I had my doubts about this mixing method, but I am now convinced. When working with a helper, the sheet method is much faster, easier and more effective than mixing concrete in a wheel-barrel with a shovel.

We used 80 pounds of concrete per post hole.
We first poured a shallow bed of concrete, then placed the first post and squared it with the fence line. We plumbed the post and poured the remaining concrete, troweling a slope in the concrete to drain away rainwater. We then set the post at the next corner of the fence. With both corners secured, we ran a new string line from post to post, flush with the rear faces of the posts. Installing all the remaining posts flush against this new string line would keep the fence straight.
Tool Tip: The magnetic Post-Rite level from Kapro features plumb vials on two sides of the post for easy reading; plus it’s a hands-free tool, a real timer-saver.
We then installed the second post in line, but measured between it and the first corner post. We measured between the inside faces of the posts, at both the top and bottom. We were looking for our magic number—94-1/2 inches. If the distance was too far, we had to move the post inward. If we were too close … You get the idea. And, we had to keep the post plumb while we adjusted it. Once we were confident with the post position, we poured the concrete and then re-measured the post distance. You can make minor adjustments with a rubber mallet. Re-check for plumb using a 4-foot carpenter’s level for accuracy. We would proceed in this manner for each run of the fence until we hit a corner. At the corner, you’ll likely end up with a distance shorter than a full 8 foot panel. That’s okay; just install the corner post and move along. You’ll cut that panel to fit.

I should stress, you should double-check that your posts are plumb. Also re-check your post-to-post distance and keep the posts lined against the string line. The proper post placement is critically fundamental to the installation of your panels. If they’re out of line, you’ll have problems. But if the posts are lined up, spaced correctly and plumb, then the rest of the installation is easy.
After all the posts are set, allow the concrete to cure for at least 24 hours and then bolt on the panels.

Adding the Panels
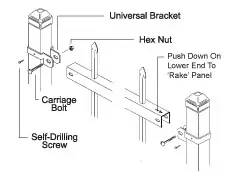
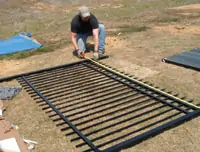
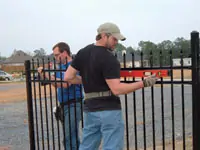
The fence panels connect with standard bolt-on gate hardware—universal metal brackets, which slip over the tops of the posts. Line up the bolt holes on the bracket with the holes on the ends of the fence panels and insert the supplied carriage bolt. When you have the bracket and fence panel in its desired position on the post, just tighten the bracket connection with the supplied hex nut.
The Montage system uses three brackets on each side of each panel. When all the brackets are properly positioned and tightened, lock each bracket in place by driving a self-drilling screw through the bracket and into the side of the fence post.
For those considering a more traditional option, a decorative wrought iron fence offers a timeless aesthetic with similar bracket-style installation. Wrought iron provides an elegant, durable alternative that works especially well for historic homes or formal landscaping.

We installed the fence panels using the supplied standard gate hardware (brackets, nuts and bolts).
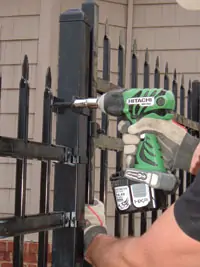
The gate installed with large hinge pins. Tool Tip: For fastening we used a new 14.4-volt impact wrench and an impact driver, both from Hitachi. These tools are lightweight and compact, so they’re easy to lift, but they deliver a lot of torque, which is ideal for quick assembly.
With most traditional metal fences, the only way the fence can follow sloping terrain is through custom fabrication. However, the Montage System has a special “all-terrain” feature to address a sloping grade. We initially installed the Montage panels completely level to make sure our post-to-post distances worked with all the panels. Then we readjusted the panels so the bottom edge of the fence follows the slope of the property.
The pickets in the Montage panels actually pivot on the rails. This means you can “rake” the panels. In other words, you can install one edge of the panel at a different height than the other side of the panel, and the rails tilt so the pickets stay upright and plumb. This smart design allows the bottom of your fence to follow the slope of the ground, eliminating any gaps at the bottom of the fence panels.
Although the ground beneath this fence was basically flat, we did adjust the height of the panels somewhat to follow the slope. A key benefit of this particular fence system is that the panel rails pivot to adjust to the slope of the land (by adjusting the bracket height along the post), while the pickets stay plumb and orderly.
The Minor family also opted for a 4-foot fence gate, which mounted very similarly to the panels. You’ll need to preassemble the gate and surrounding posts on the ground to determine your exact spacing, and install the posts accordingly. Since the gate posts are the weakest point of the fence, make sure to use a full 80 pounds of concrete to anchor each post. When hanging the gate, just bolt on the supplied large hinge brackets instead of the standard panel brackets. Attach the hinge pins approximately 8 inches from the top and bottom of the gate post. The only connection on the opposite side of the gate is the bolt-on latch. Keep the bottom of the gate two inches above the ground, and it should swing freely to and fro.
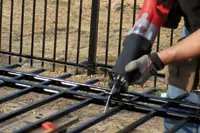
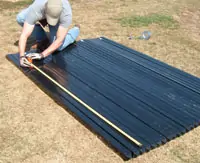
Cut the odd-sized panels as needed. Tool Tip: We used a Milwaukee Sawzall with a metal-cutting blade to speed up the process. After cutting, drill new bolt holes for the panel brackets.
For the remaining fence spaces that are too narrow for mounting a full panel, measure the distance between posts, inside face to inside face. Subtract 1/2 inch, and the remainder is the length to cut the partial panel. Place the panel on a sturdy surface, clamp it securely, and have a helper hold the panel down to minimize the vibration while cutting. You can use a hacksaw, but we used a Sawzall with a metal-cutting blade to trim the panels. Make sure the rails extend equally from the last picket at both ends of the panel. After cutting, drill new 5/16-inch bolt holes about 3/4 inch from the end of each panel rail. Remove any burrs and then mount into the brackets as usual. At the areas where you cut, apply a coat of zinc-rich primer, and then after it dries, spray on a color-matching topcoat.
At the ends of the fence you can install end posts, or mount the panel into the side of the house.
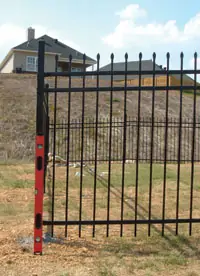
Given the handsome look and sturdy performance of the finished project, the Montage system turned out to be a quality fence that’s easy to install—recommended for a first-time fence raiser. The toughest part of the job was digging the holes, but I guess there’s no way around that. In the end, the dog had a place to play, the Minors had a nice new fence, and their neighbors need not invest in a poop scoop.

Resources
Ameristar
Hitachi Power Tools
Kapro Industries
Milwaukee Electric Tool
SDS Corporation
