

By Matt Weber
Here’s a three-fold approach to a new basement floor, including an Insulated Subfloor System, engineered cork flooring, and easy-to-install carpet squares.
A finished basement can make a great office or family room, but by virtue of being the first living space on the foundation—and often below grade—special consideration should be given to the type of flooring used. You learned years ago in science class that heat rises, so basements are naturally cooler than the upper levels of a house. In many cases they are also completely or partially surrounded below the earth surface and sitting on a cool concrete slab, which has a tendency to transfer moisture. This story details a three-fold approach to a new basement floor, including an insulated subfloor system, engineered cork flooring, and easy-to-install carpet squares.

Choices in Basement Flooring
Three critical issues to consider when choosing a basement include; moisture, warmth and, of course, décor. Basement floor options include tile, laminate, engineered wood and others.
Although you may love the look and value of genuine hardwoods, this type of flooring is generally frowned upon for basement applications because the humidity level changes too much. As the humidity changes, so can the hardwood, swelling, flexing, even cupping and warping. Some sort of subfloor, such as OSB panels or furring strips, is also required to fasten the boards over.

For the handsome look of hardwood without the performance issues, choose laminate or engineered flooring for a basement application. These products are less expensive than solid hardwoods, and they consist of an engineered wood core that is more stable and resilient when exposed to moisture than the linear grain of real wood. The material is more expensive than carpet but usually cheaper than using ceramic tile. The difference between laminate and engineered wood flooring is that the engineered version actually has a layer of solid wood—usually 1/8-inch thick—that is laminated to the fiberboard or plywood core. Both types of flooring are installed over a pad and “float,” meaning the floor adheres only to itself, usually with planks that lock together in a simple tongue-and-groove joint. The floor is not attached to any of the walls, which allows for expansion and contraction of the material as temperatures fluctuate.
As a finished surface, wall-to-wall style carpeting will be the warmest option, and some of the newest stain-repellent options do a great job of protecting the fabric. However, there are no stain-proof carpets and in a high-traffic family room, spills and other such accidents are bound to happen, and everything from bubblegum to rips in the rug can make a mess of carpet. Moisture is another enemy of carpet. In fact, we were replacing an old wall-to-wall rug in the basement because an unseen leak had soaked the carpet and resulted in mold growth.
Tile is another option for basements floors, and it offers a wide array of design options as well as the opportunity for creative installation using accents and border tiles. However, tile can be expensive and although some skillful DIY’ers can install it, it’s not nearly as easy a job as a tongue-and-groove option. Tile does a great job withstanding moisture, but it’s very chilly to the feet. Be prepared to always wear shoes on a tiled basement floor, or else consider installing a radiant heat system beneath the finished surface to add some extra underfoot comfort.

Some other things to consider include the plane of the foundation slab. The basement floor must be very level and smooth for proper laminate and engineered wood installation. Any dips or high spots will need to be filled, ground down or otherwise addressed with the installation of a subfloor. Additionally, ceiling height may be an issue, because installing a thicker floor will place people closer to overhead soffits and door frames.
Luckily, ceiling height wasn’t a concern with the basement shown in this article, but practically everything else was. After weighing these factors, we selected an insulated subfloor system from Ovrx, which reduces heat loss and moisture transfer from the basement slab, as well as creates a flat, level surface for the finished floor. We followed the subfloor with a layer of easy-to-install prefinished cork flooring from Lumber Liquidators, creating a resilient walking surface with a rich, natural appearance. Finally, we added a much-needed splash of color and underfoot warmth by making an accent rug from simple place-and-adhere carpet pads from Flor. Here’s how the project unfolded.
Insulated Subflooring
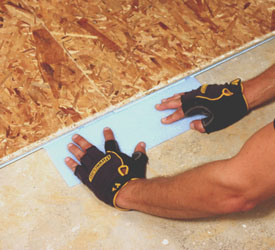
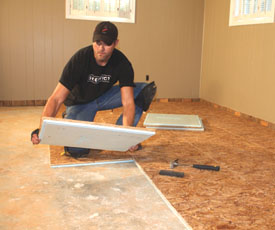
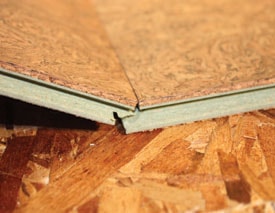
Because concrete transfers moisture, you should never install carpet or wood directly over the bare slab of a basement; they’ll ruin in no time. Tile, vinyl and linoleum flooring can transfer cold temperatures from the basement slab to the room. One solution to a dry, warm and comfortable basement floor is the Barricade Modular Subfloor from OvrX, specifically designed to insulate concrete floors. The system comes in 2-by-2-foot panels that quickly and easily install using a tongue-and-groove system, and require no fastening or gluing. The OSB panels are 1.125-inch thick and backed with a layer of closed-cell polystyrene (Styrofoam) insulation, achieving an R value of 3.2 so walls feel as much as 15 degrees warmer. The recessed channels formed in the Styrofoam allow air to flow underneath the subfloor. The airspace functions as a layer of insulation between the cold, moist concrete and the finished floor. Plus, the panels are engineered to allow uniform expansion and contraction with changes in temperature and humidity. The system provides a protective barrier against air and water infiltration, intrusion from foundation leaks, sump pump failures and burst pipes, as well as extreme hot and cold temperature transfer through the floors.

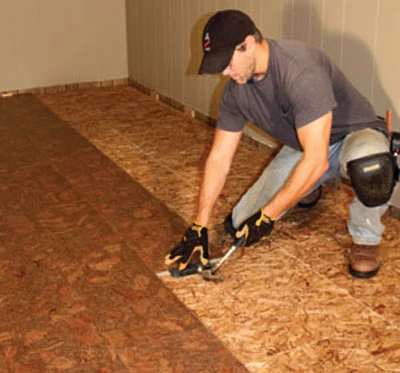
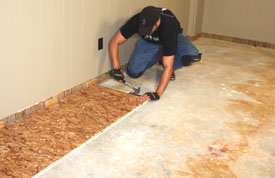
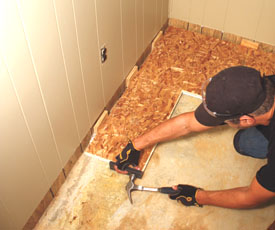
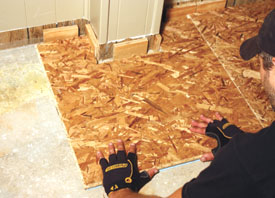
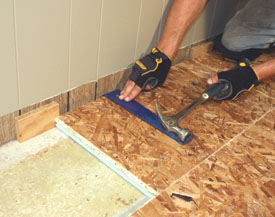
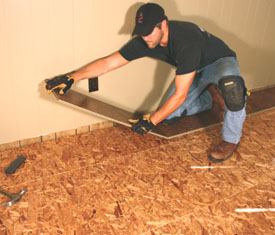
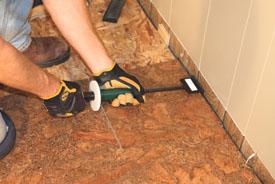
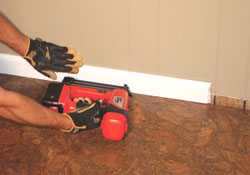
To install, first remove the old finished floor and any baseboards or floor trim. Prepare a level slab surface, and then lay a row of panels seam-to-seam, tapping together the tongue-and-groove joint with a hammer and wood block. I placed 3/8-inch plywood spacer blocks between the subfloor panels and the walls to allow for expansion. Slight dips in the floor can be shimmed with slips of scrap foam insulation (I used some old flooring underlayment that was laying around my workshop).
You’ll probably have to cut the final panel to fit against the wall at the end of the row. You can then use the scrap piece to begin the second row. Alternate the size of the first panel in each row from whole panel to partial panel, which staggers the tongue-and-groove joints for a stronger connection.
Prefinished Cork Flooring
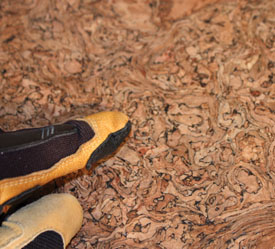
Cork flooring feels and looks much like the same cork that bottles your wine. It has a naturally organic cellular appearance and provides a cushioned, forgiving floor surface for a comfortable walkway. Cork is naturally durable and provides some extra acoustical and thermal insulation. The Lisbon Cork panels from Lumber Liquidators, shown here come with a pre-applied finish that makes the surface resistant to moisture and easy to maintain.
For the green-minded homeowner, another selling point of cork is the environmentally friendly nature of cork production. Cork is made by harvesting the outer bark of a Mediterranean tree called the Cork Oak that grows mainly in Portugal and Spain. The bark is stripped in such a way that it does not kill the tree. Only the bark is extracted, the tree stays alive, and a new layer of cork regrows, making it a renewable resource.
The Lisbon Cork floating floor should be laid on a clean, stable, flat, smooth and dry surface, and our subfloor system provided for this nicely. Without a subfloor, slopes of more than 1/4-inch over 6 feet must be leveled. You’ll also need to lay a moisture barrier of 2-millimeter plastic sheeting before laying the boards, overlapping the seams by about 8 inches. With any sort of engineered tongue-and-groove floor, it’s generally best to store the exposed planks indoors 48 hours before installing so they acclimate to the room’s temperature.
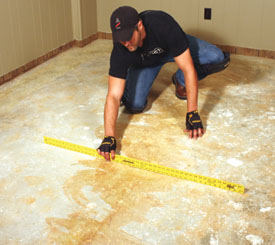
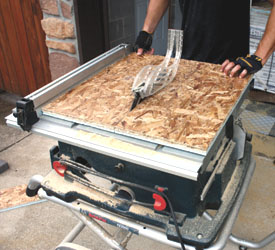
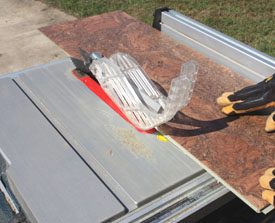
Measure the room to calculate the width of the last row. If the last row will be less than 3 inches wide, then use a table saw to rip the planks of the first row to a narrower width, which will translate to a thicker width for the last row. Even if you keep a full-width first row, you should still rip off the exposed tongue of the first row. All exposed tongues should be removed from the perimeter of the wall, including the ends of the boards that begin each row.
Also, measure to determine if the walls are square. The walls in this basement were not, which meant I had to rip certain boards to a smaller width than others to follow a slight curve in the wall.
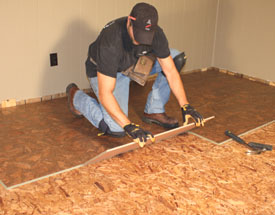
Start in one corner of the room and install the panels from left to right, with the tongue sides facing the walls. Place 3/8-inch spacers against the wall along the perimeter of the entire floor to allow for expansion. The joints of the panels connect in tongue-and-groove style, but unlike the subfloor, the cork panels must be tilted to insert the tongue into the other panel’s mating groove. Join the long seam first, if possible. Tilt downward to pull the joint together, and then tap with a hammer and rubber block to lock it closed. Be careful with the block, because the soft cork material can be damaged by the hammer blows. Rather than hit the cork edge of the panel, use a notched block that misses the cork and only connects with the engineered wood core of the panel. A scrap block of mating cork flooring can also serve as a hammer block.
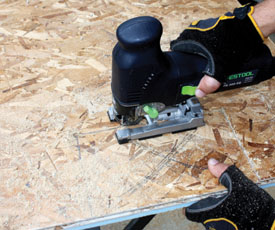
When beginning the second row, begin with a partial panel that staggers the joint at least six inches away from the preceding row. Repeat this pattern for the following rows so there is always a 6-inch minimum setback between the seams of adjoining rows. A table saw can make most of the rips and cross-cuts, although a jigsaw is a handy tool for making small cuts and notches in the floor boards.
To pass pipes and other obstacles through the floor, use a pencil to trace the cut location. Find the center point and drill a hole slightly larger than the obstruction. Then, saw the panel in two parts so the cut passes through the center of the drilled hole. Install the floor panel one piece at a time, re-assembling it around the obstacle.
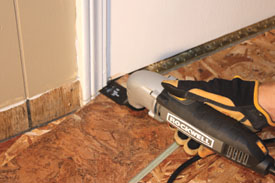
Occasionally, you’ll have to undercut a door jamb; use a flush-cut saw, an oscillating tool or even a hammer and sharp wood chisel. Doors will also need to be trimmed, so pop them off a hinge and onto a couple of sawhorses. A handheld circ saw and a homemade saw guide work well for this.
Complete the field of the floor, ripping the last row to width and closing the final T&G joints by pulling the panels away from the wall with a hammer and pull bar or, even better, a Lam-hammer. Floors larger than 27 feet will require an expansion gap, and you’ll need T-molding to hide the expansion gap. Once the floor is installed, hide the transition around the room edges with baseboard trim and/or quarter-round.
Modular Floor Tiles
The final touch to the basement floor was an area rug comprised of modular carpet tiles from Flor Inc. (www.flor.com). These 50-centimeter squares are available in a huge array of colors and styles. We chose striped tiles in a multi-color pattern to brighten the décor and add warmth and softness to the floor. These can be used for wall-to-wall carpeting or to accent certain areas of the floor. An added benefit is that they’re portable. If you want to move the carpet to another room or another home, just pull up the squares and re-install. And, if a square succumbs to a nasty spill, just replace that single square rather than the entire rug.
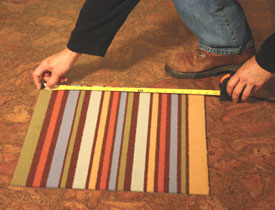
Installation couldn’t be simpler. Just measure the floor to determine the quantity of tiles needed. Consider the use of patterns, accent colors and border tiles. Carpet squares give you all the creative design freedom of ceramic tile, only they’re much easier to install. Lay the tiles on the floor with their seams butted together. In some cases it may help to snap a chalk line to keep the layout square with the walls. When you’re satisfied with the layout, use the supplied adhesive discs, called Flor Dots, to anchor the squares together. Peel off the backing and place the disc, adhesive-side up, at the intersection of four tiles to adhere to the four corners and hold them together. Do the same around the perimeter of the carpet.

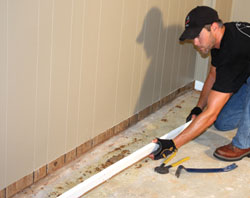
For wall-to-wall applications or any situation where the carpet tiles need to be cut, use a metal straight edge to guide a sharp carpet knife. Just score the flexible backing of the tile a few times to get a nice, clean cut.

Time for Fun
After we reinstalled the baseboards—which took a lot of puttying, sanding and painting but saved a lot of material expense and trim carpentry—we had a brand new basement floor. And, it addressed the key considerations for basement living; insulation and moisture protection, as well as warmth, comfort and good looks. We then topped it off with new couches, a pool table and a big screen TV, ready and waiting for next football season.
Recycle Your Trim and Save
Unless you’re bound and determined to replace your existing baseboard trim with a new size or style, there’s no reason to throw out the old woodwork when updating a floor. When you install the trim, you’re going to invest labor in either new trim carpentry or in repairing the old trim. If you choose to repair the old stuff, you can save a bundle on materials costs and avoid measuring, cutting and coping new boards. Here are some tips.
Keep the walls and trim as intact as possible during removal. Before removing baseboards or quarter-round, always score the joint with a razor so dried caulk or paint doesn’t cause a rip in the finish when you pull away the trim. Next, use a putty knife to open the seam, and then work a pry bar behind the trim piece all the way down to the sill plate inside the wall. Lever the pry bar against the 2-by-4 sill plate and flush with the floor, not above the plate where the end of the pry bar could pierce the wallboard at the stud cavity or break the base trim. Pry just enough to extract the baseboard nails loose from the wall, and then pound the board back in place to push the nail heads out. Then, pull all nails, working down the length of the baseboard. Pay attention to coped joints at the corners, which can pinch one baseboard behind another. Always remove the coped baseboard first.
As you remove the base trim, label the back of each piece for reassembly, i.e. “left wall, 1st piece,” “Rear wall, 2nd piece,” etc., otherwise you’ll have a jigsaw puzzle to figure out when reinstalling.
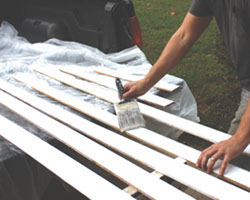
Use a quality wood glue to repair any breakage in the wood. I usually squeeze in a liberal amount of adhesive and wrap the joint tightly with painter’s tape until it dries. Use a color-matched putty to fill nail holes and repair surface damage. I chose white putty to match my white painted baseboards. Allow the glue and putty to completely cure, and then sand the baseboards smooth before repainting and nailing back in place. Caulk it, and you’re good to go.
