

My old college roommate is the type of guy who gets all the luck. I mean, if he slipped and fell, he’d probably land in a big pile of money. He was given a limited-edition Corvette as a graduation present, landed a well-paying job straight out of college and was settled into a nice, suburban home while most of his friends were still pounding the sidewalk trying to find their first “real” job. Being a single guy, he built his home into a bachelor’s dream house, complete with exercise room, guest bedrooms and the much-envied “Man Room.” The Man Room is a barroom in the basement, complete with multiple big-screen TVs, a ping-pong table, a pool table and enough seating areas to support a big, rowdy football party.
Recently, we were sitting around his bar, sharing an after-work beverage while I was admiring the Man Room. “Jeez, this place has it all,” I said. “What else could you want in here?”
“A sliding door going from the barroom to the rear deck of the house,” he said. “I want to eventually put a hot tub on the deck, and a patio door would be sweet.” Great idea.
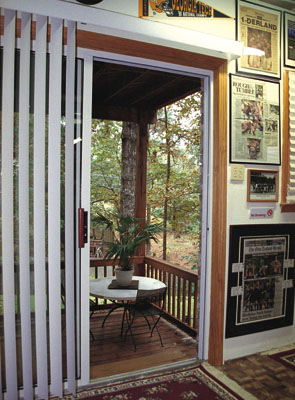
A sliding door in the Man Room would open up the room to the light and fresh air of his backyard, while providing an easy exit to the outdoors. And so it was decided, the Man Room would receive an upgrade.
First Steps
To install a sliding patio or deck door, first decide a practical, aesthetically logical and structurally sound location for the entranceway. Do not locate a patio door closer than 4 feet from any corner, otherwise the solid-wood sheathing or metal bracing at the corners could be compromised. Also, plan ahead. We chose the door’s location in part because it allowed the option of later adding a bathroom at the corner of the adjacent wall.
For help with the installation, we enlisted the help of remodeler Joe Sandoval of Sandoval Structural Systems. His first step was to turn off all electrical power to any receptacles or light switches on the wall in question. There was no plumbing in this wall, but if pipes exist, cut off the water source.
After removing any pictures, molding or other obstructions, measure and mark the dimensions of the rough opening on the interior wall. Refer to the instructions included with your patio door for the recommended rough-opening dimensions. “Rough opening” refers to the dimensions inside the trimmer studs and between the floor and the bottom header. This opening will be slightly larger than the patio doorframe. The extra space allows a little fudge room for squaring the frame with shims. This door was 6 feet, 1/8 inch wide. To determine the dimensions he needed to cut, Sandoval added 3 inches to the rough opening width to allow for the 1 1/2-inch trimmer studs on each side of the door.
Note: For patio doors wider than 6 feet, install two trimmer studs on each side of the frame for extra support, and account for this when first calculating your measurements for the installation procedure.
Mark the cut lines running all the way to the ceiling. The interior wall above the door’s rough opening will be removed to build the header.
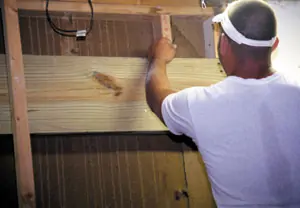
This interior wall was finished with drywall. For this type of construction, use a drywall saw at the floor level to cut a hole in the wallboard. Use short cutting strokes to prevent slicing into electrical wires. If using a Rotozip or an electrical circular saw, set the cutting depth to no more than 5/8 inch. Knock holes in the wall with a hammer to peek inside and determine wiring locations before removing the entire wallboard. Use a pry bar to remove the wallboard from the studs. It’s also advisable to wear safety goggles and a dust mask to keep away drywall debris. Remove any insulation and relocate any electrical wiring, water-supply lines or DWV piping.
Inside the Rough Opening
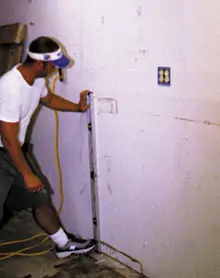
Because wall studs support ceiling and roof structures, some studs must be removed to allow room for the new door. Sandoval installed temporary 2-by-4 support studs running from floor to ceiling about 2 feet inside the designated area for the door to be installed. The supports will act as a temporary wall and should cover an area slightly wider than the proposed rough opening. Note: This step is critical to support the ceiling while you remove the wall studs and install the new door header and framing studs.
With the supports in place, use a metal-cutting blade to cut the nails at the top and bottom of the studs, and then use a pry bar to pull the studs away.
Next, mark the rough opening dimensions on each side of the wall’s floor plate. Remember, the rough opening width is measured between trimmer studs, and the headers must butt against the full studs at each end. This means the header’s width will be slightly larger than that of the rough opening. The location and width of the rough opening for our chosen location required moving the full studs slightly outward in each direction and re-nailing them in place at the sides of the opening.
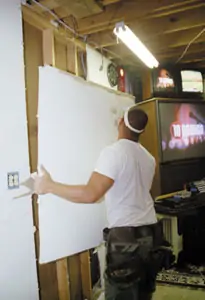
Then it’s time to install the header. Local building codes determine the required header size for different rough opening sizes. Header thickness should equal the thickness of the full studs’ width. To build the header, nail a piece of plywood between two 2-by-12’s, and then nail the stacked piece between the 2-by-4 full studs. Instead of plywood, you can also sandwich a piece of 1/2-inch cell foam between the header boards for additional insulation.
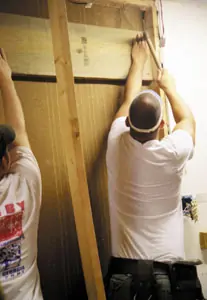
Prop up the ends of the header and use 16d nails to fasten each end to the full studs. Double-check to ensure you’re allowing the proper rough opening height. For additional strength, Sandoval added short blocking studs running from the top of the header to the bottom of the upper framing-rail.
Cut the trimmer studs to fit snugly between the bottom plate and the header, and nail them to the full studs with 16d nails. Then cut the bottom framing plate flush with the trimmer studs and pry it away from the rough opening. It is extremely important that the trimmer studs be resting on solid bearing. This door was installed on the basement level, resting on a poured concrete slab. Depending on your proposed door location, you may have to block under the floor system to create a solid bearing to the foundation or lower subfloor beneath the trimmers.
Exterior Wall Work
To remove the exterior wall, first check for any outside obstacles — telephone wires, television cable, etc. — that will need to be removed prior to cutting the opening. For houses with siding, it may help to cut pilot holes from the inside of the house at each corner of the rough opening. Use the header and trimmer studs as a cutting guide. Then, on the outside of the house, draw a chalk line connecting the pilot holes. Use a circular or reciprocating saw to cut along the chalk line, starting at the pilot holes.
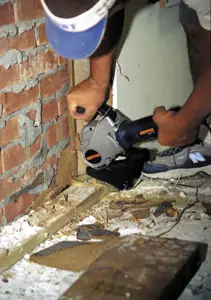
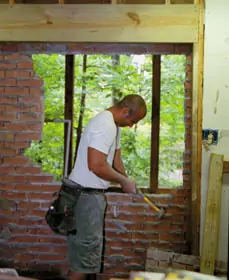
This house, however, had a brick-veneer exterior wall. From the inside of the house Sandoval first cut the sheathing along the edges of the rough opening, revealing the bare brick.
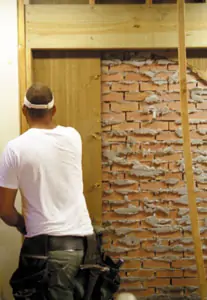
To clear the rough opening he cut away a 2- to 3-foot square in the center of the exposed brick wall. He chipped away at the mortar joints of the brick surrounding the new hole.

Then he gradually hammered out the brick, expanding the hole and trying to keep the brick intact to be reused around the frame of the installed deck door. All the brick around the perimeter of the rough opening was removed to ease the installation of the new door.
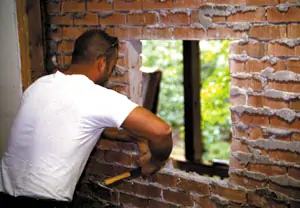
Installing the Door Frame
Patio and deck doors vary among manufacturers, so follow the instructions included with your specific door when assembling the frame. Have a helper place the doorframe in the rough opening from the outside of the house.

Because this door was installed in a brick-veneer wall, Sandoval installed a steel lintel above the frame, flush with the top course and even with the header.
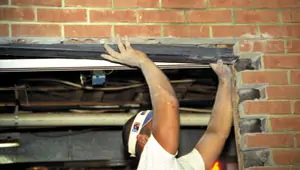
The lintel, which must extend 3 or 4 inches beyond the bricks on each side of the wall, helps support the brick above the door. He inserted each end of the lintel into the brick joints on each side of the door and mortared it into place. It’s also smart to prime and paint a finish coat on all sides and surfaces of the steel lintel prior to installing. Unprimed angle iron will rust within months, causing staining, swelling and potential problems with the surrounding brick.
Next, have a helper position the door. To ensure a tight seal between the doorsill and the floor, Sandoval caulked along the floor on the underside of the sill before resting it on the floor. Use sill-sealer insulation if the sill rests on a concrete floor. There are also seal pans available at home stores that help prevent leaks. A piece of 30-pound felt paper can also be installed beneath the door, lapping across the subfloor then over the wall to divert water away from the house.
This door had a nailing flange, which we placed between the brick and the sheathing. We then drove nails through the side-jamb flange into the trimmer stud. Rather than nailing the flange directly into the header, drive nails partially into the header and then bend them over the flange. This will prevent pressure from being forced down onto the doorframe in case the header ever bows downward.
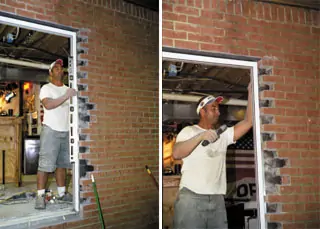
With the frame sitting in the rough opening, make sure all sides of the frame are plumb and level. Most doors have side jambs with predrilled holes for installing screws. Use wood shims between the jambs and trimming studs to keep the jambs plumb as you install the screws.
Adding the Panels
The two most common types of patio or deck doors feature either two sliding panels, or one fixed panel and one sliding or operating panel. To install the fixed panel, place it between the outside head and the sill channels and wedge it temporarily in place with a board. Secure the fixed panel by installing a parting stop (included with the door) in the head jamb and screwing the bottom in place at the sill. Install the operating panel by tipping the top of the panel into the head channel. Lift the panel within the head channel to allow room to bring the bottom of the panel over the frame and into the sill channel.

Be sure the rollers on sliding panels are centered on top of the sill guide and ride along smoothly. Check the door by sliding the panels back and forth. If the panels stick or bind, the frame may not be square. In this case two sockets located on the inside bottom rail of the panel can be adjusted. Pop off the end caps of the adjustment sockets and use a screwdriver to adjust the screw that raises or lowers the door. These sockets each adjust a roller to help you fine-tune the door’s alignment. It may help to add lubrication to the rollers to help the panels glide smoothly over the sill guides.
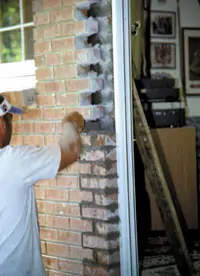
Fill any exposed framing cavities with insulation. Then, add caulk and weatherstripping to all edges of the door. We finished up the project using mortar and the discarded brick to rebuild the brick veneer along the sides of the doorframe. We then added some drywall and trim boards to the interior and built some simple wood steps to make the transition from the barroom to the deck.
The Man Room’s new door was completed. With a free weekend, a trip to Home Depot and some helping hands, my old roommate up-graded the Man Room to a bright and breezy party area that opens into a spacious rear deck. Now all he needs is that hot tub.
Editor’s Note: Special thanks to Joe Sandoval of Sandoval Structural Systems in Columbus, Georgia
