

A kitchen update doesn’t have to be expensive. Here is an inexpensive kitchen makeover done in one weekend and for just a few hundred dollars.
The lake house was built in the late 1960s. Forty summers had come and gone since any improvements had been made to the kitchen other than a fresh coat of paint. My father had just passed away the month before and it was here, at the lake house where he and I spent so much of our time together. The two of us would work on projects trying to stay ahead on the maintenance of owning not only one, but two lake houses, and it always seemed something was broken and needing repair. Of course under these ownership conditions, maintenance and repair took precedence over improvement, so the kitchen of this particular lake house retained its dated countertops and gothic hardware that must have been the style in the late 1960s.
After dad’s passing, I wanted to do something we never had time to do during his life, redo the kitchen. I decided to put to use the skills I learned from him as a belated way of saying thanks for putting up with me, for teaching me what he knew about building and for buying these lake houses so we would have a place to spend our weekends together.
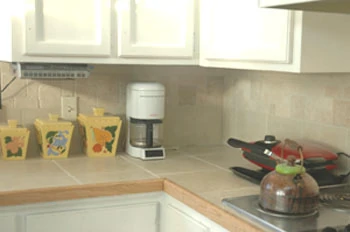
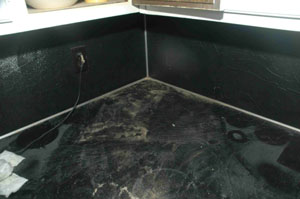
Dark and Cheap Describes the Previous Counters
The countertops were made of black vinyl—apparently another ‘60s trend that could best be described as dark and cheap. I wanted to update the countertops and make the room look brighter. Researching the available options with a big consideration on time, budget and ease of installation, I chose a 12” tile from Lowe’s Home Improvement Store for the countertop, and tumbled stone and tile mosaics to provide contrast and texture for the backsplash. Cost for the 12” tile was reasonable at less than $2 per tile, while the sheets of mosaic tiles and individual tumbled stone tiles were about $8 per square foot. To save time, I used Mapei’s premixed thinset to set the tile and Mapei’s premixed color-matching grout. After inspecting the old countertop for structural soundness, I decided to install tile backerboard on top of the old countertop to save time.
Tile Backerboard
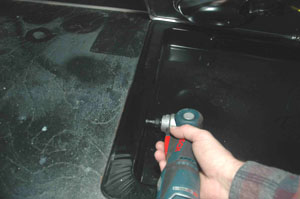
Tile cannot be installed over wood. Wood contracts and expands, and plywood is not suitable as a tile substrate. If the existing countertop is in poor condition, or not suitable for overlaying backerboard, remove it and fasten the backerboard to the cabinet frames making sure the studs are no greater than 16 inches on center. Drywall is suitable if there is no moisture issue. However, I was concerned with kitchen sinks and dishwashers in this area so I used backerboard. Backerboard is not impervious to water, but unlike drywall, it will not soften when exposed to moisture. Special screws are required for backerboard installation and are available where you purchase the material. I used screws intended for the Hardie brand of backerboard I was using. I chose a length long enough to penetrate the old countertop and studs, but short enough to keep from penetrating into the cabinet space. By leaving the existing countertop in place, I was able to lay the backerboard on top of the cutouts for the sink and stove top, and mark the cut out lines on the backerboard by tracing along the edges of the old countertop from underneath the counter. This resulted in perfectly matched cuts for the appliances. For making the cuts in the backerboard, I used a small tile cutting saw with a wet diamond blade. However, you can use a utility knife and a straight edge to score and break the material, similar to the method used for drywall. You can also use a circular saw with the appropriate blade.
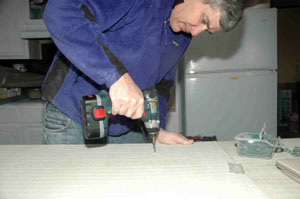
Using the 12” tiles rather than smaller tiles saved time in two ways; the larger tiles covered more area requiring fewer grout joints. After installing the backerboard, I test fitted the tiles to determine the design and to avoid placing narrow tiles around the edges. This is actually easier than it sounds. Had I laid my tiles beginning with a full tile on one end, I would have ended up with a 4” tile on the other end. The solution—cut end tiles to 8” so the end tiles are equal in size. I also had to use an 8” center tile. After making my cuts, I test fitted the tiles to ensure that once we began setting the tiles, that the result would be correct. As you can see, I used the spacers when doing this to make sure the installed tiles would be the same as the dry fit tiles.
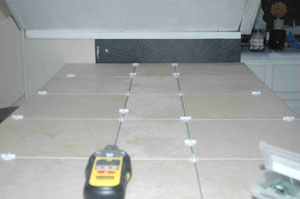
Installing the tile
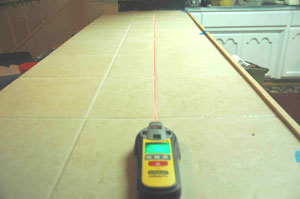
Installing the tiles is simple. Spread thinset in a small area where you want to lay the tiles, no more than enough for three or four square feet. Use a notched trowel according to the manufacturers directions–in this case a ¼ by ¼ trowel—keeping the trowel at a 35- to 45-degree angle, and spread the mortar until you have consistent grooves in the area where you will be working. I used a laser to ensure square lines, but you could also snap a chalk line where the tile will be placed. If you are unable to spread the thinset using the notched trowel in tight corners or areas such as around the sink, back butter the tiles. Spread thinset on the back of the tile, use your notched trowel to make the grooves the same way you did on the backerboard and set the tiles in place. In both methods you will need to lightly press and twist the tile to obtain a good adhesion. After setting the tile you will have time to adjust the tiles, should you need to, to maintain the layout pattern before the thinset hardens. Use your spacers to keep the tiles spaced evenly and this will help keep your tiles lined up just as they were during the dry fit process. Once you have finished setting tiles in the area you are working, allow the tiles to sit undisturbed until the thinset has hardened.
Grouting
Once the thinset has cured, it’s time to grout. Remove the spacers between the tiles, and dampen the tiles with a damp cloth. This will aid in clean up later. Spread the grout with a rubber grout float, using back and forth strokes, at a 45-degree angle to the joints, otherwise you will just pull the grout from the joints. Scrape off the excess grout using the edges of the rubber float. Once the grout has set for 15-20 minutes, grab two sponges and a bucket of clean water and wipe the tiles in a circular pattern changing the dirty sponge for the clean one, etc. Two sponges speeds up the process. After this initial cleaning, wait another 30-45 minutes before coming back with a damp sponge to remove the haze from the tiles. If your manufacturer’s directions differ from these, then use the directions of the manufacturer. Not all grout is the same formulation and each formulation requires a different method.
Sealing
Once the grout has cured, I suggest applying a sealer. I used a spray sealer that was easily applied to the grout and did not cause a haze on the surrounding tiles. The sealer helps keep your grout joints looking fresh for an extended period of time and helps prevent your grout from becoming stained, which is likely in a kitchen that sees frequent use.
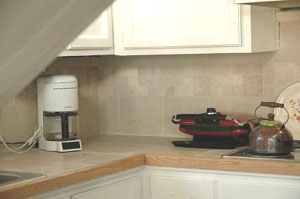
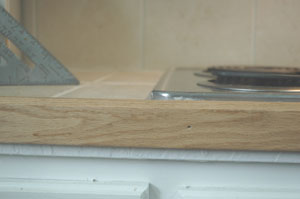
Using Wood Molding Instead of Corner Tiles
In the above and below pictures you can see the oak edge molding that I used instead of the bull nose tiles. This was another great time saving product. While I was waiting on the thinset to cure, I finished the molding. I simply sanded the contours with 80-grit and then 120-grit sandpaper, and sprayed a clear lacquer finish to allow the beauty of the oak to shine through. I mitered the corners and used a finish nailer to attach the molding. If desired, you could stain the molding to match existing woodwork or even paint the molding to match your cabinets.
Painting the Cabinetry was Necessary
The drawback to redoing any portion of your house is that it makes the other areas needing attention more noticeable. This was the case with the aging paintjob on the existing cabinets. Years of neglect and poor paint jobs had made the cabinets an eyesore. The new countertops made it even more noticeable.
Before Painting
I removed all of the gothic-looking ‘60s hardware from the cabinets, which may come back in style, but I seriously doubt it. I saved it regardless. After covering the entire area with drop cloths and taping Kraft paper to the back splashes, I began to remove 40 years of paint and kitchen grease using chemical strippers. When this method became too messy, I reverted to using my 6” Bosch orbital sander with 80-grit paper and this did the trick. It was still messy, but not the same liquid mess I had using chemical strippers.

Prime Cabinets First
I primed the cabinetry first using Valspar’s interior/exterior latex primer and was able to use the paint straight from the can with no thinning. After priming, I finished sanded the cabinet faces with 120-grit sandpaper. Some painters might skip the primer step, but my experience has taught me that prep and primer are the most important parts of a paint job. My wife would argue and say that clean up is the most important part.
Painting Cabinets Using an HVLP System
I had recently used my Fuji HVLP painting system on a crown molding project. The HVLP system allowed me to achieve a professional finish and I knew it was the perfect choice to finish these cabinets. Gloss White and a smooth finish that I could only achieve using the Fuji paint system. If you do much finish work, these HVLP systems are the ticket. I’m a novice and the finishes I get are professional quality. Using Valspar paints and a little Floetrol, I make sure the paint is thinned properly, and I get a finish that looks as though it were made by a machine. Since I paint frequently, the machine I use is a professional model, but I have been told that even the less expensive systems are amazing and provide professional quality finishes even in hands of novices like me.
Applying the Finish Coat to your Cabinets
I added Floetrol to the Valspar High Gloss White paint. The Floetrol aids in achieving a professional finish when using spray equipment. Also, I keep the compressor as far away from the painting area as possible to avoid getting paint particles into the compressor air intake. I sprayed the entire cabinetry in little more than two hours. One advantage of the HVLP system is that you can achieve a very distinct spray pattern with little overspray. Also, this feature allowed me to spray the crown molding attached to the cabinets without getting paint on the ceiling. When painting overhead using a sprayer, I suggest weaingr a mask and eye protection, and using a smaller and lighter air supply line, such as the whip line that Fuji offers. The weight savings makes the overhead painting much less tiring. A heavy thick airline coupled with the weight of the gun and the paint inside the gun gets tiring very fast when you are holding all of this weight above your head.

Completing your inexpensive kitchen makeover
Finishing with New Cabinet Hardware
Adding new knobs and pulls completed the makeover. I chose basic knobs and pulls, stainless with gloss white, for only $2 each. I originally underestimated the number required. I thought there would be 12 knobs and 20 pull handles. I was wrong, 24 knobs and 36 pull handles. The hardware ended up costing nearly as much as all of the other material combined. Finding them on sale for 50 percent off was a huge savings. It took one evening and two full days to complete the makeover. Prep work and taking measurements for the countertop was done on Friday night. Saturday morning was spent installing the backerboard. The afternoon was spent dry fitting the tiles, cutting to size and installing the porcelain tiles. While waiting on the thinset to dry, I sanded and applied the first coat of polyurethane to the corner molding. Saturday evening I prepped and primed the cabinets. Sunday Morning, I grouted the tile and covered it with Kraft paper to protect it from possible overspray from the finish coats to the cabinets. After the paint had sufficient drying time, I installed new cabinet hardware. Costs for the building materials were less than $500. Hardware was a major portion of this, and you may have the option of reusing your existing hardware.
Money could have been saved using drywall instead of backerboard as the substrate for the tile. We chose ready-to-use grout and thinset, however you could buy it in the dry form, mix it yourself and save additional money. For cabinetry, I recommend the best paint you can afford in gloss or semi gloss finish. Kitchen cabinets are subject to repeated cleanings, grease, fingerprints and other spills. Gloss finishes stand up to cleaning, and repel stains better than flatter finishes. So for a little bit of cash and a weekend, you can make a large visual impact on your house.
